Season three of Bridgerton is out today! Fancy baking something elegant and delicious for your Bridgerton watch party or themed birthday? My Bridgerton theme cake brings together classic and summery flavours with a Regency-era vibe to make the perfect match this season. It’s a fun and easy one, friends. Grab your ball gown and apron, let’s get baking.
Contents
The Bake
Bridgerton feels big and lavish and elegant. I wanted my recipe inspired by the show to feel like that, too.
Now. Those of you with a keen eye and a knowledge of British baked goods throughout history might be questioning a few things.
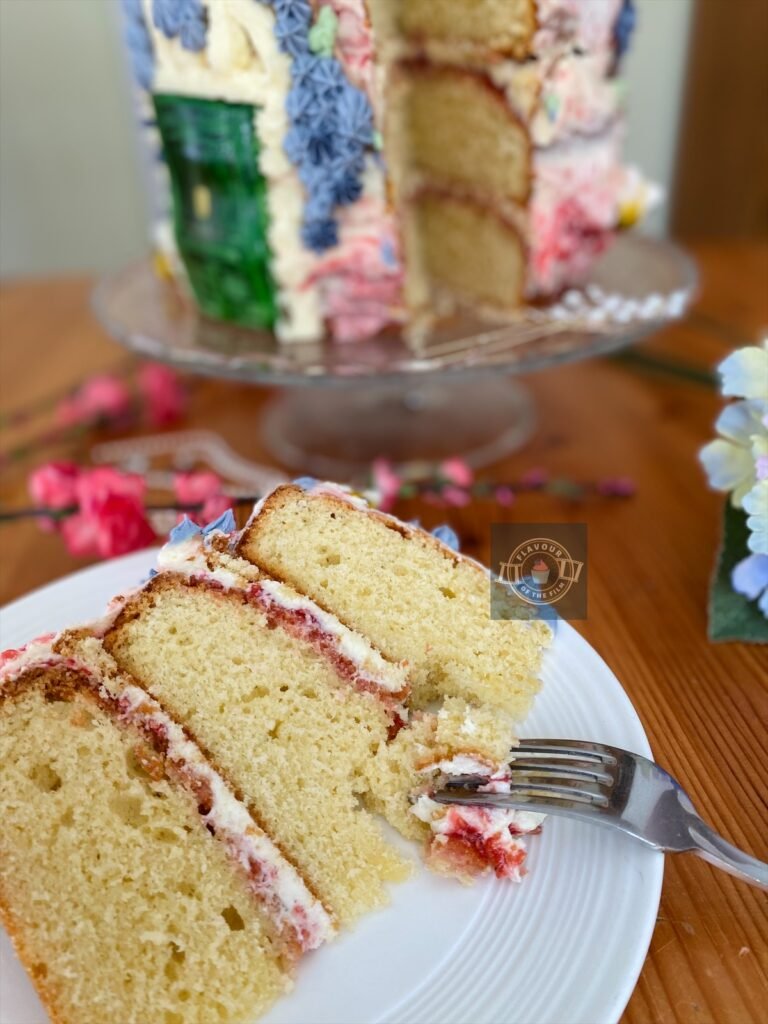
Yes. My Bridgerton themed cake resembles a Victoria sponge cake. No, Victoria sponge cakes were not technically around in the era that Bridgerton is set in. Victoria sponge cakes were created at the request of Queen Victoria and her reign was around two hundred years after Bridgerton.

HOWEVER. My Bridgerton inspired cake is not a strict Victoria sponge cake.
There is no fresh cream. The jam is not strawberry (whether the original Victoria sponge cake involved raspberry or strawberry jam is a heated debate in itself).
Plus, iterations of a basic sweet sponge cake like this have been around since the seventeenth century (1600s), according to written recordings.
Taking into account the last fact, I decided a basic sponge cake would still work for my Bridgerton inspired recipe. There are lots of delicious looking cakes and delicacies throughout the show, and I could have taken inspiration from research into popular desserts of that era.
But, honestly… a basic sponge cake with buttercream and jam just hits the spot.
It’s classic, it’s light and sweet, it’s traditional, and it’s deliciously fresh. You can also customise it to your taste by switching up the fruits used or adding a flavour to the buttercream. Whatever floats your boat.
I considered mango flavour because I love it, but it was too far of a stretch from the brief for me. Historically speaking.
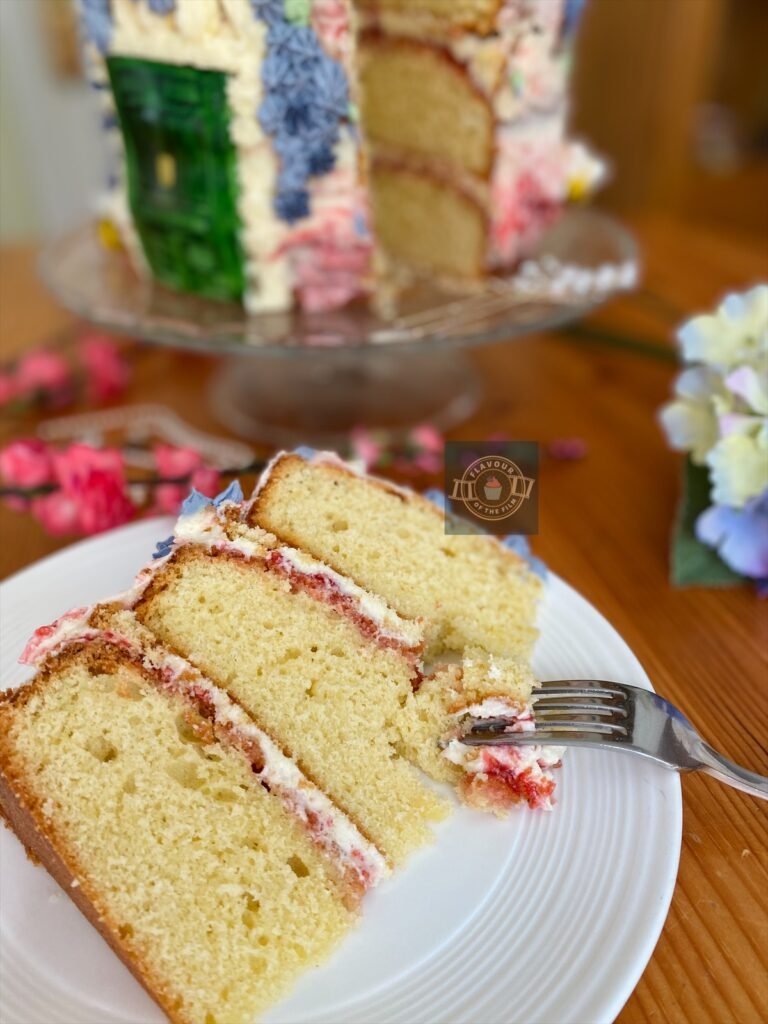
My Bridgerton celebration cake contains my own homemade raspberry jam.
I enjoy making my own jam, so making it especially for this cake was a no brainer.
However, as I said in various other recipe posts like my The Powerpuff Girls jam filled cupcakes recipe, Barbie cake design recipe and One Piece tangerine puff pastries recipe, you can buy the jam instead of making it.
Especially if you have a favourite jam or want to support a local farm shop. I bought jam to use in my Demon Slayer bamboo bites, so it’s absolutely fine to buy it! I often say that making jam is ideal because you can use your own home grown fruit (if you grow any) and you know exactly what’s in it, but buying from the shop is all good, too.
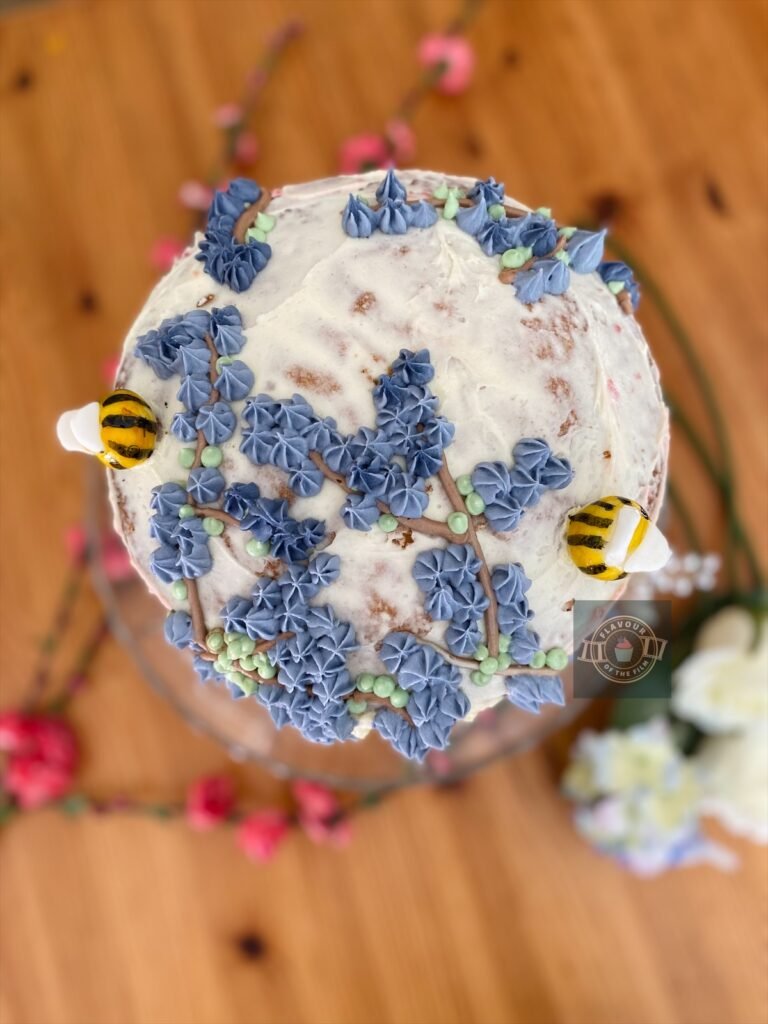
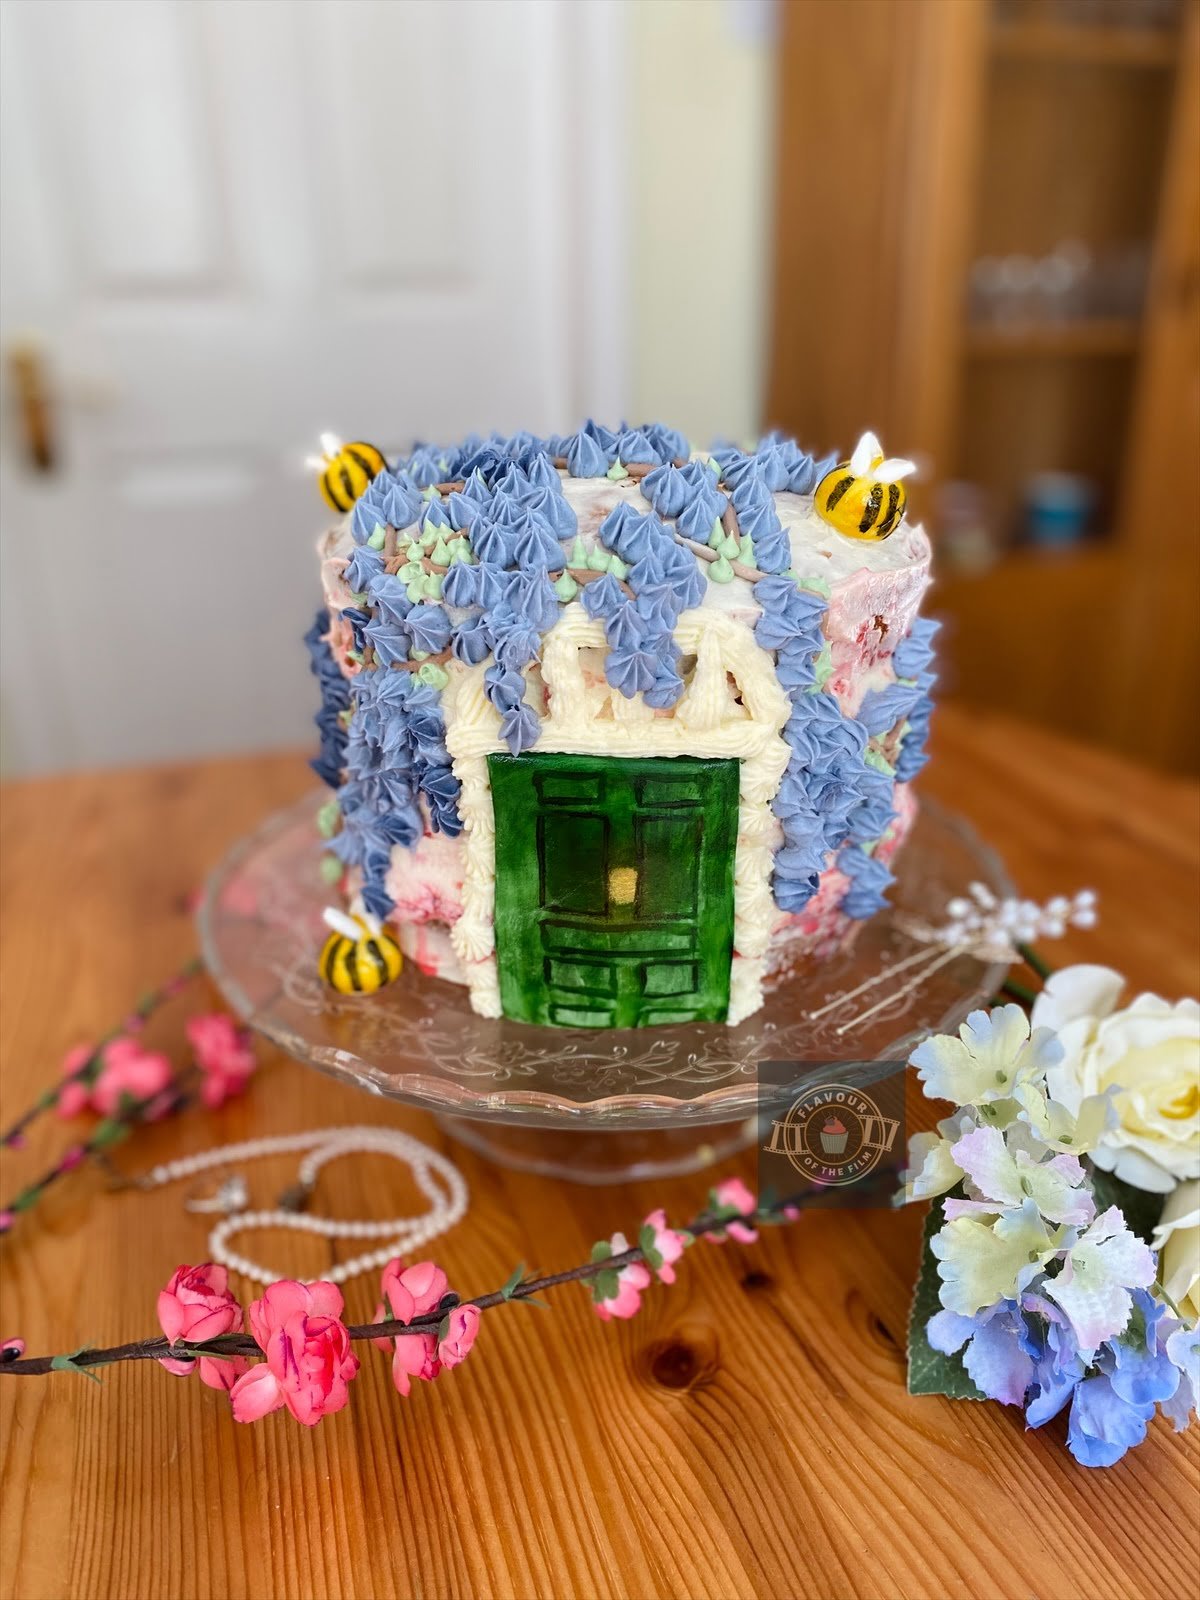
The decoration of my Bridgerton cake is where I really wanted to connect the bake to the show.
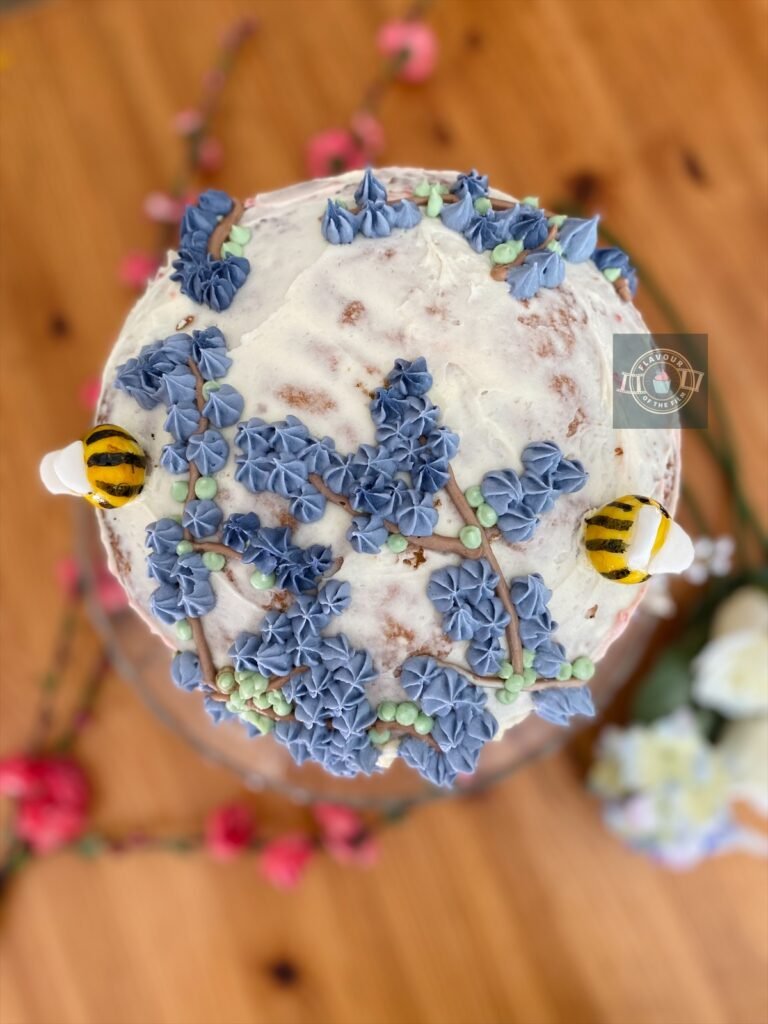
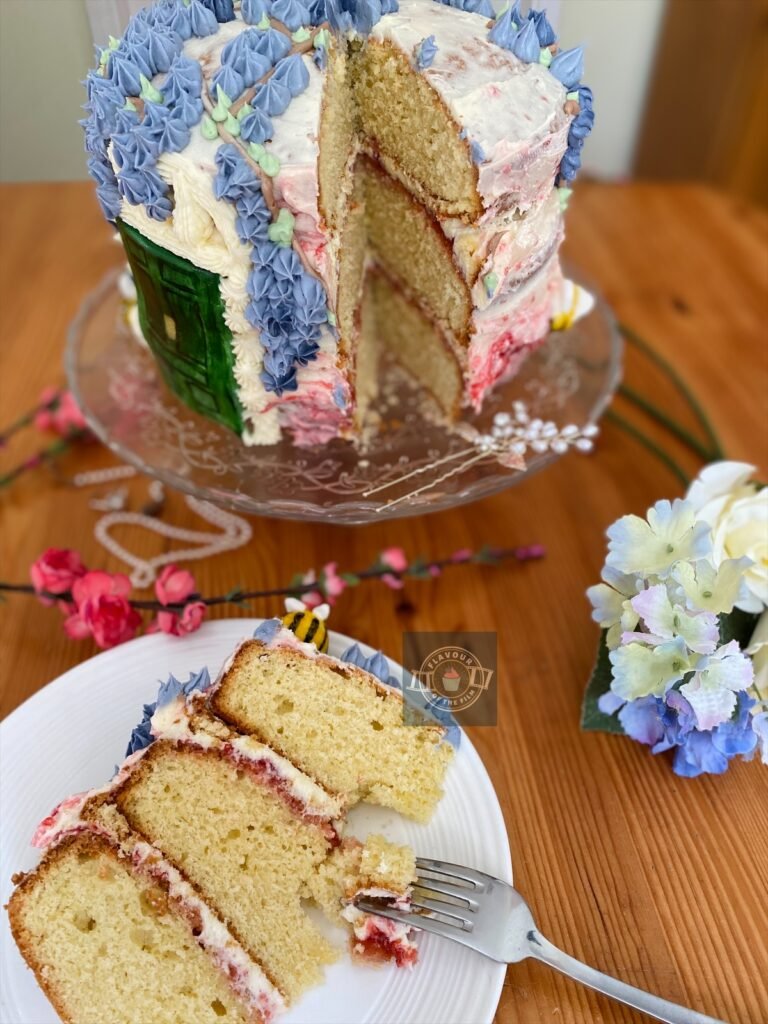
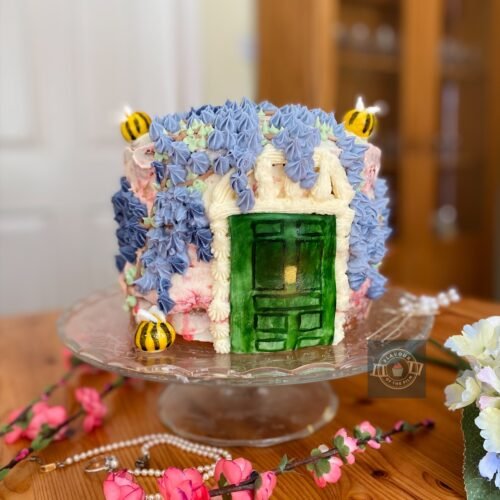
I love the wisteria flowers growing all around the Bridgerton house, and seeing as the show is mostly centred on the Bridgerton family (though season three is shaking that up a little by the looks of things), it felt appropriate to do the same with my Bridgerton theme cake.
The door on the front of the cake is cut from sugar paste, and was designed to replicate the door to the Bridgerton family house.
As for the bees, well if you’ve seen the show or read the books then you’ll know the significance of those, too.
I went for a semi-naked look with the buttercream; a sort of crumb coat, which I encouraged the jam to mix into to get a beautiful mixture of pale buttercream and pink strokes. The overall vibe is elegant and rustic at the same time. That’s how the Regency era makes me feel.

Top Tips
- As always, avoid overmixing the cake mix so that you achieve the best cake texture possible.
- Weigh out your eggs first and get as close to 500g as you can. Then, weigh out the rest of the ingredients to the exact weight of your eggs. Doing this creates the best sponge cake texture!
- Feel free to buy the jam instead of making it if preferred.
- If making the jam yourself, jam sugar or granulated sugar will both work. The only difference is the pectin in the jam sugar which helps it to set. However, you only need to let the jam simmer for a little longer with granulated sugar and it’ll still set well. Make sure to use the lemon juice as this is also what helps the jam to set!
- I love the look of jam mixed through the buttercream because it gives a textured look with strokes of pink throughout, but that method is optional. You can absolutely put a little less jam in and keep it further in from the edges to keep the buttercream crumb coat one colour, and pipe a ring of buttercream around the surface edge of each cake layer to create a border.
- The piping tips you use for your wisteria and door frame are completely up to you. I used a 2D open star tip for the door frame and a much smaller closed star tip for my wisteria. To achieve the branches and leafage, I used a pin-point style tip.
- I bought white sugar paste for the door and the bees and painted the individual elements with food colouring. This is a lot more cost effective if you use food colouring regularly so have the right colours already on hand. If preferred, you can buy the sugar paste in yellow, black, green and white for the different features.
- Now that the weather is warmer, make sure to chill the cake once you put the crumb coat on. It may not be much buttercream on the cake but it will make all the difference once you start decorating it!
This Bridgterton inspired cake really is a wonderfully moist and traditional treat. It’s the perfect addition to your Bridgerton themed birthday party, watch party, or high tea. I hope you have fun making this cake and I also hope that the newest season of Bridgerton is everything you hoped for. Enjoy!
Happy baking, happy eating!
The Recipe
Ingredients
Raspberry jam (if making):
- 250g fresh raspberries
- 250g [1 cup + 3 tbsp] granulated sugar or jam sugar
- Juice of ½ lemon
Bridgerton theme cake:
- 500g [17.75 oz] unsalted butter room temperature
- 500g [2½ cups] caster sugar
- 500g eggs (around 8-9 medium)
- 500g [3 cups + 2 tbsp] self-raising flour
- 2 tsp vanilla extract
Bridgerton cake decoration:
- 350g [12.25 oz] unsalted butter room temperature
- 700g [4¾ + 1 tbsp] icing [confectioners] sugar
- 1 tsp vanilla extract
- Violet liquid food colouring/paint
- Brown liquid food colouring/paint (or mix black and red/orange)
- Green liquid food colouring/paint
- White sugar paste
- Yellow liquid food colouring/paint
- Black liquid food colouring/paint
- Vodka for painting optional
- OR sugar paste in yellow, white, black and green
Serves: 12+
Preparation time: 25 minutes
Baking time: 30 – 35 minutes + 10 minutes for the jam
Decorating time: 45 minutes
Method
Raspberry jam (if making):
- Wash the raspberries well then put them in a saucepan. Mash the raspberries with a fork until they have become a collective pulp. If wanting to remove the seeds, do so now by straining them through a sieve into a bowl. Place back into the saucepan and turn the heat up to medium.
- Once the raspberries start to bubble, turn the heat up to a medium-high setting and add the sugar. Stir in the sugar until it has dissolved.
- Squeeze in the lemon juice and stir in.
- Allow the mixture to simmer for 10 minutes until reduced and thickened. The colour will also go darker.
- To test whether your jam is ready, use a spoon to get a dab of jam from the saucepan and drop the dab of jam onto a clean and cool plate or bowl. Leave for a few moments, then gently push your finger into it. If the jam feels set and squidgy, it’s ready. If it’s still liquid-like, allow the jam to simmer for a few more minutes before testing again.
- When your jam is ready, pour it into a clean jar or glass container and leave to cool on the side.
Bridgerton theme cake sponges:
- Preheat your oven to 180°C [350°F] or 160°C fan. Grease and line three deep 8 inch round cake tins. Set aside.
- Weigh out your eggs in their shells and get as close to 500g as possible. Then, weigh out the rest of your ingredients to the exact weight of your eggs.
- In a large mixing bowl, cream together the butter and sugar until light and fluffy.
- Add the eggs, one at a time, beating in between until fully incorporated.
- Spoon in the vanilla extract and beat in.
- Sieve in the flour and mix in until the flour is no longer visible. Avoid over mixing here.
- Split the cake mixture evenly between your three lined cake tins. Lift each one and bang it on your work surface to pop any large air bubbles.
- Bake the sponges on the middle shelf of your oven for 30 – 35 minutes or until baked.
- Your cake sponges will be ready when a skewer comes out clean when tested; the surfaces spring back when gently pressed on, and you hear little to no bubbling/crackling when you listen to them.
- Once baked, leave the cakes to cool in the tins for 10 or so minutes before transferring upside down to a wire rack to cool completely.
Buttercream:
- While your cakes are cooling, make your buttercream frosting.
- In a large mixing bowl, beat the butter to loosen it. Pour in ½ the icing sugar and beat in until light and smooth.
- Add the remaining ½ of the icing sugar and beat in until smooth. Spoon in the vanilla extract and beat in.
- If your buttercream seems overly stiff, add a small splash of water or milk and beat in to loosen it a little.
- Spoon 2 heaped tbsp of the buttercream into a smaller bowl. This will be your leafage. Do the same again with another bowl: this will be for your branches. Spoon 3 heaped tbsp into another small bowl: this will be for your wisteria flowers.
- Add a couple of drops of green food colouring into the first bowl and beat in until an even colour is achieved. Do the same with the brown food colouring and violet food colouring in the other bowls. Start with a small amount of food colouring in each one and build on it if needed to achieve the desired tint or shade.
Construction:
- When your cakes are completely cool, build your cake.
- Place a small dab of plain buttercream on a plate/cake stand/cake board. Put a cake sponge over it to create your first layer.
- Spread a generous amount of jam over this first layer. If wanting to encourage the jam to mix into the buttercream crumb coat, spread it right to the edges. Otherwise, keep the jam away well away from the edges and pipe an outer ring of buttercream around the surface of the sponge to create a border.
- Add a generous amount of plain buttercream on top of the jam. The easiest way to do this is by either piping the buttercream straight onto the jam, or by spreading it on the underside of the next sponge layer.
- Place your next sponge layer on top of the base of the cake. Repeat the same process with the jam and buttercream.
- Top the cake with the last sponge layer.
- Take a moment here to place 1-2 heaped tbsp of plain buttercream into a piping/sandwich bag with your chosen piping tip for the door frame. Set aside.
- Using the remaining plain buttercream, create a semi-naked crumb coat layer over the entire cake. Use a palette knife to do this and don’t worry too much about achieving a completely smooth finish; this is the rustic element of the cake!
- Chill the cake in the fridge while you make your decorations.
Decoration:
- If using sugar paste in multiple colours, mould your bees and door using the appropriate colours: green for the door, yellow for the bees’ bodies, black for the bees’ stripes, and white for the bees’ wings.
- If using white sugar paste, shape the door, the bees’ bodies and their wings. Attach the wings to the bees’ bodies by dabbing the base of the wings with water and gently pressing them onto the bees’ bodies. Work at a good pace as the sugar paste will start to harden as you work.
- Use this time to spoon the violet buttercream into a piping bag or sandwich bag with your chosen piping tip i.e. a small closed star tip. Do the same with the brown and green buttercream in separate piping/sandwich bags with the appropriate piping tips attached.
- Retrieve your cake from the fridge. Gently press the sugar paste door into the front of your cake, securing it to the buttercream frosting.
- Do the same with your bees around your cake.
- If doing so, paint these sugar paste features using the appropriate food colourings/paints and a small paint brush. If needed, mix the food colouring/paste with a dash of vodka in a small bowl to create a thinner paint. This is optional with liquid food colouring.
- If desired, use a thin and blunt tool (end of a paint brush would work) or knife to etch in the panels on the door instead of painting them.
- Using the piping bag of plain buttercream you set aside earlier, pipe the detailing of the door frame around your sugar paste door.
- Pipe on your wisteria branches in various areas around your cake.
- Use the piping bag of green buttercream to pipe the leafage around and on your branches.
- Finish by piping the violet buttercream around the leafage and branches to create your wisteria flowers.
This Bridgerton theme cake is massive, making it the perfect homemade Bridgerton inspired cake for a themed party or viewing session. The flavours are so delicious and so traditional that you’ll feel as though you’re eating a slice of cake during high tea. This cake will last around 4+ days if kept in an airtight container/cake box/cake stand/cake case. Covering it with a little aluminium foil will help. The sponges can be made ahead and kept in the freezer for up to 3 months (wrapped). Be sure to defrost at room temperature. Enjoy!
The TV Show
Some TV shows just take the world by storm when they are released. It’s quite the achievement when it happens. Despite the amount of television that is being made these days, this sort of triumph is a rare event.
Perhaps that’s why it’s so rare for a TV show to literally sweep across the world and be so well received that everyone is talking about how good it is. There is so much choice – too much choice, some would argue – that it can be difficult for a television show to break ground and then shoot into the stars.
Bridgerton is one of those shows; breaking streaming records and being devoured by Netflix audiences in every direction.
Timing would certainly have a part to play in the near immediate success of Bridergton, considering it was released on Christmas Day of 2020.
Nevertheless, that shouldn’t take away from the fact that it is a genuinely well made show that is loved by so many globally.
Based on the books by Julia Quinn and produced by Shondaland, Bridgerton is set in Regency-era England during the Summer season.
An important season for young women of the time in particular. These months were crucial for them to secure husbands – and their future as a result.
You can practically hear my eyes rolling as I write that last sentence. It was true, though.
These warmer months had members of high society walking around public parks and attending social events like balls in order to find a suitable match. Though Bridgerton focuses heavily on the potential romance side of this, that wasn’t always the goal historically. An advantageous match was determined by financial wealth and social status prospects above all.

Otherwise known as the stuff we shouldn’t care about. Love is love. Nothing else matters.
It’s easier to say that today, of course. Back in those days, if women didn’t marry as soon as they were of age, they didn’t have a secure future.
In Bridgerton, not only is the Queen watching on as her subjects attempt to pair themselves together; a certain gossip columnist is on the prowl, broadcasting the goings on – and secrets – of their society.
Lady Whistledown reports on everything she hears and everything she sees within this high society, and sends it out as a pamphlet regularly, keeping her true identity hidden. Members of this society soon become fixated on both wanting to know Lady Whistledown’s findings and whether or not their delicate reputations will be ruined by her.
After all, it only takes a few words written by her to tear down everything they’ve built. The very power Lady Whistledown has accumulated is something to behold. It makes sense why they cast Julie Andrews to narrate this character!
At the centre of it all is the Bridgerton family.
Eight siblings and their mother, taking turns to fully enter society and find their most advantageous match. Each season puts a different character in the spotlight, which I find really thrilling.
Bridgerton hosts one heck of a cast. Nicola Coughlan; Claudia Jessie, Jonathan Bailey, Adjoa Andoh, Luke Newton, Luke Thompson, Ruth Gemmell, Golda Rosheuval, Phoebe Dynevor, Regé-Jean Page, Simone Ashley, Martins Imhangbe, Emma Naomi, Charithra Chandran, Bessy Carter, Polly Walker and SO many more.
It’s a huge cast that keeps shifting as the seasons progress. Which also means there are a considerable number of directors and writers that have worked on the show already.
Chris Van Dusen created the show for television and also wrote a number of episodes. There are too many names to list here, but they all had a hand in shaping Bridgerton into what it is. As did the numerous directors.

In my opinion, the music of Bridgerton plays a sizable part in its success.
Kris Bowers scored the show. Honestly, creating era-appropriate classical pieces of music using current pop songs was a very clever strategic decision. It’s a way to bring the audience in closer to the story and works very well in this case.
I’m so excited that the newest season of Bridgerton is out. It’s been two years since the last one, which feels so long but also like it’s flown by! I will genuinely be watching it with a slice of my Bridgerton theme cake as soon as this post goes up.
Recipe Card
Bridgerton Theme Cake
Ingredients
Raspberry jam (if making):
- 250 g fresh raspberries
- 250 g [1 cup + 3 tbsp] granulated sugar or jam sugar
- Juice of ½ lemon
Bridgerton theme cake:
- 500 g [17.75 oz] unsalted butter room temperature
- 500 g [2½ cups] caster sugar
- 500 g eggs around 8-9 medium
- 500 g [3 cups + 2 tbsp] self-raising flour
- 2 tsp vanilla extract
Bridgerton theme cake decoration:
- 350 g [12.25 oz] unsalted butter room temperature
- 700 g [4¾ + 1 tbsp] icing [confectioners] sugar
- 1 tsp vanilla extract
- Violet liquid food colouring/paint
- Brown liquid food colouring/paint or mix black and red/orange
- Green liquid food colouring/paint
- White sugar paste
- Yellow liquid food colouring/paint
- Black liquid food colouring/paint
- Vodka for painting optional
- OR sugar paste in yellow, white, black and green
Instructions
Raspberry jam (if making):
- Wash the raspberries well then put them in a saucepan. Mash the raspberries with a fork until they have become a collective pulp. If wanting to remove the seeds, do so now by straining them through a sieve into a bowl. Place back into the saucepan and turn the heat up to medium.
- Once the raspberries start to bubble, turn the heat up to a medium-high setting and add the sugar. Stir in the sugar until it has dissolved.
- Squeeze in the lemon juice and stir in.
- Allow the mixture to simmer for 10 minutes until reduced and thickened. The colour will also go darker.
- To test whether your jam is ready, use a spoon to get a dab of jam from the saucepan and drop the dab of jam onto a clean and cool plate or bowl. Leave for a few moments, then gently push your finger into it. If the jam feels set and squidgy, it’s ready. If it’s still liquid-like, allow the jam to simmer for a few more minutes before testing again.
- When your jam is ready, pour it into a clean jar or glass container and leave to cool on the side.
Bridgerton theme cake sponges:
- Preheat your oven to 180°C [350°F] or 160°C fan. Grease and line three deep 8 inch round cake tins. Set aside.
- Weigh out your eggs in their shells and get as close to 500g as possible. Then, weigh out the rest of your ingredients to the exact weight of your eggs.
- In a large mixing bowl, cream together the butter and sugar until light and fluffy.
- Add the eggs, one at a time, beating in between until fully incorporated.
- Spoon in the vanilla extract and beat in.
- Sieve in the flour and mix in until the flour is no longer visible. Avoid over mixing here.
- Split the cake mixture evenly between your three lined cake tins. Lift each one and bang it on your work surface to pop any large air bubbles.
- Bake the sponges on the middle shelf of your oven for 30 – 35 minutes or until baked.
- Your cake sponges will be ready when a skewer comes out clean when tested; the surfaces spring back when gently pressed on, and you hear little to no bubbling/crackling when you listen to them.
- Once baked, leave the cakes to cool in the tins for 10 or so minutes before transferring upside down to a wire rack to cool completely.
Buttercream:
- While your cakes are cooling, make your buttercream frosting.
- In a large mixing bowl, beat the butter to loosen it. Pour in ½ the icing sugar and beat in until light and smooth.
- Add the remaining ½ of the icing sugar and beat in until smooth. Spoon in the vanilla extract and beat in.
- If your buttercream seems overly stiff, add a small splash of water or milk and beat in to loosen it a little.
- Spoon 2 heaped tbsp of the buttercream into a smaller bowl. This will be your leafage. Do the same again with another bowl: this will be for your branches. Spoon 3 heaped tbsp into another small bowl: this will be for your wisteria flowers.
- Add a couple of drops of green food colouring into the first bowl and beat in until an even colour is achieved. Do the same with the brown food colouring and violet food colouring in the other bowls. Start with a small amount of food colouring in each one and build on it if needed to achieve the desired tint or shade.
Construction:
- When your cakes are completely cool, build your cake.
- Place a small dab of plain buttercream on a plate/cake stand/cake board. Put a cake sponge over it to create your first layer.
- Spread a generous amount of jam over this first layer. If wanting to encourage the jam to mix into the buttercream crumb coat, spread it right to the edges. Otherwise, keep the jam away well away from the edges and pipe an outer ring of buttercream around the surface of the sponge to create a border.
- Add a generous amount of plain buttercream on top of the jam. The easiest way to do this is by either piping the buttercream straight onto the jam, or by spreading it on the underside of the next sponge layer.
- Place your next sponge layer on top of the base of the cake. Repeat the same process with the jam and buttercream.
- Top the cake with the last sponge layer.
- Take a moment here to place 1-2 heaped tbsp of plain buttercream into a piping/sandwich bag with your chosen piping tip for the door frame. Set aside.
- Using the remaining plain buttercream, create a semi-naked crumb coat layer over the entire cake. Use a palette knife to do this and don’t worry too much about achieving a completely smooth finish; this is the rustic element of the cake!
- Chill the cake in the fridge while you make your decorations.
Decoration:
- If using sugar paste in multiple colours, mould your bees and door using the appropriate colours: green for the door, yellow for the bees’ bodies, black for the bees’ stripes, and white for the bees’ wings.
- If using white sugar paste, shape the door, the bees’ bodies and their wings. Attach the wings to the bees’ bodies by dabbing the base of the wings with water and gently pressing them onto the bees’ bodies. Work at a good pace as the sugar paste will start to harden as you work.
- Use this time to spoon the violet buttercream into a piping bag or sandwich bag with your chosen piping tip i.e. a small closed star tip. Do the same with the brown and green buttercream in separate piping/sandwich bags with the appropriate piping tips attached.
- Retrieve your cake from the fridge. Gently press the sugar paste door into the front of your cake, securing it to the buttercream frosting.
- Do the same with your bees around your cake.
- If doing so, paint these sugar paste features using the appropriate food colourings/paints and a small paint brush. If needed, mix the food colouring/paste with a dash of vodka in a small bowl to create a thinner paint. This is optional with liquid food colouring.
- If desired, use a thin and blunt tool (end of a paint brush would work) or knife to etch in the panels on the door instead of painting them.
- Using the piping bag of plain buttercream you set aside earlier, pipe the detailing of the door frame around your sugar paste door.
- Pipe on your wisteria branches in various areas around your cake.
- Use the piping bag of green buttercream to pipe the leafage around and on your branches.
- Finish by piping the violet buttercream around the leafage and branches to create your wisteria flowers.
Notes
© Flavour of the Film. All content and imagery is copyright protected. Please do not use any of my images or written content without prior permission. If you would like to share any of the recipes or images on Flavour of the Film, please link back to the recipe in question and rewrite it in your own words, crediting Flavour of the Film as the original source.
2 Comments
Comments are closed.