
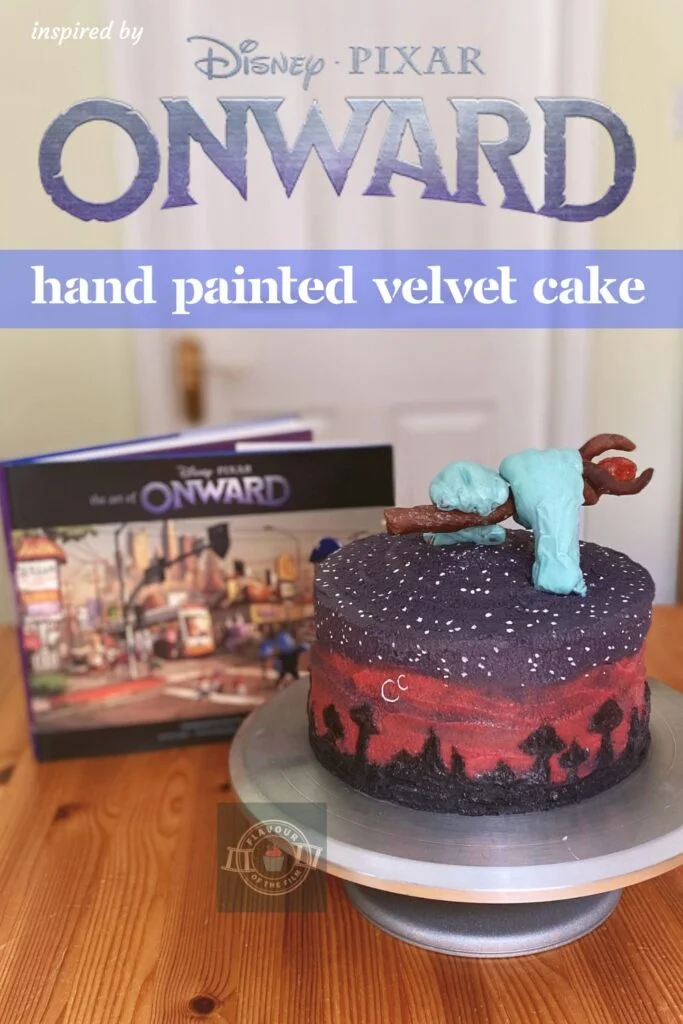
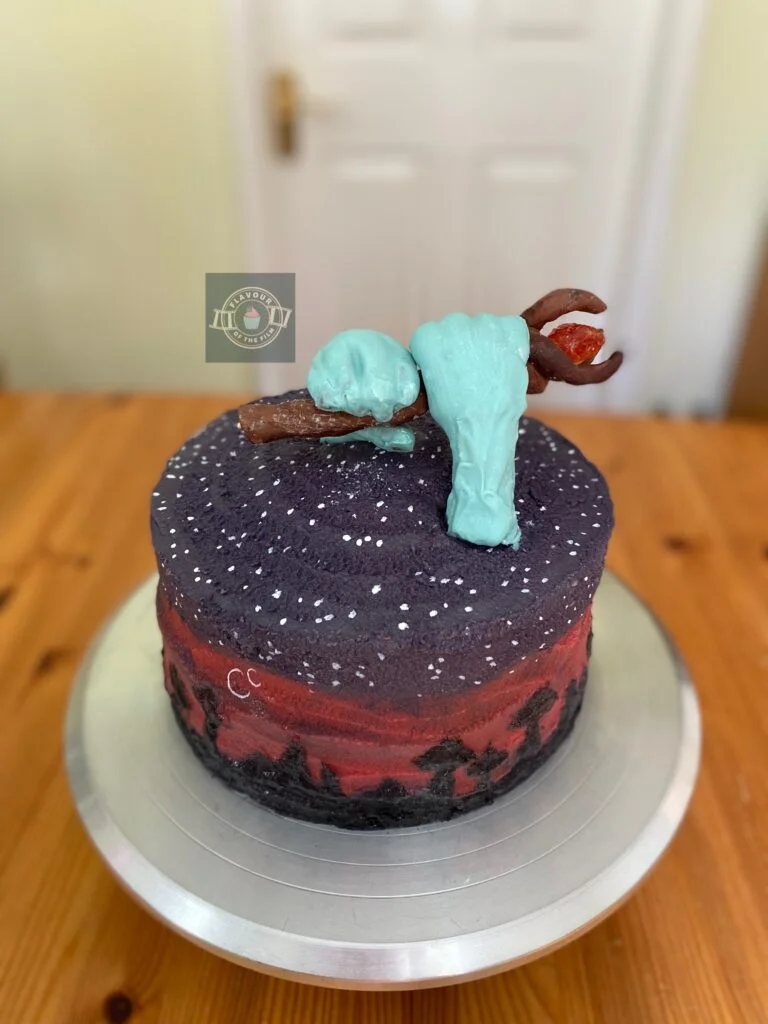
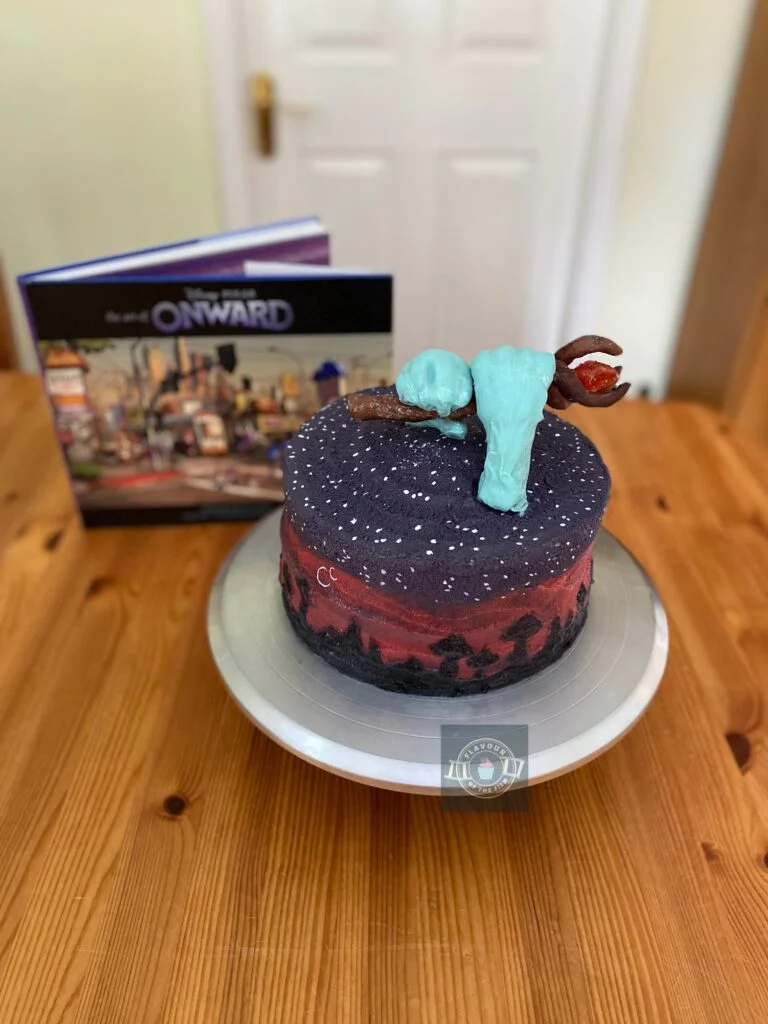
It’s my 26th birthday! Naturally, I chose to base my own birthday cake on a film that is incredibly special to me: Disney Pixar’s Onward. My Pixar Onward birthday cake is incredibly soft and became a canvas for the New Mushroomton skyline. Who’s up for a quest?
Contents
The Bake
As this was my birthday cake, I wanted to make it special to me, special to Onward, and make it so that anyone could read the recipe and believe they could bake it themselves.
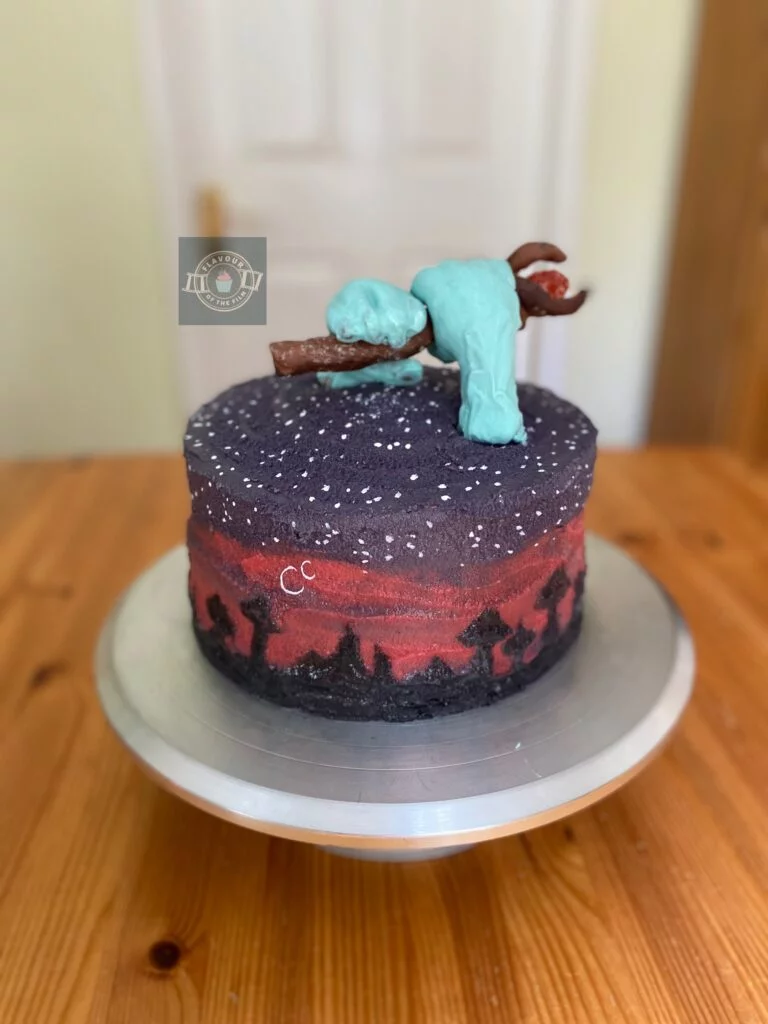
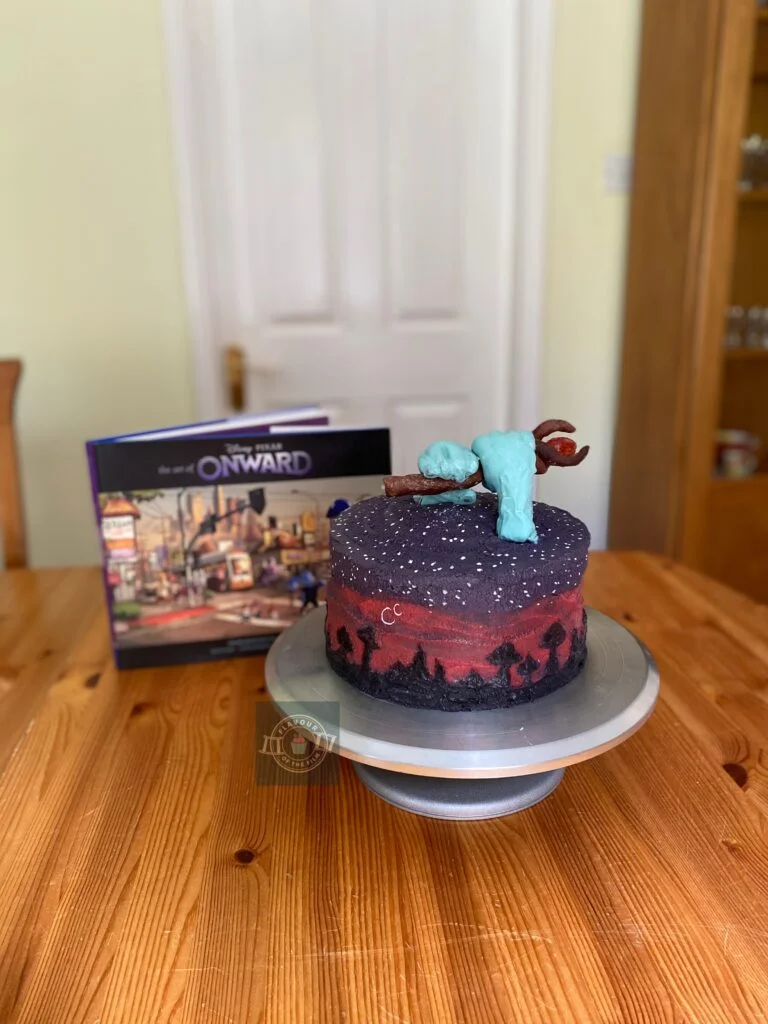
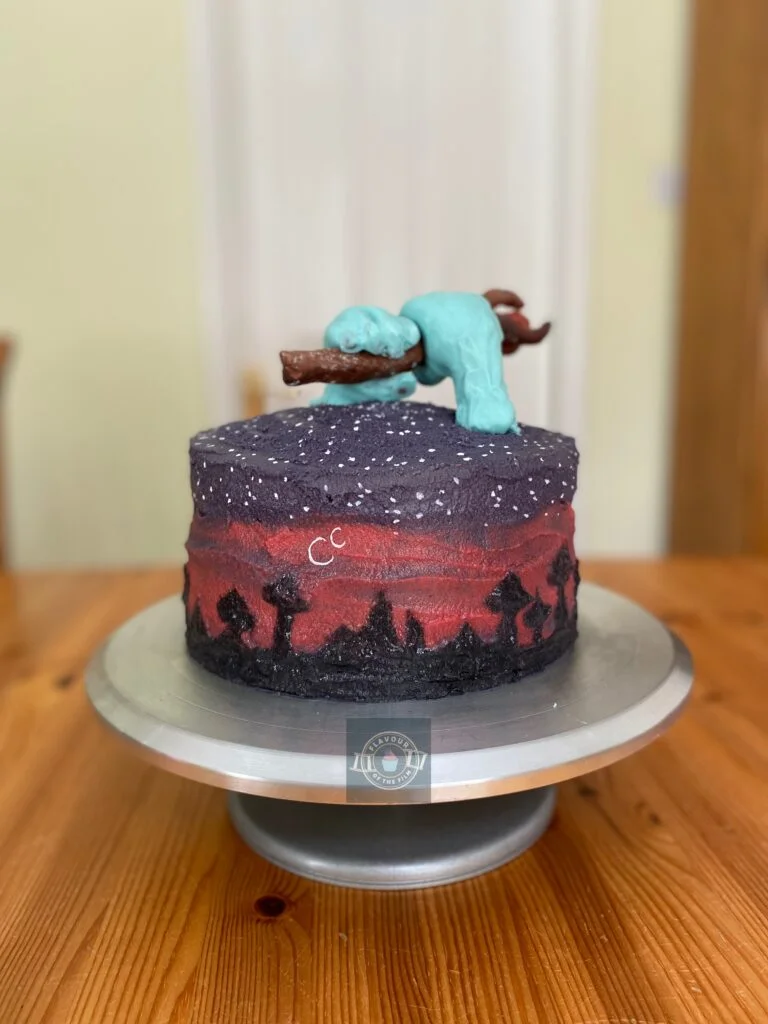
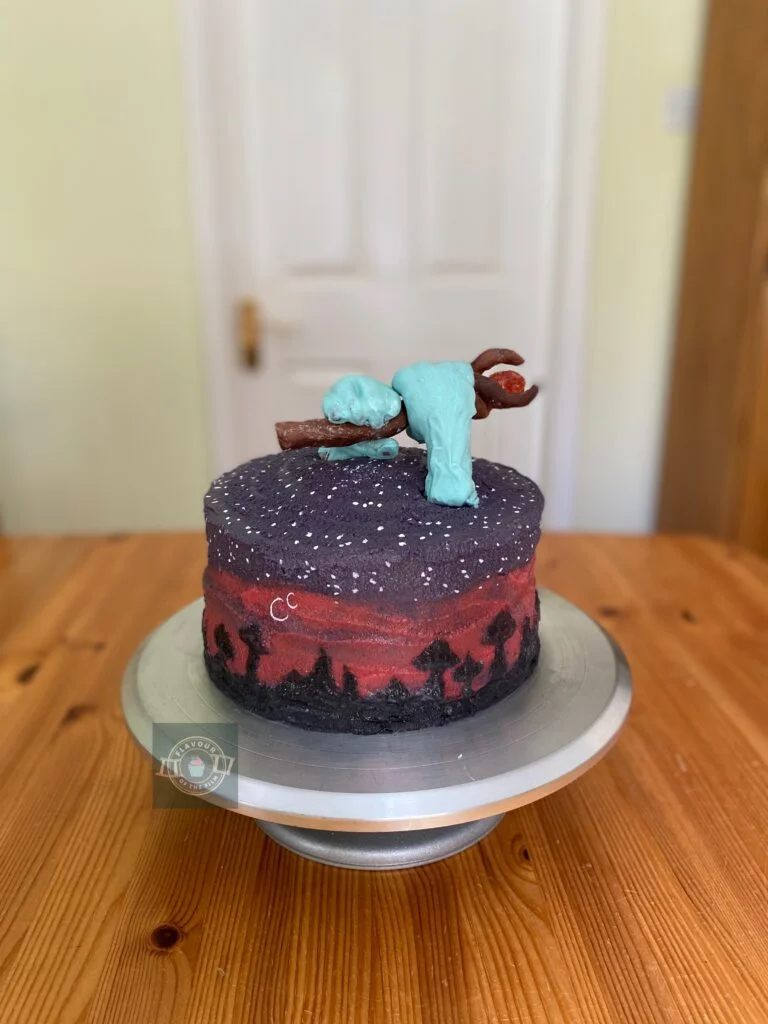
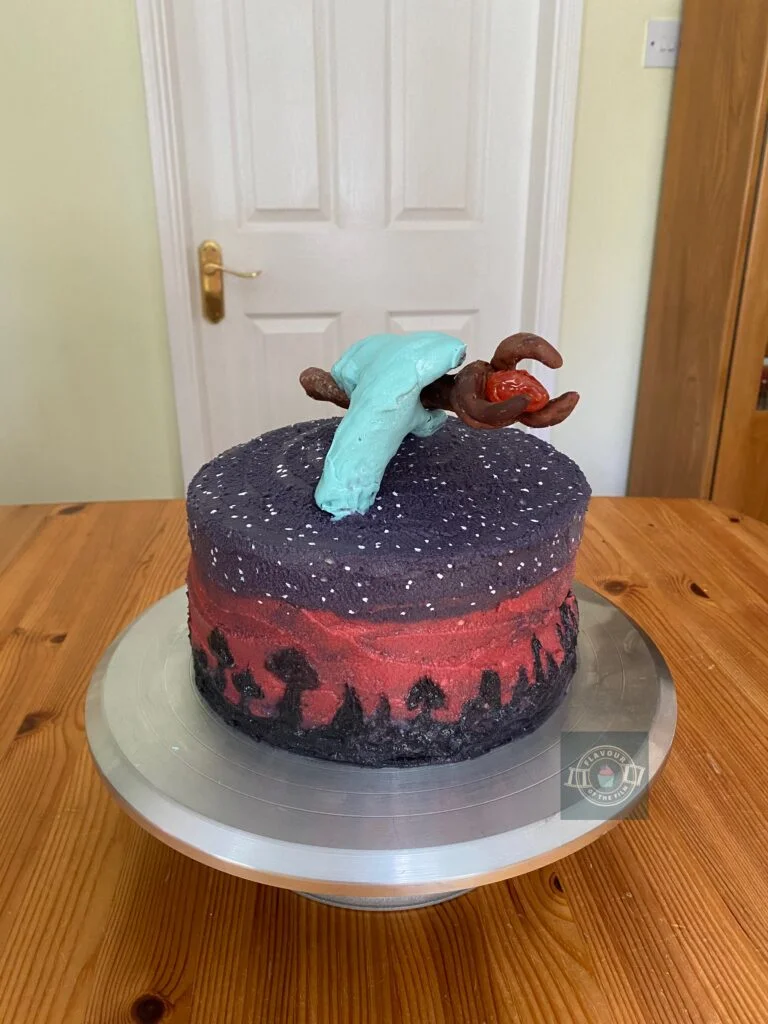
For the aesthetic of my Pixar Onward birthday cake, I chose to go for an oil painting look with the buttercream. It turns out I thoroughly enjoy painting cakes! The decoration is inspired by Onward’s main poster with the sunset look and the skyline background. Deep purple, sunset pink and a silhouette skyline with mountains.
I also incorporated mushroom shaped buildings to represent characters’ hometown: New Mushroomton. I painted the stars and moons on with white food colouring and a small paintbrush: the stars even gives the cake a mushroom vibe as well which is so appropriate!
To achieve the effect, I painted the buttercream in layers using a small palette knife.
The one I used looked a little like a cement scraper, just far smaller and narrower! It’s much easier than trying to do this with a paint brush. You can also be more delicate with the application with a small palette knife.
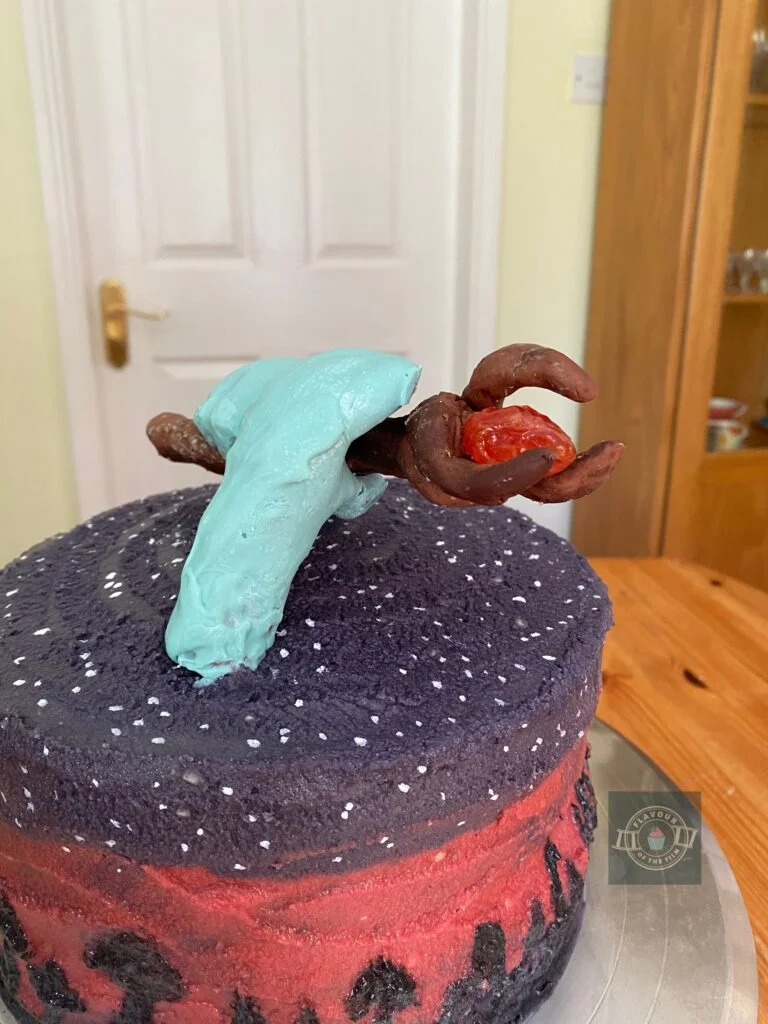
To top my Pixar Onward inspired birthday cake, I moulded the wizard’s staff that Ian and Barley are gifted by their late father out of modelling chocolate. I melted down boiled sweets to shape the Phoenix gem to go inside the top of the staff.
The staff is held up by two pale blue hands, one each to represent the two brothers.
These were also shaped out of modelling chocolate and then covered in white chocolate that I tinted blue.
Whilst I am very happy with the end result of my Pixar Onward themed birthday cake, I would definitely use a different method for the hands. I only had dark and milk modelling chocolate on hand (if you’ll pardon the pun) so I had to cover them in white chocolate that I tinted sky blue in order to change their colour.
It’s not my favourite finish but we’re rolling with it!
It’s all part of the journey.
I have written this recipe to include instructions that are better than the method I used, so you shouldn’t have to make do. It’s still delicious, which is what matters most! I’m literally eating a slice of my Pixar Onward birthday cake with a cup of Earl Grey tea while I write this post.
You may choose to mould the hands and staff out of fondant icing, but know that modelling chocolate is far sturdier. The only support the staff has on my cake is the hands holding it in place. There is no other support holding it up, so you may find that you struggle to get that balance if you decide to use fondant. You may also struggle to find the right tint of blue!
Modelling chocolate is a little more expensive in terms of price per quantity, but it’s better all round and you don’t need much for these decorations. I myself only use modelling chocolate for smaller elements for this reason.
This recipe only requires milk and white modelling chocolate: milk for the staff and white for the hands.
Using white modelling chocolate for the hands means you’ll be able to paint the blue directly on, either using an airbrush if you have one, or with an oil based food colouring and a paintbrush.
I haven’t got fancy baking tools – though I will look to invest in an airbrush – but I will always aim to make these recipes as accessible as possible. Everyone should feel like they can make something that looks and tastes great, whether they have posh baking equipment or not.
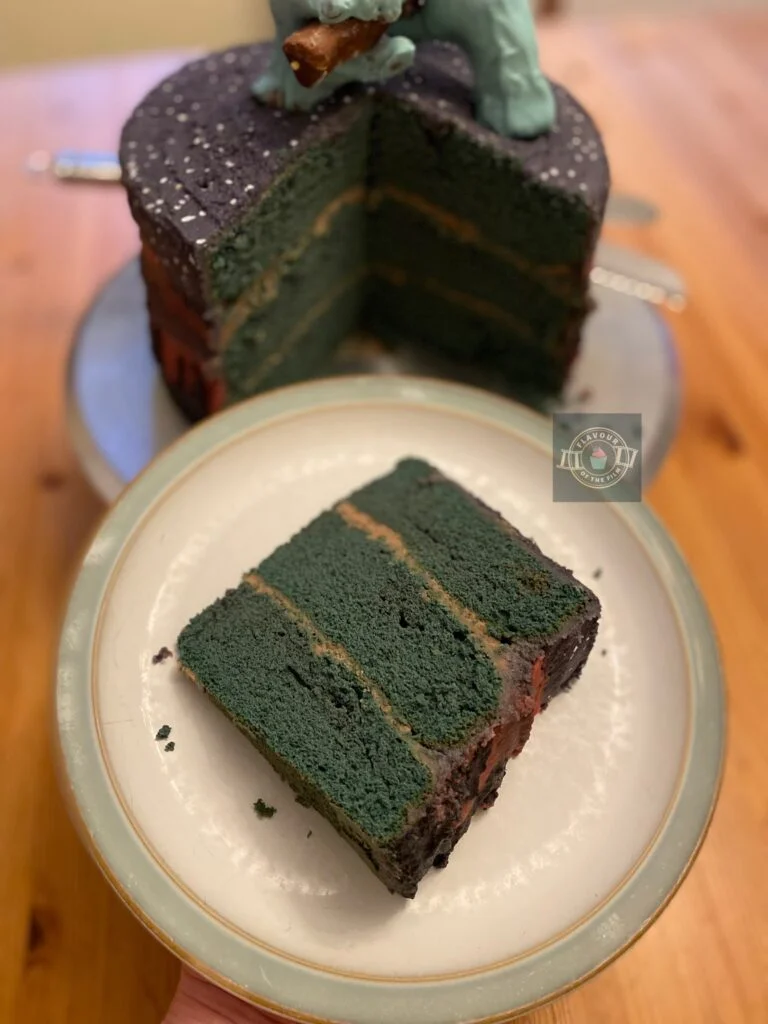
The flavours are blue velvet with a chocolate buttercream.
The blue in the blue velvet is more of an enchanting blue-green, as I mixed a sky blue in the batter and it turned this wonderful blue-green after mixing with the cocoa powder. The colour of the sponge is completely optional – you could make a red velvet or a dark blue velvet or no colour at all, if preferred. I just really liked the magical blue-green I ended up with.
When it came to the sponge, I looked to Jane’s Patisserie’s spooky red velvet cake for inspiration. The main difference with mine (other than the colour) is that I made my own ‘buttermilk’ rather than using a shop bought one.
By all means, use a shop bought buttermilk if preferred! Add an equal amount: 375ml if using a shop bought one.
Otherwise, follow my recipe to make your own version. It’s incredibly easy and whilst it is thinner than shop-bought buttermilk, I find that it makes for a softer sponge. Any sort of velvet cake will be more dense than other types of cake because it’s a different set of ingredients and the structure is different.
Adding a ‘buttermilk’ you’ve made with just two ingredients will make a difference in the texture of the sponge.
Any velvet cake uses acidic ingredients in it to give it the desired texture and to help it rise. You’ll notice there is no baking powder in recipes for these types of cake – this is why! Therefore, it is crucial not to leave out any of the acidic ingredients, like the lemon juice and white wine vinegar. You’ll likely end up with a flat cake otherwise!
It’s also important to chill in between stages, especially if it is a warm day.
The buttercream needs to be slightly softer in order to make the painting stages easier, so bear that in mind and be sure to chill in between layers of buttercream application.
Top Tips
- If using actual buttermilk from the shop, simply swap out the lemon milk mix in exact measurements.
- Any sort of velvet cake requires a little more effort than your standard cake mix. Nevertheless, it is still wise to avoid over mixing once the flour is added!
- Don’t skip the paste making step. This really helps to develop the colour you are using for your sponges before it is added to the rest of the ingredients. It also helps to achieve a more even colour distribution.
- If making with kids, let them mix the sodium bicarbonate and white wine vinegar. The fizzing is such a thrill to see and not something you see often when making cakes.
- Make sure the buttercream is a little looser than usual so that it is easier to paint onto your cake. The texture achieved is really cool!
- Be careful when handling the melted candy/boiled sweets. They are very hot straight from the oven and can burn you.
- Enjoy the painting element! It’s so relaxing. As is the moulding of the modelling chocolate.
So, there we have it. My 26th birthday cake a.k.a my Pixar Onward birthday cake. I hope you thoroughly enjoy creating this bake and have fun with the artistic process. Believe me when I say that this cake makes a magical addition to any Onward themed party. If you haven’t watched Onward yet… well, I reckon you can gather what I would say to that. It’s just so wholesome.
Happy baking, happy eating!
The Recipe
Ingredients
‘Buttermilk’:
- 375ml [14 oz] milk of your choice (I used whole milk)
- 2 tbsp fresh lemon juice (about ½ a lemon) or white vinegar
Pixar Onward birthday cake:
- 185g [6.5 oz] unsalted butter
- 400g [2 cups] caster sugar
- 4 large or 5 medium eggs
- Oil based food colouring of your choice (I used sky blue) optional
- 2 tsp vanilla extract
- 50g [¼ cup + 3 tbsp] cocoa powder
- 450g [2¾ cups + 1 tbsp] plain flour
- 1.5 tsp bicarbonate of soda [baking soda]
- 3 tsp white wine vinegar
Decoration:
- 250g [8.75 oz] unsalted butter
- 550g [3¾ cups] icing [confectioners] sugar
- 2 tbsp cocoa powder
- Milk of your choice (I used whole)
- Purple food colouring oil based
- Violet food colouring oil based
- Rose pink food colouring oil based
- Black food colouring oil based
- White food colouring oil based
- Sky blue food colouring oil based
- 75g milk modelling chocolate
- 150g white modelling chocolate
- Red and orange boiled sweets [hard candies]
Serves: 12+
Preparation time: 30 minutes
Chilling time: 30 minutes
Baking time: 30 – 35 minutes
Decorating time: 40 minutes
Method
Pixar Onward birthday cake:
- Make your ‘buttermilk’. Measure out your milk and set aside for a few minutes to bring to room temperature.
- Preheat your oven to 180°C [350°F] or 160°C fan. Grease and line three 8-inch cake tins and set aside.
- When the milk is roughly room temperature, mix in the lemon juice or white vinegar in the milk and leave for 10 or so minutes.
- In a large bowl, cream together the sugar and butter until light and fluffy.
- Beat in the eggs, one at a time, until combined.
- In a small bowl, mix together the cocoa powder, food colouring and vanilla extract and mix until a thick paste has formed. You’ll likely need to add milk to bring the ingredients together – do so if needed. I used whole milk but you can use any milk of your choice.
- Add this cocoa powder paste to your sugar, butter and eggs and beat in until smooth and an even colour.
- Pour in the buttermilk and beat in until smooth. Add the flour and mix again until fully combined.
- In a small bowl, mix together the bicarbonate of soda and white wine vinegar. Watch it fizz then add to your cake mixture and mix in.
- Split evenly between the cake tins and bake for 30 – 35 minutes. The sponges will be ready when a cocktail stick or skewer comes out clean, the surface bounces back when pressed on gently and there is barely any or no crackling/bubbling sound at all when you listen to them.
- Leave to cool in the tins for around 10 minutes and then transfer to a wire rack to cool completely.
Feature decoration:
- Keep the oven on and place the two boiled sweets [hard candies] on a lined baking tray. Place under the heat for a couple of minutes until softened but not completely melted.
- Using two small spoons, work the melted sweets and shape as much as possible. Do not touch them with your hands – the hot sugar will burn your skin.
- Once they are cooler, you may mould into the shape of the Phoenix gem with your fingers. Set aside.
- While your sponges are cooling, make your cake topper elements. Work with the modelling chocolate to soften it – knead a little if needed. Shape the milk chocolate into a staff with three twisted prongs. Lay on a lined baking tray or plate and put into the fridge straight away.
- Shape the white chocolate into two gripping hands – shape them gently around the staff as a guide but only when the staff has hardened enough not to melt.
- Be sure to give the hands wrists and fingers – detail is key. Give the wrists flat ends so that they sit in/on the cake more evenly.
- Place the hands in the fridge with the staff.
Buttercream:
- Make your buttercream. Beat the butter to loosen it and then beat in the sugar, ½ at a time. Add a splash of milk to soften if needed.
- Add the cocoa powder and beat in until light and fluffy. It needs to be soft enough to paint but firm enough to hold when spread over the cake.
- Put some into a smaller bowl, add the dark purple food colouring and beat in. Place some in another small bowl, add the rose pink food colouring and beat in. Keep the remaining buttercream in the large bowl colour free – this should be the largest amount of buttercream you have.
- Once your cakes are fully cool, begin to build your cake. Place one sponge on a cake stand/board/plate. Spread 2 heaped tbsp of the colour free buttercream over the top. Place the next sponge on top and repeat. Place the last sponge on the top.
- Add the violet food colouring to the large bowl and beat in. Spread a thin layer of this around your entire cake to create a crumb coat.
- Place your cake in the fridge to chill.
Finishing touches:
- Retrieve your modelling chocolate elements and paint the hands with the sky blue food colouring. Do this with either an airbrush if you have one or a regular small paintbrush. Place back in the fridge once done.
- Get your cake from the fridge. Spread a layer of dark purple buttercream over the top of the cake, then around the top edge. Spread over more violet buttercream across the midsection and bottom of the cake.
- Place back in the fridge for a few minutes.
- Once set again, retrieve your cake from the fridge. Using a small palette knife, paint on your pink buttercream and smooth to create a wispy sunset look. Place back in the fridge for a few moments.
- Add the black food colouring to your remaining buttercream and beat in until you achieve the deep shade needed.
- Get your cake back out and, using a small palette knife and the black buttercream, paint on your mountainous New Mushroomton skyline around the bottom of your cake. Try to keep this within and below the pink areas of your cake.
- Using a thin paintbrush and the white food colouring, paint on two moons beside each other. Using either the paintbrush or a chopstick, paint the stars across the top of your cake in white food colouring. If you know any constellations, paint them on!
- Place your cake back in the fridge until the entire thing is set and firm.
- Once the buttercream is set, attach the hands to the top of the cake using a cocktail stick – one stick in the bottom of each hand and secure into the cake.
- Gently press the Phoenix gem you made earlier into the centre of the end of the staff so that the three prongs are twisted around it.
- Slide the staff into the grip of the hands slowly. The hands should be able to hold the staff without other support.
- Marvel at your work of art!
This magical and enchanting Pixard Onward birthday cake will last for around 4 days if covered with a cake dome or aluminium foil (do not wrap this before the buttercream is fully set and dry!). You can keep it in the fridge overnight to make sure it remains fully set. The modelling chocolate will remain in shape at room temperature so it doesn’t need to be kept in the fridge for any longer than that. Enjoy!
The Film
I first saw Onward (2020) when it was released in cinemas. I was living in Japan at the time and this particular film was on my list of must-watch releases. It’s very special to me for many reasons and whenever I watch it, it makes me feel reconnected to those moments that I spent watching it in a place that is very dear to me.
As you can tell, I have a very strong emotional connection to this film that is generally unrelated to the story. With that being said, I still find the film’s actual story incredibly moving: I cry EVERY SINGLE TIME. The sense of brotherhood. The familial connection. The love. It brings me to tears each time I watch it, it’s that powerful.
Inspired by his own story, Dan Scanlon directed Onward. It’s a tale of two elven brothers living in a diversely magical world where magic is no longer used. Very much like our own modern day world, convenience is one of the most desirable attributes when it comes to… well, anything.
As magic is not so easy to master, this world found other ways to make life easier.
The two main protagonists are the Lightwood brothers: Ian and Barley. Barley being the outgoing, board game-loving, fearless older brother and Ian being the kind-hearted, introverted high school student.
On Ian’s sixteenth birthday, their mother gives Barley and Ian a gift from their late father: a wizard’s staff, a Phoenix gem and a spell to bring him back to life for one day.
Their father died when they were too young to remember him properly, so this particular gift is priceless to them.
It is Ian that is able to source magic from within and cast the spell, only it isn’t completed and they end up with just their Dad’s legs wandering around. Barley and Ian then set out on a quest to find another (incredibly rare) Phoenix gem so that they can complete the spell and see their late father one last time.
When their mother discovers that her sons have set off on a dangerous quest, she teams up with The Manticore and follows them, learning things about herself along the way.
As with any Disney film, the animation is superb and enchanting to look at.
Dan Scanlon also worked as a writer on this project, alongside Keith Bunin and Jason Headley. The cast are recognisable voices: something that helps to make the film feel even more comforting, in my opinion (with that being said, I do love when big films cast new talent).
Ian is voiced expertly by Tom Holland and Barley is voiced by Chris Pratt. Julia Louis-Dreyfus voiced their mother, Laurel Lightfoot, and the excellent Octavia Spencer voiced The Manticore. They are joined by Mel Rodriguez, Kyle Bornheimer, Ali Wong, Lena Waithe, Grey Griffin, Tracey Ullman, Wilmer Valderrama, George Psarras and John Ratzenberger as a whole range of integral characters.
This story is full of adventure, magic, gorgeous animation and pure heart. It’s one of my comfort films and I think it is highly underrated as far as Disney films go. The colour scheme also happens to include all of my favourite colours so that doesn’t do any harm!
I also love the fact that while Ian and Barley are the main protagonists, Laurel also goes on her own journey.
She remains a focal point rather than solely a supporting character. The entire family goes through a transformative adventure and it’s wonderful to watch.
If you haven’t seen Onward yet, I highly recommend it. I even watched a making-of special, that’s how much I enjoy this film. A copy of The Art of Onward – a book on the making of Onward – also happens to be in my possession, as you can see in the photos.
Pixar did a fantastic job on it and I think Dan Scanlon feeling brave enough to allow his life story to be the inspiration for the film makes it even more special. I applaud you, Dan Scanlon.
Recipe Card

Pixar Onward Birthday Cake
Ingredients
'Buttermilk’:
- 375 ml [14 oz] milk of your choice I used whole milk
- 2 tbsp fresh lemon juice about ½ a lemon or white vinegar
Cake:
- 185 g [6.5 oz] unsalted butter
- 400 g [2 cups] caster sugar
- 4 large or 5 medium eggs
- Oil based food colouring of your choice I used sky blue optional
- 2 tsp vanilla extract
- 50 g [¼ cup + 3 tbsp] cocoa powder
- 450 g [2¾ cups + 1 tbsp] plain flour
- 1.5 tsp bicarbonate of soda [baking soda]
- 3 tsp white wine vinegar
Decoration:
- 250 g [8.75 oz] unsalted butter
- 550 g [3¾ cups] icing [confectioners] sugar
- 2 tbsp cocoa powder
- Milk of your choice I used whole
- Purple food colouring oil based
- Violet food colouring oil based
- Rose pink food colouring oil based
- Black food colouring oil based
- White food colouring oil based
- Sky blue food colouring oil based
- 75 g milk modelling chocolate
- 150 g white modelling chocolate
- Red and orange boiled sweets [hard candies]
Instructions
- Make your ‘buttermilk’. Measure out your milk and set aside for a few minutes to bring to room temperature.
- Preheat your oven to 180°C [350°F] or 160°C fan. Grease and line three 8-inch cake tins and set aside.
- When the milk is roughly room temperature, mix in the lemon juice or white vinegar in the milk and leave for 10 or so minutes.
- In a large bowl, cream together the sugar and butter until light and fluffy.
- Beat in the eggs, one at a time, until combined.
- In a small bowl, mix together the cocoa powder, food colouring and vanilla extract and mix until a thick paste has formed. You’ll likely need to add milk to bring the ingredients together – do so if needed. I used whole milk but you can use any milk of your choice.
- Add this cocoa powder paste to your sugar, butter and eggs and beat in until smooth and an even colour.
- Pour in the buttermilk and beat in until smooth. Add the flour and mix again until fully combined.
- In a small bowl, mix together the bicarbonate of soda and white wine vinegar. Watch it fizz then add to your cake mixture and mix in.
- Split evenly between the cake tins and bake for 30 – 35 minutes. The sponges will be ready when a cocktail stick or skewer comes out clean, the surface bounces back when pressed on gently and there is barely any or no crackling/bubbling sound at all when you listen to them.
- Leave to cool in the tins for around 10 minutes and then transfer to a wire rack to cool completely.
- Keep the oven on and place the two boiled sweets [hard candies] on a lined baking tray. Place under the heat for a couple of minutes until softened but not completely melted.
- Using two small spoons, work the melted sweets and shape as much as possible. Do not touch them with your hands – the hot sugar will burn your skin.
- Once they are cooler, you may mould into the shape of the Phoenix gem with your fingers. Set aside.
- While your sponges are cooling, make your cake topper elements. Work with the modelling chocolate to soften it – knead a little if needed. Shape the milk chocolate into a staff with three twisted prongs. Lay on a lined baking tray or plate and put into the fridge straight away.
- Shape the white chocolate into two gripping hands – shape them gently around the staff as a guide but only when the staff has hardened enough not to melt.
- Be sure to give the hands wrists and fingers – detail is key. Give the wrists flat ends so that they sit in/on the cake more evenly.
- Place the hands in the fridge with the staff.
- Make your buttercream. Beat the butter to loosen it and then beat in the sugar, ½ at a time. Add a splash of milk to soften if needed.
- Add the cocoa powder and beat in until light and fluffy. It needs to be soft enough to paint but firm enough to hold when spread over the cake.
- Put some into a smaller bowl, add the dark purple food colouring and beat in. Place some in another small bowl, add the rose pink food colouring and beat in. Keep the remaining buttercream in the large bowl colour free – this should be the largest amount of buttercream you have.
- Once your cakes are fully cool, begin to build your cake. Place one sponge on a cake stand/board/plate. Spread 2 heaped tbsp of the colour free buttercream over the top. Place the next sponge on top and repeat. Place the last sponge on the top.
- Add the violet food colouring to the large bowl and beat in. Spread a thin layer of this around your entire cake to create a crumb coat.
- Place your cake in the fridge to chill.
- Retrieve your modelling chocolate elements and paint the hands with the sky blue food colouring. Do this with either an airbrush if you have one or a regular small paintbrush. Place back in the fridge once done.
- Get your cake from the fridge. Spread a layer of dark purple buttercream over the top of the cake, then around the top edge. Spread over more violet buttercream across the midsection and bottom of the cake.
- Place back in the fridge for a few minutes.
- Once set again, retrieve your cake from the fridge. Using a small palette knife, paint on your pink buttercream and smooth to create a wispy sunset look. Place back in the fridge for a few moments.
- Add the black food colouring to your remaining buttercream and beat in until you achieve the deep shade needed.
- Get your cake back out and, using a small palette knife and the black buttercream, paint on your mountainous New Mushroomton skyline around the bottom of your cake. Try to keep this within and below the pink areas of your cake.
- Using a thin paintbrush and the white food colouring, paint on two moons beside each other. Using either the paintbrush or a chopstick, paint the stars across the top of your cake in white food colouring. If you know any constellations, paint them on!
- Place your cake back in the fridge until the entire thing is set and firm.
- Once the buttercream is set, attach the hands to the top of the cake using a cocktail stick – one stick in the bottom of each hand and secure into the cake.
- Gently press the Phoenix gem you made earlier into the centre of the end of the staff so that the three prongs are twisted around it.
- Slide the staff into the grip of the hands slowly. The hands should be able to hold the staff without other support.
- Marvel at your work of art!
Notes
© Flavour of the Film. All content and imagery is copyright protected. Please do not use any of my images or written content without prior permission. If you would like to share any of the recipes or images on Flavour of the Film, please link back to the recipe in question and rewrite it in your own words, crediting Flavour of the Film as the original source.


3 Comments
Comments are closed.