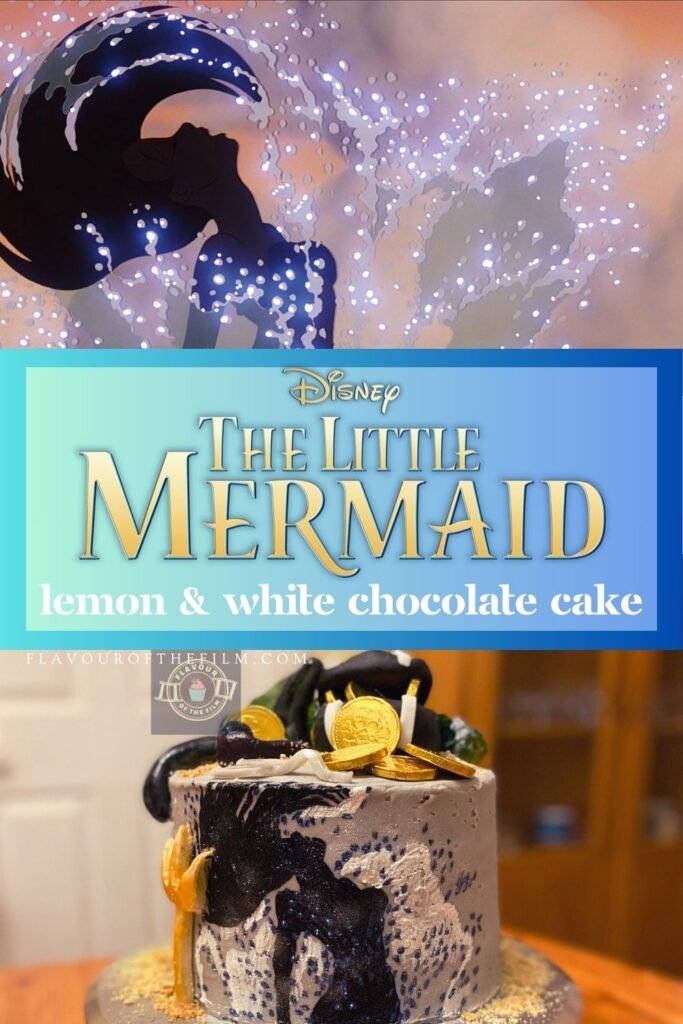
Can someone pass me a dinglehopper so I can dig into a slice of this delectable cake, please? My The Little Mermaid inspired lemon and white chocolate cake is a worthy find for any classic Disney fan. Let’s dive in.
Contents
The Bake
My older sister’s favourite classic Disney film is The Little Mermaid and as it was her birthday earlier this month, I created her a special birthday cake inspired by the film for the occasion. I can say with genuine glee that she loved it.
Like my other celebration cakes, my Spider-Man chocolate cake and my SpongeBob Squarepants marble cake included, this cake is built up with three delicious layers. You can choose any flavour you want, but I chose a lemon and white chocolate cake combo as it’s one of my sister’s favourites. It was her birthday cake, after all.
I used the zest of three lemons in the sponges and achieved a nice flavour, but if you like it stronger, I recommend zesting four lemons for some extra strength. Fresh lemon with a few rows of white chocolate melted down and beat into the buttercream to finish it off.
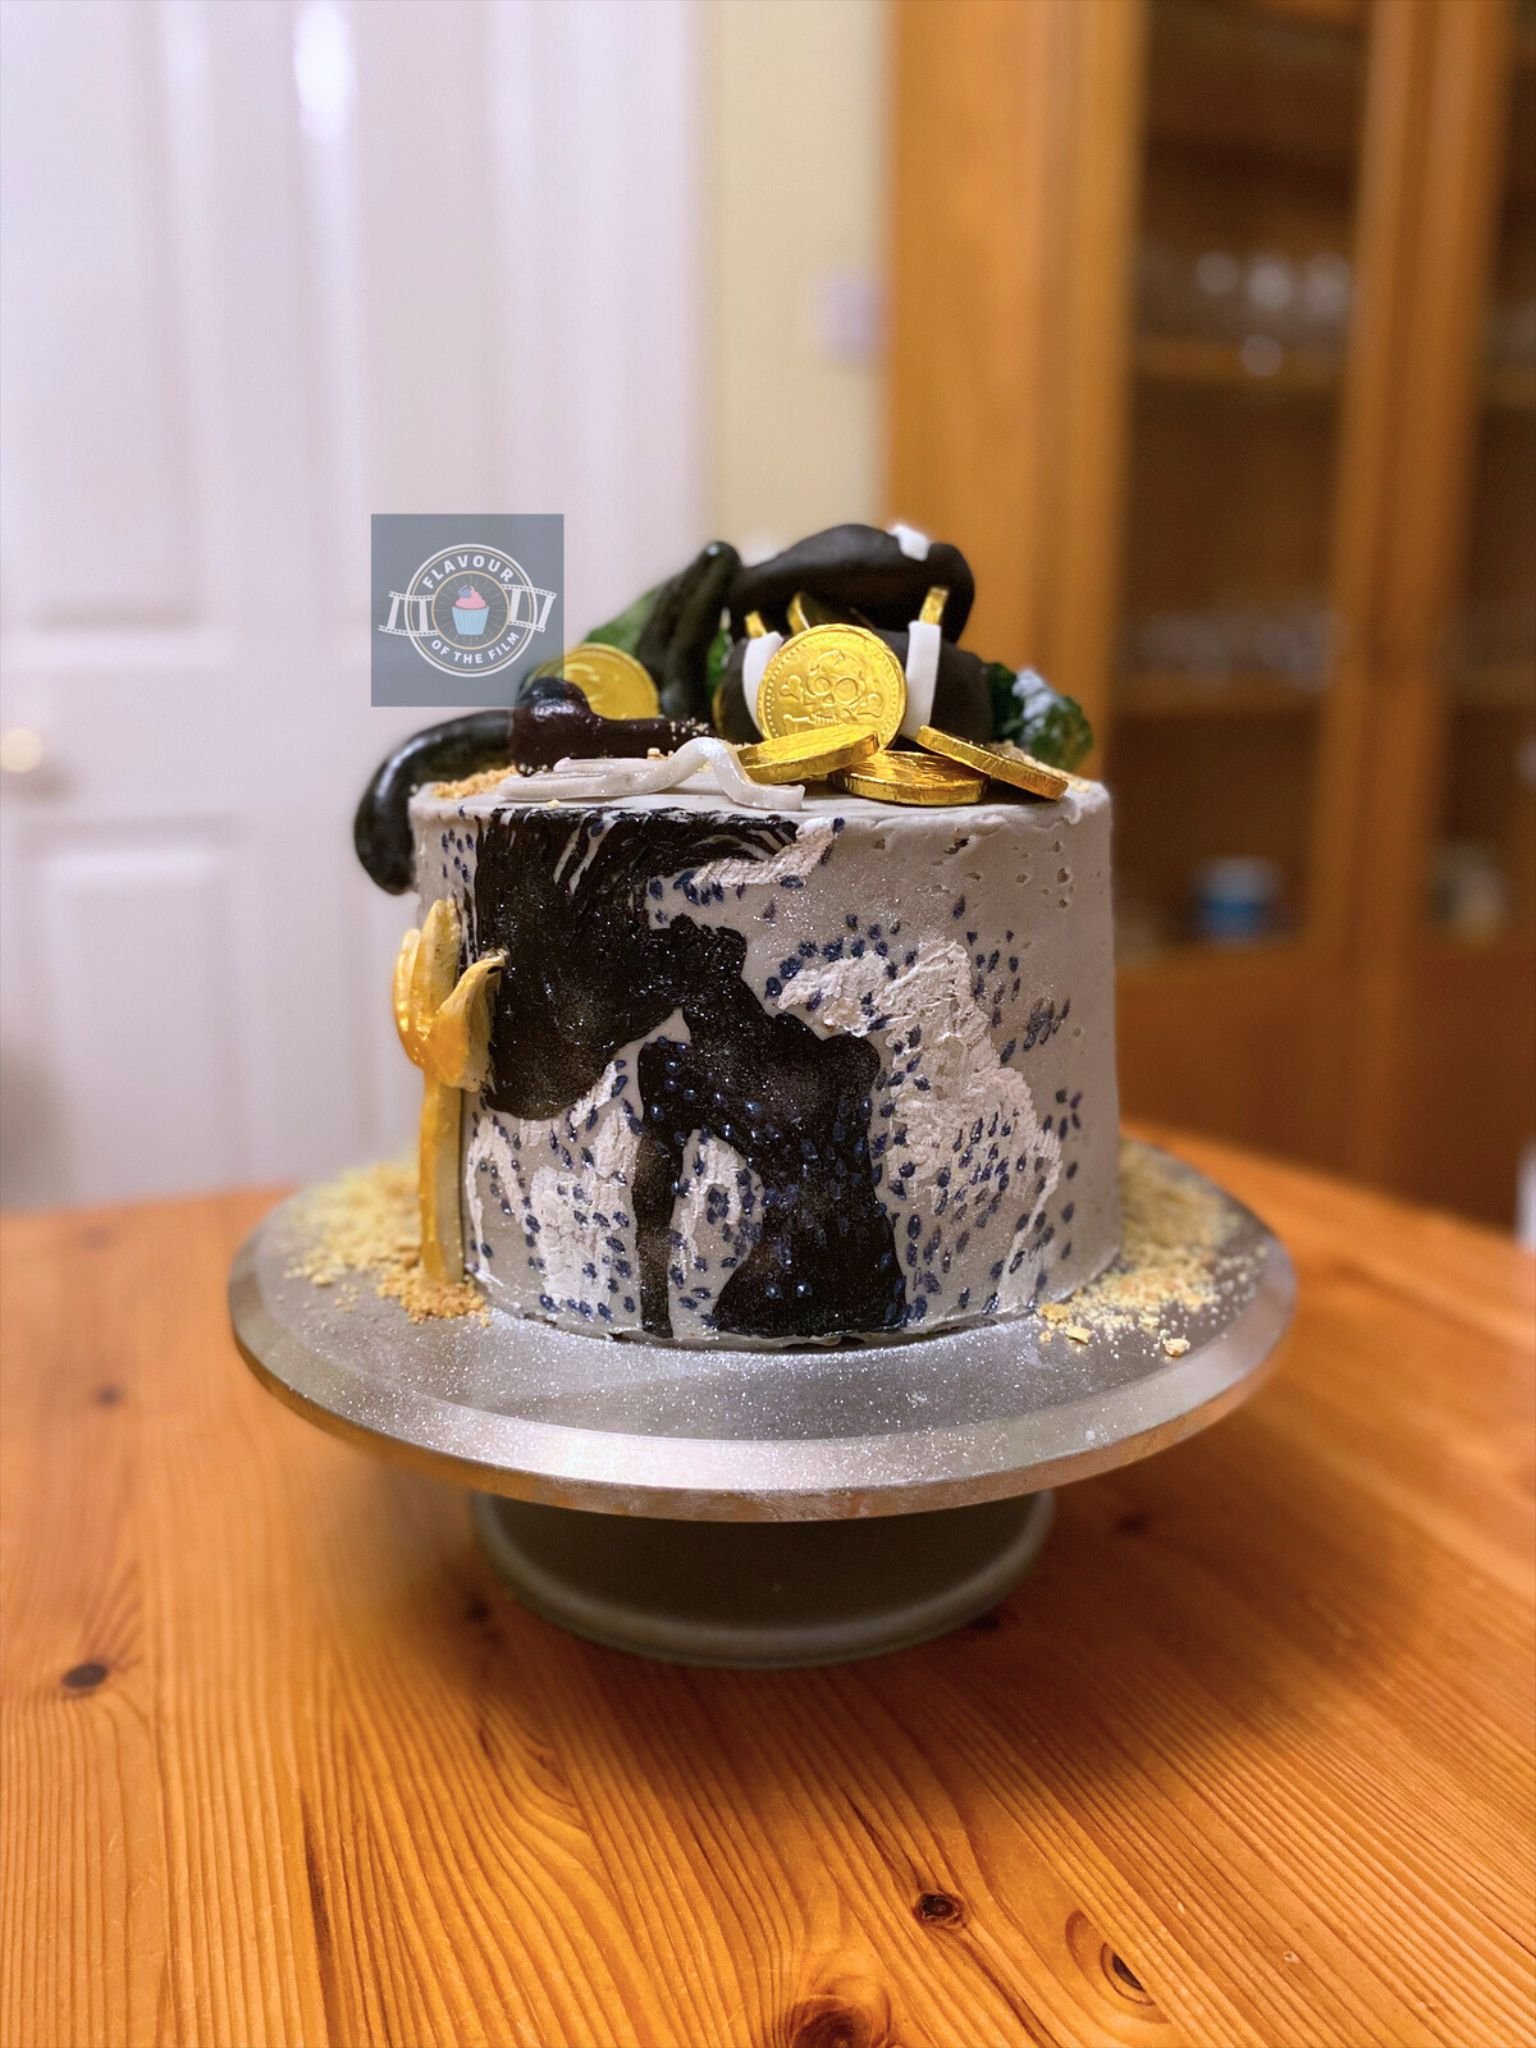
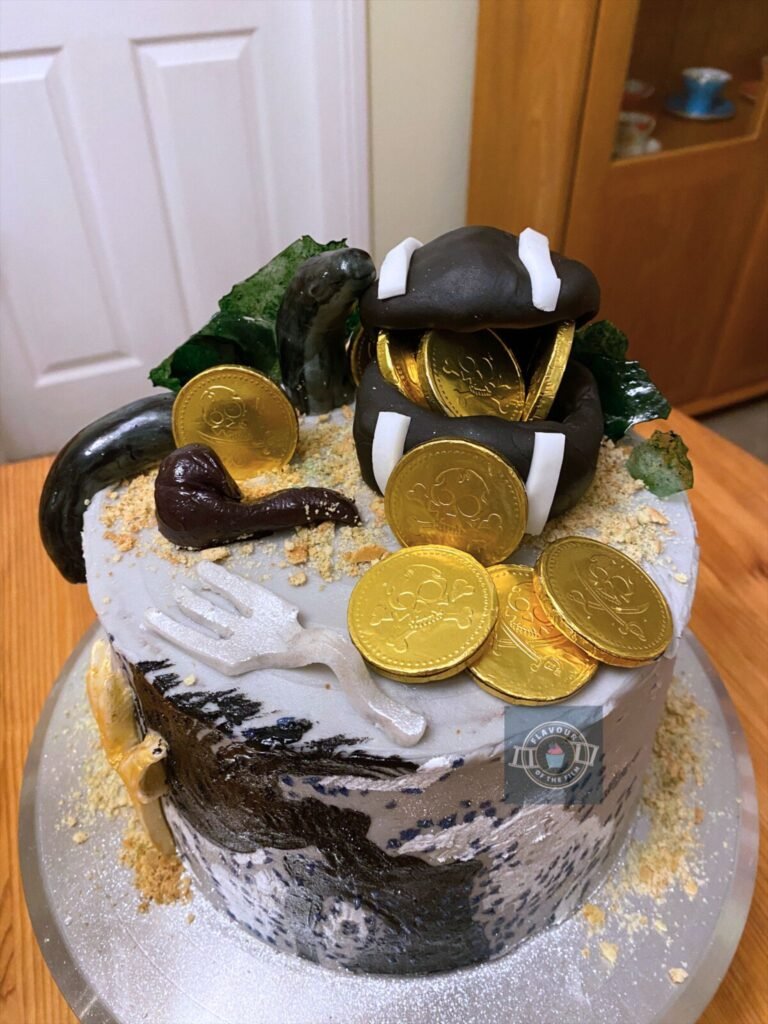
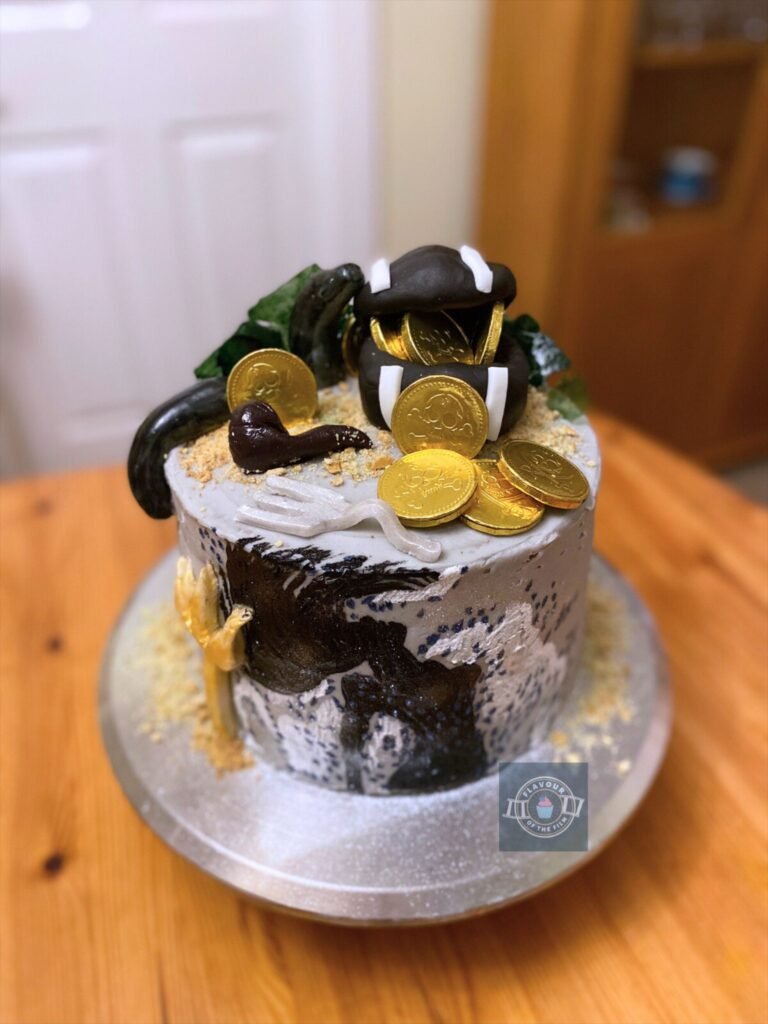
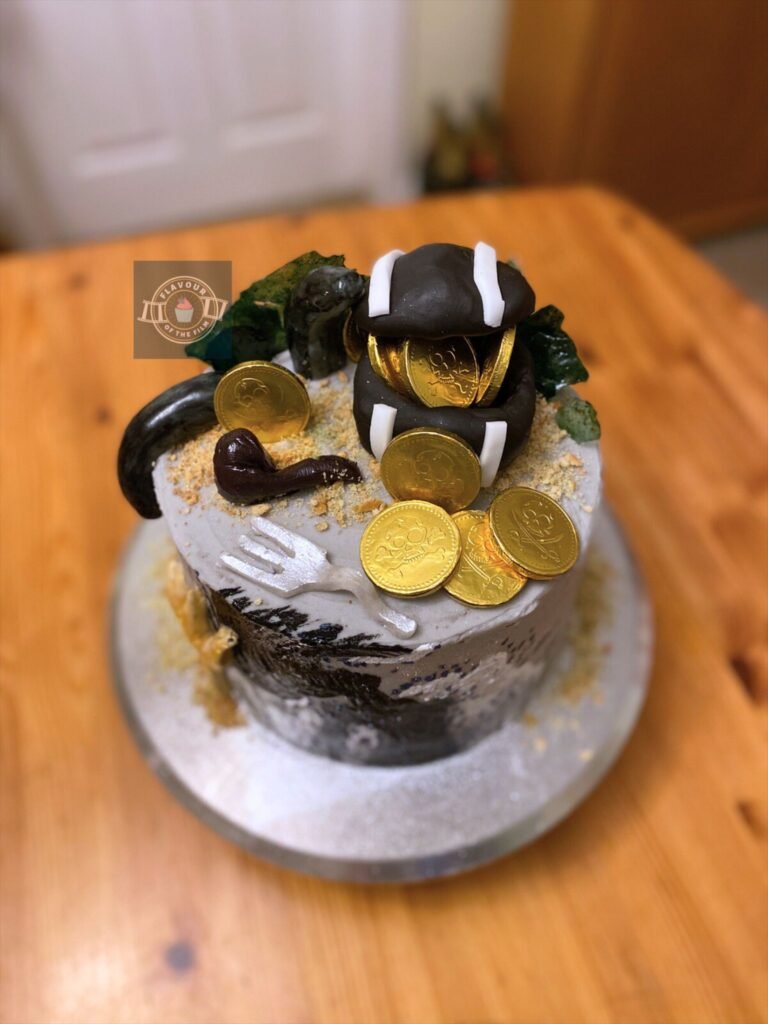
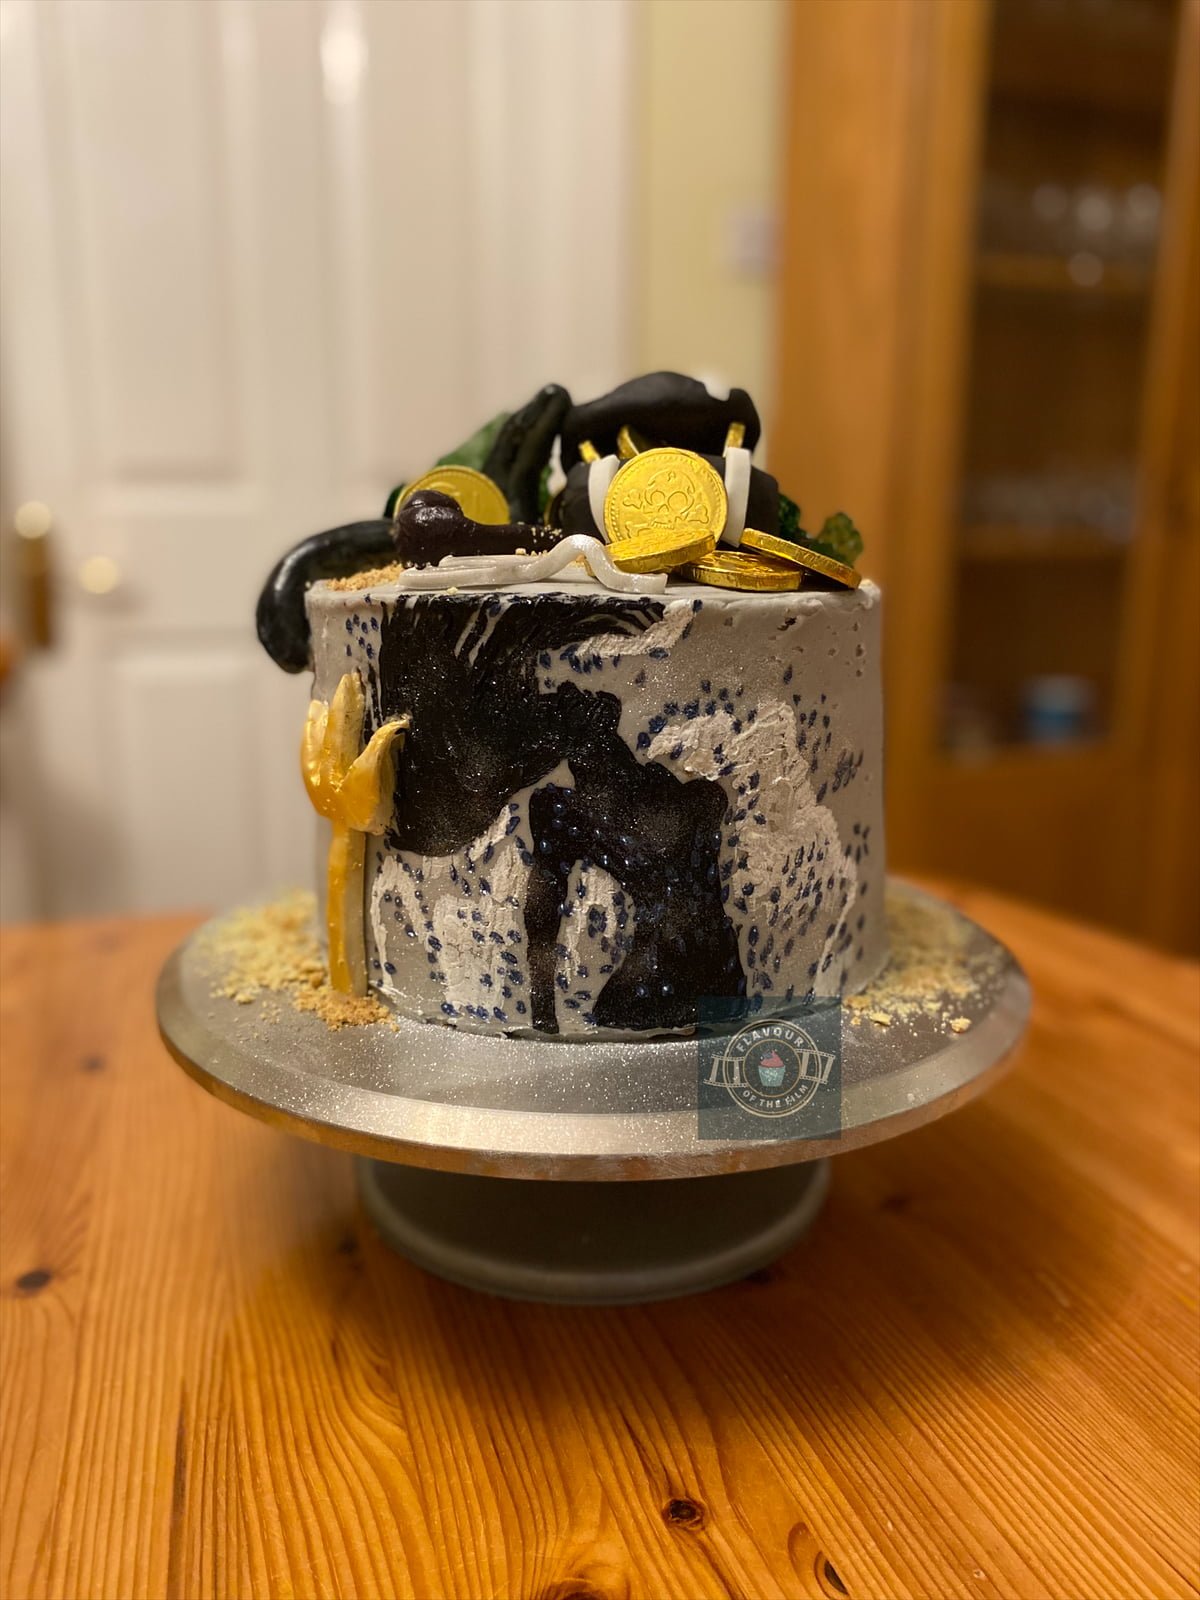
To decorate the top, I created ‘seaweed’ using glucose and food colouring, but this is purely optional.
I don’t advise eating it as it’s literally pure glucose… it just looks cool. Fondant was my material of choice for the remaining decorations: the treasure chest, fork, smoking pipe, Ursula’s tentacles and Triton’s trident.
I carved and shaped all of these elements for my The Little Mermaid themed cake free hand but you can always use a stencil if need be.
I still don’t love working with fondant, unless I’m molding it to make smaller elements. Then it’s not so bad. Covering a cake in fondant is my least favourite thing, but I do it every now and again because it makes others happy.

I used white fondant for everything apart from the treasure chest.
This is because I was using what I had in the cupboard, rather than buying blocks of various different colours of fondant. You can, however, buy all the different colours you need, if you’d rather do so, instead of painting the white fondant with food colouring/edible food paint.
That’s completely up to you – I just found it more cost effective to use plain white fondant and then paint it.
To fill the treasure chest, I found some pirate-style gold chocolate coins online and am so pleased with the effect they added. They also tasted pretty good, too. I’m definitely saving them for a few other bakes I have planned.
For the ‘sand’ effect, I simply crushed a biscuit in various parts on and around my The Little Mermaid inspired cake. This is optional, of course, it just adds more to the cake and fits with the theme! You can use any biscuit you like, so long as it resembles the colour of sand.
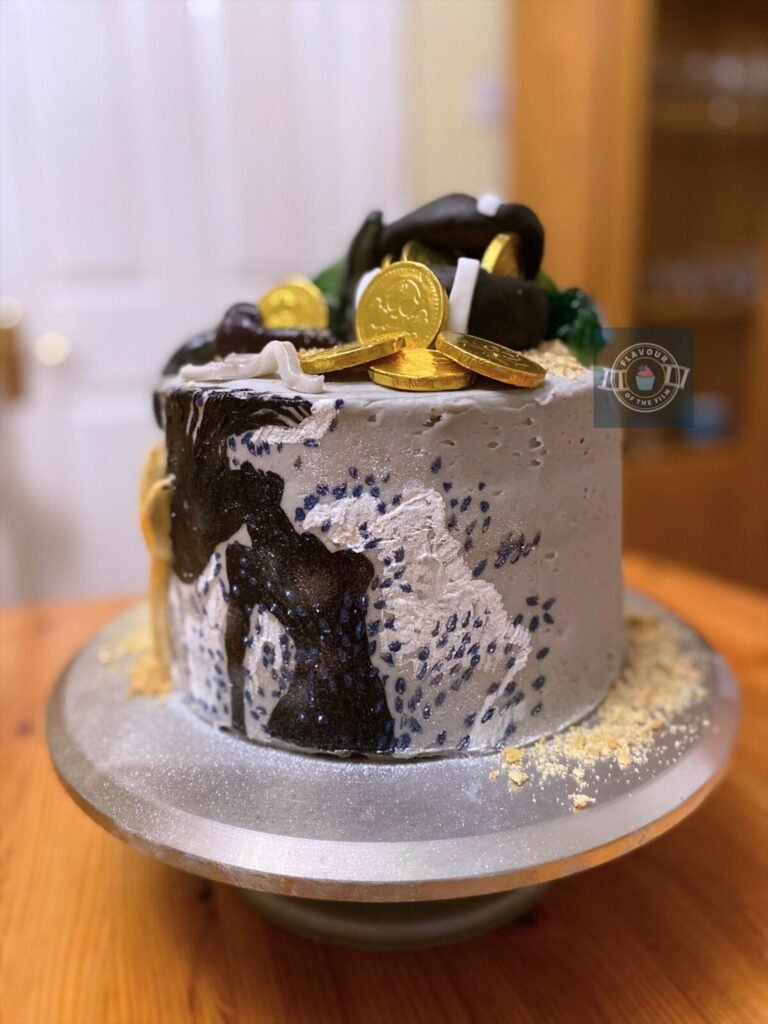
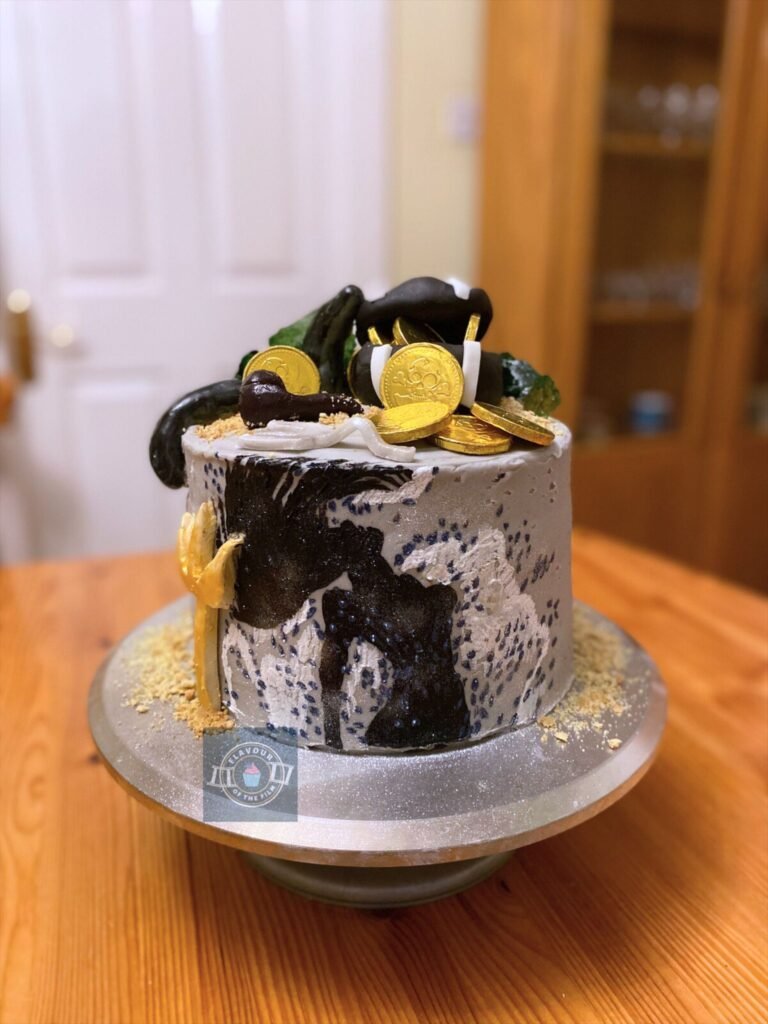
The main event of this The Little Mermaid cake is the scene I hand painted onto the buttercream.
I chose to paint the shot of Ariel bursting out from the water having just been turned into a human. Her silhouette fills the shot, with sparkling water splashing up with her and a lilac sky.
If you have an airbrush, you can recreate this using a stencil. I hand painted it using food colouring and a couple of small paint brushes so this works, too! It was honestly the most fun part of making the entire cake for me.
The buttercream was actually a pale lilac colour to match the shot from The Little Mermaid, but I had to take the pictures once the natural light had gone so it looked grey. Still cool, though.
When I say that I utilised the edible glitter I have, I truly mean it. The silver and gold edible glitter was out in full force. Just the way I like it. But, this is optional, of course.
Top Tips
- Weigh out your eggs in their shells, then weigh out the rest of your base ingredients to the exact weight of your eggs. Allow for 20g either way. That way you can achieve the best texture!
- Take care not to over mix the cake batter so that you get the light and fluffy cakes you are after.
- Get the buttercream as smooth as possible to create a surface that is easier to paint.
- Start light with the painting and build up on it. I started with the body and then rounded the silhouette out.
- Have fun with the painting! It’s genuinely one of the best parts of making this cake.
- If needed, paint the fondant features after you’ve placed them on the cake. It’s a lot quicker to do this than to paint them beforehand and wait for the food paint/colouring to dry.
That, my friends, is the lemon and white chocolate The Little Mermaid cake that I created for my older sister, inspired by Disney’s 1989 film The Little Mermaid. A cake that honours both the Disney cartoon, as well as the original, much darker text. I hope you have lots of fun making this cake (especially the painting!).
Happy baking, happy eating!
The Recipe
Ingredients
The Little Mermaid cake sponges:
- 450g [15.75 oz] unsalted butter room temperature
- 450g [2¼ cups] golden caster sugar
- 450g eggs (about 8 medium)
- 450g [2¾ cups + 1 tbsp] self-raising flour
- Zest of 3 – 4 lemons
Buttercream:
- 400g [14 oz] unsalted butter room temperature
- 800g [5½ cups] icing [confectioners] sugar
- 3 rows white chocolate melted
- Lilac food colouring oil based
- Black food colouring oil based
- White food colouring oil based
- Purple food colouring oil based
Decorations:
- White fondant or sugar paste
- Brown fondant or sugar paste
- Silver food colouring oil based
- Gold food colouring oil based
- A plain biscuit i.e. Malted Milk or Nice biscuit
- Liquid glucose
- Green food colouring oil based
- Edible glitter optional
Serves: 10+
Preparation time: 30 minutes
Baking time: 30 – 35 minutes + 1 hour for ‘seaweed’
Decorating time: 1 hour
Method
The Little Mermaid cake sponges:
- Preheat your oven to 180°C [350°F] or 160°C fan. Grease and line three 8 inch (20cm) cake tins with greaseproof paper/baking parchment. Set aside.
- Weigh out your eggs in their shells and get as close as you can to 450g. Whatever number you achieve (20g either way works), weigh out the rest of your ingredients to this exact number.
- Cream together the butter and sugar until light and fluffy.
- Beat in the eggs one at a time until fully combined.
- Beat in the lemon zest.
- Sieve in the flour and mix in until there is no flour left visible. Try not to overmix!
- Divide the batter equally into the three prepared tins and bake for 30 – 35 minutes.
- Your cakes will be ready when a skewer/cocktail stick comes out clean, the surface of the sponges bounce back when gently pressed on, and you hear little to no crackling/bubbling sound when you listen to them.
- Leave your cakes to cool in the tins for around 10 minutes before transferring upside down to a wire rack to cool completely.
‘Seaweed’:
- If making the seaweed, do so now. Turn your oven down to 150°C [300°F] or 130°C fan.
- Line a baking tray with greaseproof paper/baking parchment.
- Squeeze a few big blobs of liquid glucose onto the paper.
- Add a drop of green food colouring into each blob of liquid glucose.
- Place the tray in the oven for 1 hour, until the liquid glucose is completely green and has melted. Avoid opening the door if you want bubbles in your ‘seaweed’.
- Once melted, leave to cool and harden.
- While your cakes are cooling and your ‘seaweed’ is in the oven, prepare your buttercream.
Buttercream:
- Melt the white chocolate in a microwavable safe bowl in the microwave in 20 second bursts, stirring in between until fully melted. Set aside.
- Beat the butter to loosen it, then add half of the icing sugar and beat in. Add the rest of the sugar and beat in completely.
- If needed, add a splash of milk to loosen if needed. It needs to be spreadable!
- Add the melted chocolate and beat in until fully combined.
- Add a few drops of the lilac food colouring and beat in until an even colour is achieved. Add more to reach the desired tint if necessary but start with a little!
- Place one sponge on a plate/cake board/cake stand and smother generously with buttercream.
- Lay the second sponge on the top and do the same, then lay the last sponge on the top.
- Smother the entire cake in the remaining buttercream, using a palette knife to smooth it over. If it is a particularly hot day, place the cake in the fridge to chill.
Decorations:
- Mould and paint/airbrush any of the fondant decorations that you are doing i.e. the fork (dinglehopper) and treasure chest.
- Retrieve your cake from the fridge. Crush the biscuit in patches on the cake and around the bottom for the ‘sand’.
- Arrange your fondant decorations on and around the cake. Place on the chocolate coins.
- Using a couple of small paint brushes and the black, purple and white food colourings, paint on the silhouette scene. If using a template, gently hold it up against the cake, being careful not to press it into the buttercream. If using an airbrush, do so now.
- Carefully peel the glucose ‘seaweed’ from the paper and break into shards if needed. Gently push these shards into the cake.
- Finish by spraying the buttercream scene and other elements with edible glitter, if using.
This tail-flipping The Little Mermaid movie cake is so tasty, it’s sure to make you sing out in happiness. It’ll last around 4+ days in a cake stand/case with a lid or airtight container. The sponges can be frozen for up to 3 months. Enjoy!
The Film
In 1989, The Little Mermaid splashed onto cinema screens in Disney’s usual fashion. Bright colours, catchy musical tunes, great animation and a story filled with heart. It has been a go-to Disney classic since. Well, at least for many Disney fans that I know.
Now, if you know your fairy-tales, you’ll know that The Little Mermaid is originally a tale written by the great Hans Christian Andersen. His original text is a lot darker. A lot darker. As is the way with a lot of original fairy-tales. Has anyone read the original Charles Perrault version of Cinderella?
OOF.

Disney is known for happier tones when it comes to storytelling.
Even if there is nearly always a sad part somewhere in the mix. I’m looking at you Big Hero 6. So, when it came to adapting Andersen’s dark and gritty fairy-tale, Disney fluffed it up and made it family friendly. Of course.
This year, they turned their own version of The Little Mermaid into a live action adaptation. Which, I am pleased to say, I genuinely enjoyed.
Disney’s 1989 version was written and directed by John Musker and Ron Clements, with original music by the legend that is Alan Menken. Jodi Benson led the cast list as Ariel; with Christopher Daniel Barnes as Eric, the great Samuel E. Wright as Sebastian, Jason Marin as Flounder, Buddy Hackett as Scuttle, Kenneth Mars as Triton and the incomparable Pat Carroll as Ursula, to name a few.


Did anyone see Jodi Benson in her cameo role in the live action adaptation of The Little Mermaid?
I love that they included her. Feels like a full circle kind of situation.
Also, I want to state here and now that Melissa McCarthy as Ursula in the live action adaptation was fantastic and I will fight anyone that says otherwise.
For anyone not familiar with the story, The Little Mermaid is about a young, adventurous mermaid by the name of Ariel who dreams of walking the sands of the surface world. Despite her father, the king, doing his very best to push her onto the path he deems is best, Ariel makes a deal with a sea witch.
Her siren song in exchange for three days as a human, in which she must be kissed by the prince she has fallen for. Should she fail, Ariel becomes Ursula’s property.
Sounds pretty intense as I’m writing it out, I won’t lie.
Has anyone written out the plot for Finding Nemo? When you write it down and read it back to yourself, it sounds like a dark drama that requires a box of tissues for the tears that are bound to flow. Madness, right?
Anyway, I digress.
The Little Mermaid is a true Disney classic and remains a firm favourite for fans to this day. Fans including myself, I must add. Sometimes it’s the flavour of the day. You know?
Recipe Card
Lemon and White Chocolate Cake | The Little Mermaid
Ingredients
Lemon and white chocolate cake:
- 450 g [15.75 oz] unsalted butter room temperature
- 450 g [2¼ cups] golden caster sugar
- 450 g eggs about 8 medium
- 450 g [2¾ cups + 1 tbsp] self-raising flour
- Zest of 3 – 4 lemons
Buttercream:
- 400 g [14 oz] unsalted butter room temperature
- 800 g [5½ cups] icing [confectioners] sugar
- 3 rows white chocolate melted
- Lilac food colouring oil based
- Black food colouring oil based
- White food colouring oil based
- Purple food colouring oil based
Decorations:
- White fondant or sugar paste
- Brown fondant or sugar paste
- Silver food colouring oil based
- Gold food colouring oil based
- A plain biscuit i.e. Malted Milk or Nice biscuit
- Liquid glucose
- Green food colouring oil based
- Edible glitter optional
Instructions
- Preheat your oven to 180°C [350°F] or 160°C fan. Grease and line three 8 inch (20cm) cake tins with greaseproof paper/baking parchment. Set aside.
- Weigh out your eggs in their shells and get as close as you can to 450g. Whatever number you achieve (20g either way works), weigh out the rest of your ingredients to this exact number.
- Cream together the butter and sugar until light and fluffy.
- Beat in the eggs one at a time until fully combined.
- Beat in the lemon zest.
- Sieve in the flour and mix in until there is no flour left visible. Try not to overmix!
- Divide the batter equally into the three prepared tins and bake for 30 – 35 minutes.
- Your cakes will be ready when a skewer/cocktail stick comes out clean, the surface of the sponges bounce back when gently pressed on, and you hear little to no crackling/bubbling sound when you listen to them.
- Leave your cakes to cool in the tins for around 10 minutes before transferring upside down to a wire rack to cool completely.
- If making the seaweed, do so now. Turn your oven down to 150°C [300°C] or 130°C fan.
- Line a baking tray with greaseproof paper/baking parchment.
- Squeeze a few big blobs of liquid glucose onto the paper.
- Add a drop of green food colouring into each blob of liquid glucose.
- Place the tray in the oven for 1 hour, until the liquid glucose is completely green and has melted. Avoid opening the door if you want bubbles in your 'seaweed'.
- Once melted, leave to cool and harden.
- While your cakes are cooling and your seaweed is in the oven, prepare your buttercream.
- Melt the white chocolate in a microwavable safe bowl in the microwave in 20 second bursts, stirring in between until fully melted. Set aside.
- Beat the butter to loosen it, then add half of the icing sugar and beat in. Add the rest of the sugar and beat in completely.
- If needed, add a splash of milk to loosen if needed. It needs to be spreadable!
- Add the melted chocolate and beat in until fully combined.
- Add a few drops of the lilac food colouring and beat in until an even colour is achieved. Add more to reach the desired tint if necessary but start with a little!
- Place one sponge on a plate/cake board/cake stand and smother generously with buttercream.
- Lay the second sponge on the top and do the same, then lay the last sponge on the top.
- Smother the entire cake in the remaining buttercream, using a palette knife to smooth it over. If it is a particularly hot day, place the cake in the fridge to chill.
- Mould and paint/airbrush any of the fondant decorations that you are doing i.e. the fork (dinglehopper) and treasure chest.
- Retrieve your cake from the fridge. Crush the biscuit in patches on the cake and around the bottom for the ‘sand’.
- Arrange your fondant decorations on and around the cake. Place on the chocolate coins.
- Using a couple of small paint brushes and the black, purple and white food colourings, paint on the silhouette scene. If using a template, gently hold it up against the cake, being careful not to press it into the buttercream. If using an airbrush, do so now.
- Carefully peel the glucose ‘seaweed’ from the paper and break into shards if needed. Gently push these shards into the cake.
- Finish by spraying the buttercream scene and other elements with edible glitter, if using.
Notes
© Flavour of the Film. All content and imagery is copyright protected. Please do not use any of my images or written content without prior permission. If you would like to share any of the recipes or images on Flavour of the Film, please link back to the recipe in question and rewrite it in your own words, crediting Flavour of the Film as the original source.
One Comment
Comments are closed.