
Stan Lee’s friendly neighbourhood hero is swinging back into my recipe collection! I first swooped in with my Spider-Man: Into the Spider-Verse NYC cookies… now I have created a customisable celebration cake in honour of one of my favourite fictional superheroes.
Contents

The Bake
I was actually commissioned to make this cake for a shared birthday and couldn’t help but make it into a celebration of all the Spider-Man films that have graced our screens. I’m a big Spider-Man fan so this was a particularly fun one for me.
This is a celebration cake so whilst the recipe I’m writing is for a chocolate cake, you can make this any flavour. To make it easier, you can make it fit to the three twenty-centimetre / eight-inch tins this recipe calls for. You can even use this recipe solely as inspiration for the decoration! See the Top Tips section below for guidance on changing the flavour.
I’ve got to say though, this chocolate cake is so simple but so indulgent, it would be a shame not to try it out if you’re a chocolate fan.
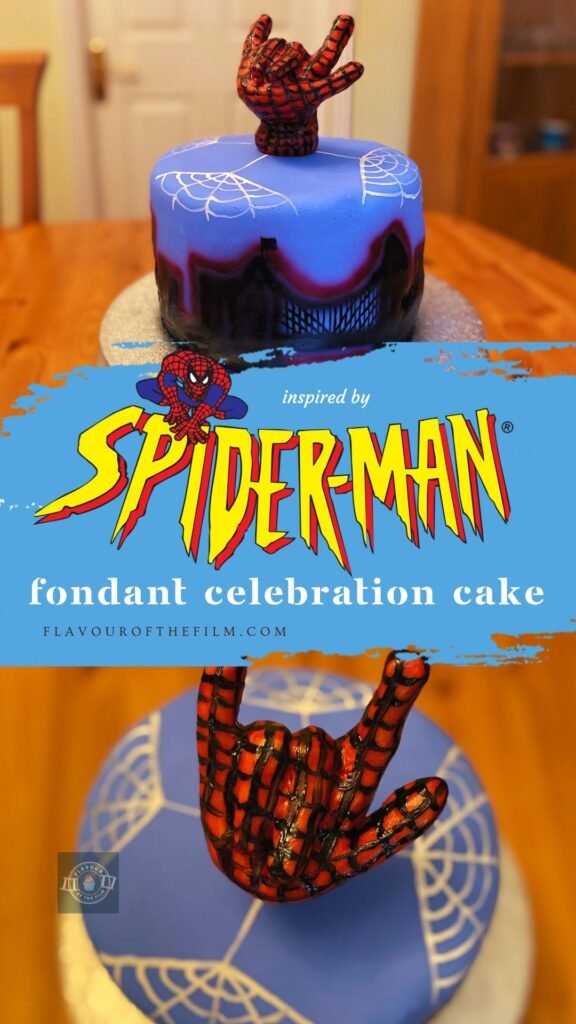
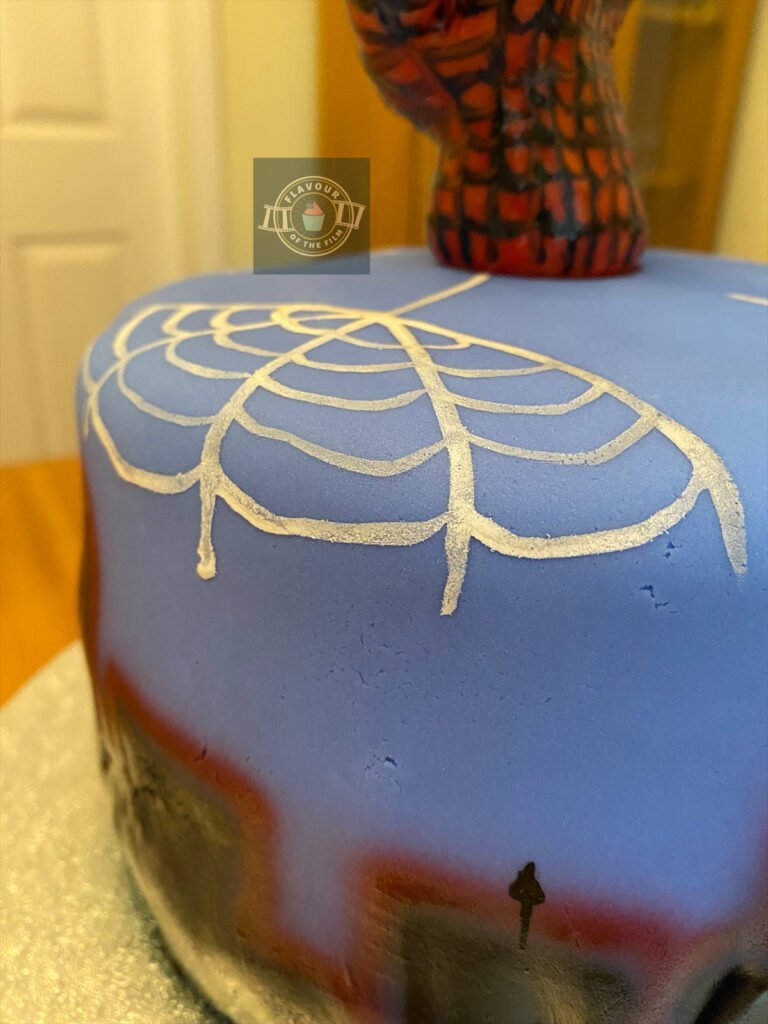
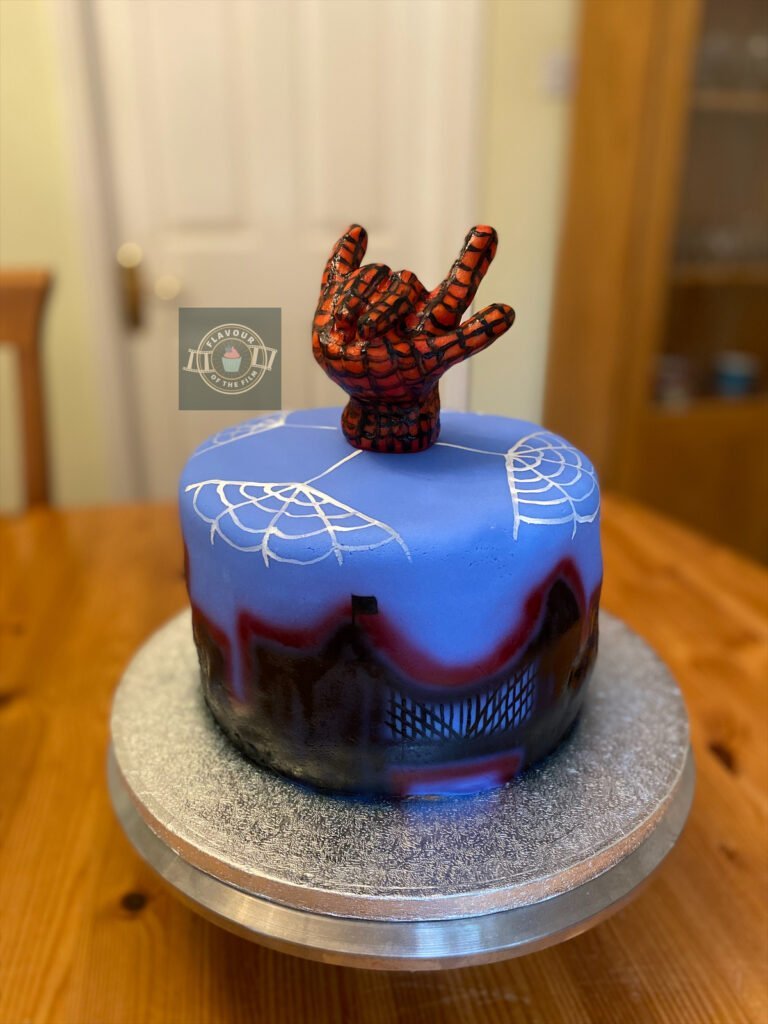
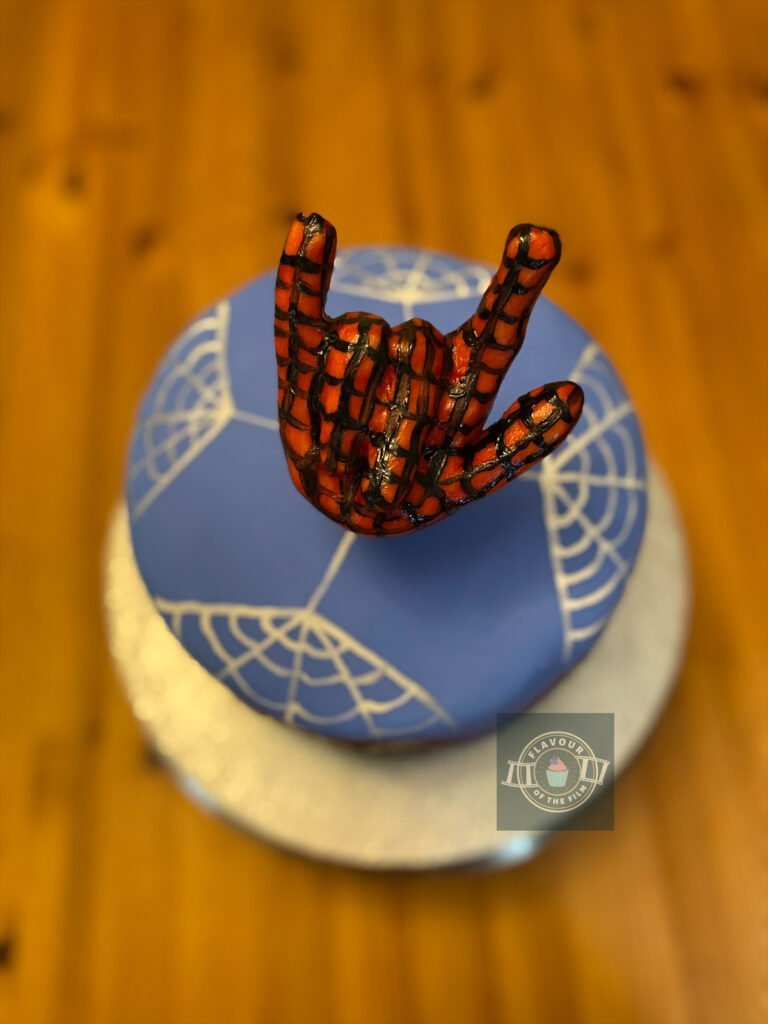
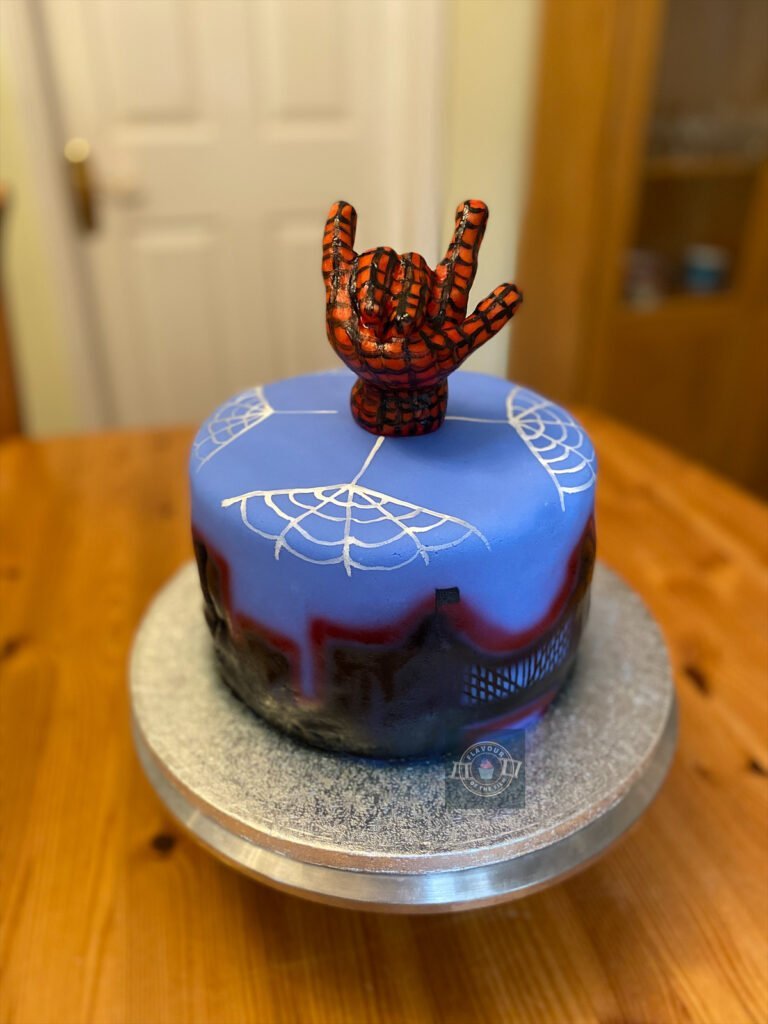
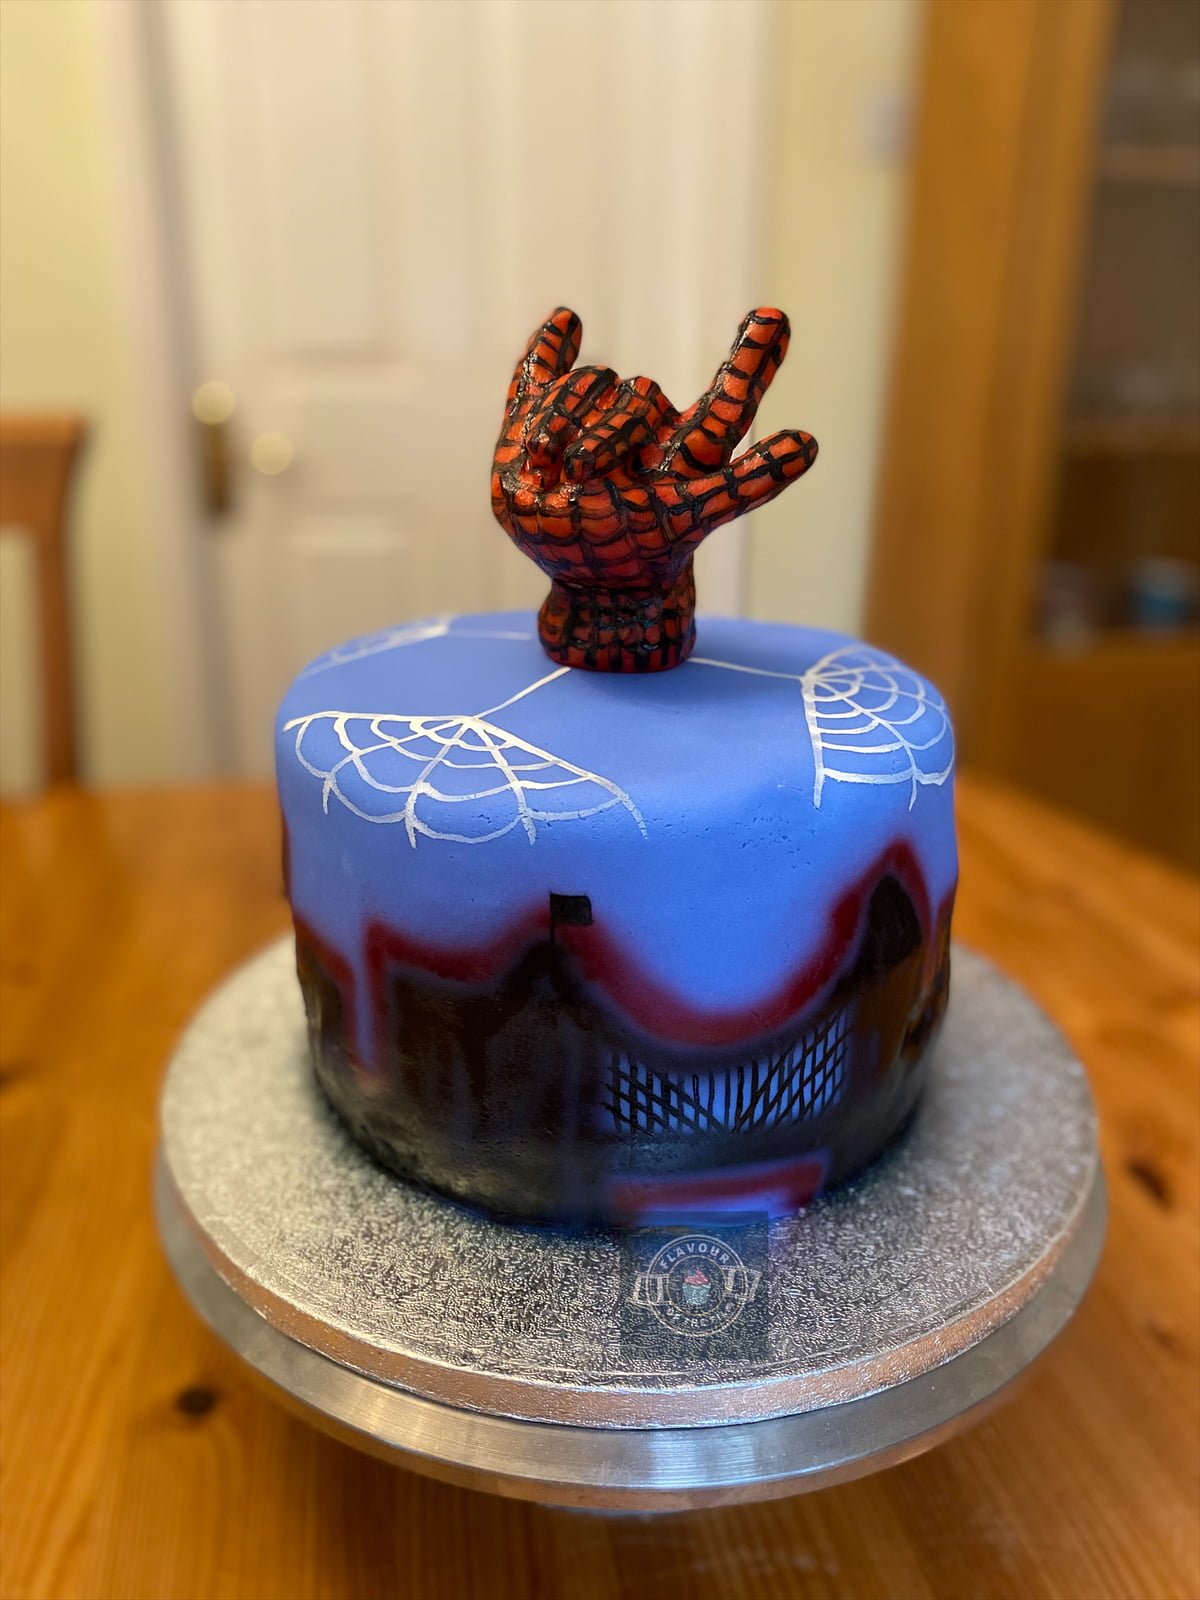
I went with a blue fondant for my Spider-Man cake because the original Spidey suit is blue and red.
When it came to decoration, I genuinely only covered it in fondant icing because I needed to keep it as fresh as possible for the birthday boys receiving it. Most of the time I will do my best to avoid fondant at all costs because I just don’t enjoy working with it. It is fun to paint though, I will say that.
You can leave it at the buttercream and skip out on the fondant if preferred.
I was lucky enough to treat myself to an airbrush kit recently, which I had great fun using on this cake to create a silhouette cityscape of Brooklyn. It gives a really cool graffiti look which is super relevant to Miles Morales in particular. This can just as easily be painted on though!
I did this freehand because I enjoy the flexibility but you can easily create yourself a paper template if desired (either painting or airbrushing).

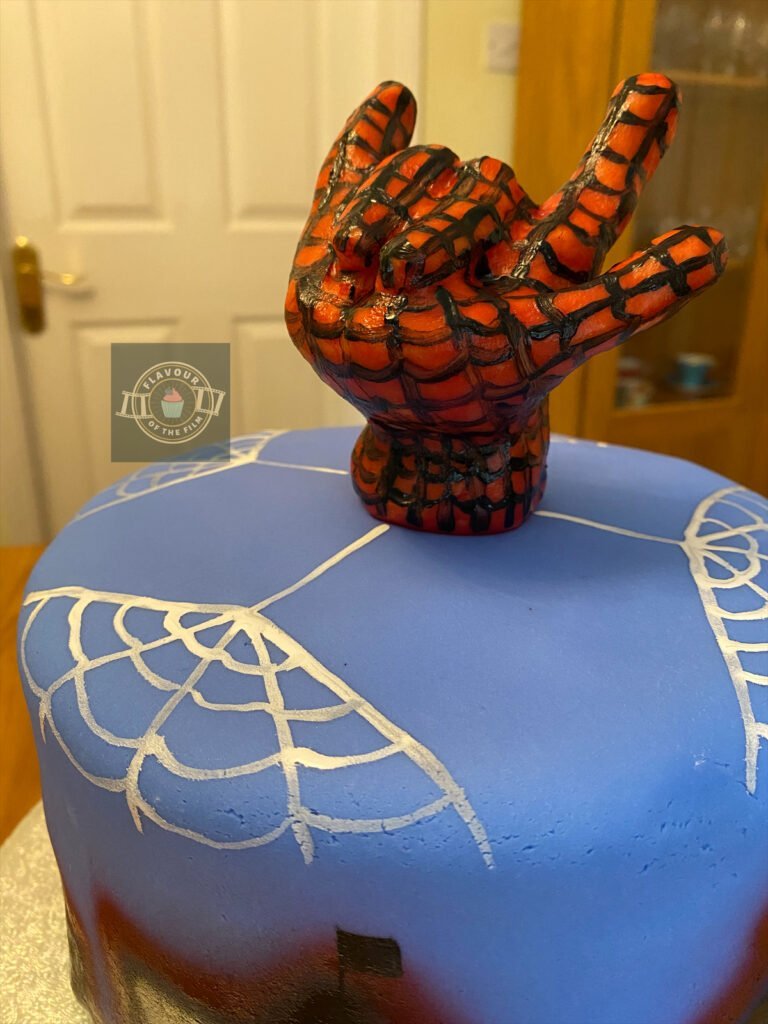
The ‘topper’ element is a Spider-Man hand in the web-shooting position.
I moulded this out of white modelling chocolate because it’s great to paint but you can do the same with red fondant if preferred. Modelling chocolate is a little pricier but it’s a personal preference thing at the end of the day!
I made this Spider-Man inspired cake on a really humid day and found that the modelling chocolate had to be chilled repeatedly just so it could hold shape. This is something to bear in mind when deciding between modelling chocolate or fondant icing: the weather!
I painted the webbing detailing of the hand in black food colouring freehand as it was the easiest way for me, but you can choose how to do this if you have a preferred technique. I also hand-painted webs on in white food colouring around the top of the cake for the final touch.
Key point: always make sure your self-raising flour is in date.
If it’s been open for longer than a few months and has gone past the best before date, you risk your sponges not rising during baking. The more recently-bought the self-raising flour is, the better the rise.
I had a lot of fun making this Spider-Man themed cake and am pleased to report that I received wonderful feedback from those who ate it! I even got to see a picture of the birthday boys calling dibs on the fingers of the modelling chocolate hand topper. Super cute.
Cakes like this often look more difficult to make than they actually are.
I’ve said it before but that’s part of the idea for Flavour of the Film: these celebration bakes look and taste impressive but can be made by any baker at any level.
This particular Spider-Man cake design makes for a wonderful birthday cake but can just as easily be made for any Spider-Man fan for any occasion. Or, no occasion at all. Sometimes an itch to bake a cool cake hits and you gotta scratch. I get it.
Top Tips
- Weigh out your eggs in their shells first, then get as close to the required weight for the base ingredients as possible. Allow for 20g either way. This leads to the fluffiest cake texture!
- Use a high percentage cocoa powder for a deliciously rich chocolate flavour, both in your cake and in the chocolate buttercream.
- To adapt the flavour, feel free to replace the cocoa powder with self-raising flour in equal parts. You can then add 1 – 2 tsp of your favourite extract or flavouring to the sponges and buttercream (same measurement for each). Or, use zest and juice of citrus fruits instead of the extract.
- Chill, chill, chill! Especially the modelling chocolate hand if you are making it during the warmer months.
- Don’t stress if you rip the fondant around the bottom of the cake. You can paint/airbrush over any areas that are less than smooth.
- Get in there with a thin paint brush to really get some detail on the cake. It’s so satisfying!
I hope you have a great time with this recipe and feel extra super once it’s finished and you’re demolishing a slice or two. It’s a deliciously chocolatey Spider-Man cake with a luscious rich buttercream (especially if you use high quality, high cocoa percentage cocoa powder), making it a wonderful addition to any Spider-Man themed party. It also makes for a great movie viewing snack… cake does as it’s soft! No off-putting crunching here.
Happy baking, happy eating!
The Recipe
Ingredients
Spider-Man cake sponges:
- 500g [17.75 oz] unsalted butter room temperature
- 500g [2½ cups] caster sugar
- 500g eggs (about 8 large eggs)
- 425g [2½ cups + 2 tbsp] self-raising flour
- 75g [½ cup + 3 tbsp] high quality cocoa powder
Decoration:
- 150g [5.25 oz] unsalted butter room temperature
- 550g [3¾ cups] icing [confectioners] sugar
- 1 tbsp high quality cocoa powder or 2 rows dark chocolate melted
- 250g [around 8.75 oz] white modelling chocolate or 500g [around 17.75 oz] red fondant icing/sugar paste
- White food colouring
- Black food colouring
- Red food colouring or airbrush colouring (if using an airbrush)
- Black airbrush colouring (if using an airbrush)
- 1kg [around 35.25 oz] blue fondant icing/sugar paste
Serves: 12+
Preparation time: 20 minutes
Chilling time: 15 minutes
Baking time: 40 – 45 minutes
Decorating time: 1 hour
Method
Spider-Man cake:
- Preheat your oven to 180°C [350°F] or 160°C fan. Grease and line three 8 inch (20 cm) cake tins and set aside.
- Weigh out your eggs in their shells and find a weight as near to 500g as possible. For example, my eggs weighed 511g, so I weighed the rest of my ingredients accordingly. Whatever your eggs weigh, match the rest of the ingredients to that weight. Keep the cocoa powder at 75g and simply take 75g from the weight of your flour i.e. eggs weigh 511g so flour will be 511g – 75g cocoa powder = 436g flour.
- Beat together the butter and sugar in a large bowl until light and creamy.
- Add the eggs in one at a time and beat in until fully combined.
- Add the flour and cocoa powder and mix in just until you can no longer see any flour.
- Split the mixture evenly into the three cake tins and bake for 40 – 45 minutes, until a skewer/cocktail stick comes out clean, the surface of the cakes spring back when pressed on gently and there is little to no bubbling/crackling sound when you listen to your sponges.
- Allow the sponges to cool in the tins for around 10 minutes, then transfer to a wire rack upside down to cool completely.
- Whilst your cakes are cooling, start moulding your hand topper.
Construction:
- If using modelling chocolate, be sure to chill every few minutes if it is a particularly warm day. Allow to solidify in the fridge (either fondant or modelling chocolate). It’s easier to mould the hand from the whole piece of chocolate or fondant rather than trying to stick multiple parts of it together!
- Make the buttercream. Beat the butter to loosen it and add half the sugar. Beat well, then add the other half of the sugar. Add the cocoa powder and beat together until light and fluffy. If needed, add 1 tbsp – 2 tbsp of water to bring together the mixture.
- Once the sponges are cool, spread a smear of buttercream on a plate/cake board/cake stand and place the bottom sponge over it. Add a generous helping of buttercream over the top of that sponge, then lay the next one on top. Repeat until all three sponges are stacked. Make sure to stack the top sponge upside down for the flattest surface possible!
- Smother the remaining buttercream over the entire cake for the fondant to stick to. Place your cake in the fridge to chill.
- On a clean surface, sprinkle some icing [confectioners] sugar over the top. Knead your blue fondant a little to soften, then roll it out using a rolling pin, making sure to keep it around 1 inch in thickness to reduce possible tearing. Roll it out as big as you can as it’s better to trim excess off than to try and patch up where the fondant didn’t quite reach.
Decoration:
- Retrieve your cake from the fridge. Roll the fondant over the rolling pin and use this to lay the fondant over the cake. Smooth down with your hands and trim any excess around the bottom with a sharp knife. Try not to pull and stretch it as it will rip easily.
- If necessary, airbrush or paint your hand topper with red food colouring/airbrush colouring and leave to dry in the fridge.
- Either airbrush or paint your Brooklyn cityscape in black across the blue fondant around the cake. Use a small paint brush for detail like the Brooklyn bridge elements.
- Go around the outline of the cityscape with red to give another dimension effect.
- Attach the hand onto the top of the cake using cocktail sticks as dowels.
- Using a small paintbrush, paint the webbing over the top of the cake in white food colouring.
- Using black food colouring and a small paint brush, paint the suit detailing on the hand topper. Leave the cake to set completely in the fridge.
- Remove from the fridge 15 or so minutes before serving for peak cake texture!
This incredibly indulgent super Spider-Man cake will last for around 4 or so days in an airtight container or cake case/box, once the cake has been cut into. It can stay in the fridge overnight before the cake is cut. I especially recommend keeping it in the fridge during the warmer months. Enjoy!
The Films
Originally a comic book character, Spider-Man was created by the superhero legend himself, Stan Lee, alongside artist Steve Ditko. The fact that Stan Lee made numerous cameos in a number of the film adaptations warms my heart. What makes the Spider-Man character so wonderful is how relatable he is: Peter Parker is nerdy, awkward and has the essence of your ‘average Joe’ kind of guy.
After the spider bite, he gets infused with pretty cool superpowers… but under the suit, he’s still that same kind of person that many of us can relate to!
It’s not just Peter Parker either. Miles Morales and the countless versions of the Spider-Man character allow for an even bigger spectrum for audiences to relate to. Spider-Man: Across the Spider-Verse (2023) blew that wide open and it’s one of the many reasons why this new release is SO epic.


As far as casting goes, I think every actor that has portrayed Peter Parker has been great in their own way.
Tobey Maguire was great as the super nerdy and awkward Peter; Andrew Garfield made for a pretty fantastic Spider-Man, and Tom Holland has achieved an excellent balance of both. Shameik Moore as Miles Morales adds a whole new level of the exceptional.
Each of the directors also brought fresh interpretations. Sam Raimi gave us the early noughties trilogy. Marc Webb swung in with two installments of The Amazing Spider-Man (2012 and 2014). Jon Watts brought us the latest trilogy that made space for a cross-dimensional meeting.
Then, the directorial genius of Bob Perischetti, Peter Ramsey and Rodney Rothman brought us the pure artistic joy of Spider-Man: Into the Spider-Verse (2018), and Joaquim Dos Santos, Kemp Powers and Justin K. Thompson followed up with the insanely good Spider-Man: Across the Spider-Verse (2023). Not to mention when Spider-Man joined the Avengers! Man, that was epic.
I can hand-on-heart say that Spider-Man: No Way Home (2021) is one of the best films I have ever seen.
It made me feel exactly how a film on a cinema screen should make a soul feel. SO many emotions were flowing during those 148 minutes.
Who is your favourite Spider-Man? Which Spider-Man film is at the top of your list? Let me know on social media and we can vibe.
Whichever Spider-Man version is your favourite, you know you can relate to them because they make us feel that anyone can be a superhero. Growing up as a nerd meant that bullies were rife, but it also meant that I could see people similar to me represented as superheroes with immense strength and power and will. People with exceptional gifts that are using those gifts for good.
After all, “with great power, comes great responsibility.”
Recipe Card
Spider-Man Cake | Chocolate Celebration Cake
Ingredients
Spider-Man cake:
- 500 g [17.75 oz] unsalted butter room temperature
- 500 g [2½ cups] caster sugar
- 500 g eggs about 8 large eggs
- 425 g [2½ cups + 2 tbsp] self-raising flour
- 75 g [½ cup + 3 tbsp] high quality cocoa powder
Decoration:
- 150 g [5.25 oz] unsalted butter room temperature
- 550 g [3¾ cups] icing [confectioners] sugar
- 1 tbsp high quality cocoa powder or 2 rows dark chocolate melted
- 250 g [around 8.75 oz] white modelling chocolate or 500g [around 17.75 oz] red fondant icing/sugar paste
- White food colouring
- Black food colouring
- Red food colouring or airbrush colouring if using an airbrush
- Black airbrush colouring if using an airbrush
- 1 kg [around 35.25 oz] blue fondant icing/sugar paste
Instructions
- Preheat your oven to 180°C [350°F] or 160°C fan. Grease and line three 8 inch (20 cm) cake tins and set aside.
- Weigh out your eggs in their shells and find a weight as near to 500g as possible. For example, my eggs weighed 511g, so I weighed the rest of my ingredients accordingly. Whatever your eggs weigh, match the rest of the ingredients to that weight. Keep the cocoa powder at 75g and simply take 75g from the weight of your flour i.e. eggs weigh 511g so flour will be 511g – 75g cocoa powder = 436g flour.
- Beat together the butter and sugar in a large bowl until light and creamy.
- Add the eggs in one at a time and beat in until fully combined.
- Add the flour and cocoa powder and mix in just until you can no longer see any flour.
- Split the mixture evenly into the three cake tins and bake for 40 – 45 minutes, until a skewer/cocktail stick comes out clean, the surface of the cakes spring back when pressed on gently and there is little to no bubbling/crackling sound when you listen to your sponges.
- Allow the sponges to cool in the tins for around 10 minutes, then transfer to a wire rack upside down to cool completely.
- Whilst your cakes are cooling, start moulding your hand topper. If using modelling chocolate, be sure to chill every few minutes if it is a particularly warm day. Allow to solidify in the fridge (either fondant or modelling chocolate). It’s easier to mould the hand from the whole piece of chocolate or fondant rather than trying to stick multiple parts of it together!
- Make the buttercream. Beat the butter to loosen it and add half the sugar. Beat well, then add the other half of the sugar. Add the cocoa powder and beat together until light and fluffy. If needed, add 1 tbsp – 2 tbsp of water to bring together the mixture.
- Once the sponges are cool, spread a smear of buttercream on a plate/cake board/cake stand and place the bottom sponge over it. Add a generous helping of buttercream over the top of that sponge, then lay the next one on top. Repeat until all three sponges are stacked. Make sure to stack the top sponge upside down for the flattest surface possible!
- Smother the remaining buttercream over the entire cake for the fondant to stick to. Place your cake in the fridge to chill.
- On a clean surface, sprinkle some icing [confectioners] sugar over the top. Knead your blue fondant a little to soften, then roll it out using a rolling pin, making sure to keep it around 1 inch in thickness to reduce possible tearing. Roll it out as big as you can as it’s better to trim excess off than to try and patch up where the fondant didn’t quite reach.
- Retrieve your cake from the fridge. Roll the fondant over the rolling pin and use this to lay the fondant over the cake. Smooth down with your hands and trim any excess around the bottom with a sharp knife. Try not to pull and stretch it as it will rip easily.
- If necessary, airbrush or paint your hand topper with red food colouring/airbrush colouring and leave to dry in the fridge.
- Either airbrush or paint your Brooklyn cityscape in black across the blue fondant around the cake. Use a small paint brush for detail like the Brooklyn bridge elements.
- Go around the outline of the cityscape with red to give another dimension effect.
- Attach the hand onto the top of the cake using cocktail sticks as dowels.
- Using a small paintbrush, paint the webbing over the top of the cake in white food colouring.
- Using black food colouring and a small paint brush, paint the suit detailing on the hand topper and leave the cake to set completely in the fridge.
- Remove from the fridge 15 or so minutes before serving for peak cake texture!
Notes
© Flavour of the Film. All content and imagery is copyright protected. Please do not use any of my images or written content without prior permission. If you would like to share any of the recipes or images on Flavour of the Film, please link back to the recipe in question and rewrite it in your own words, crediting Flavour of the Film as the original source.
One Comment
Comments are closed.