Lemon and White Chocolate Cake | The Little Mermaid
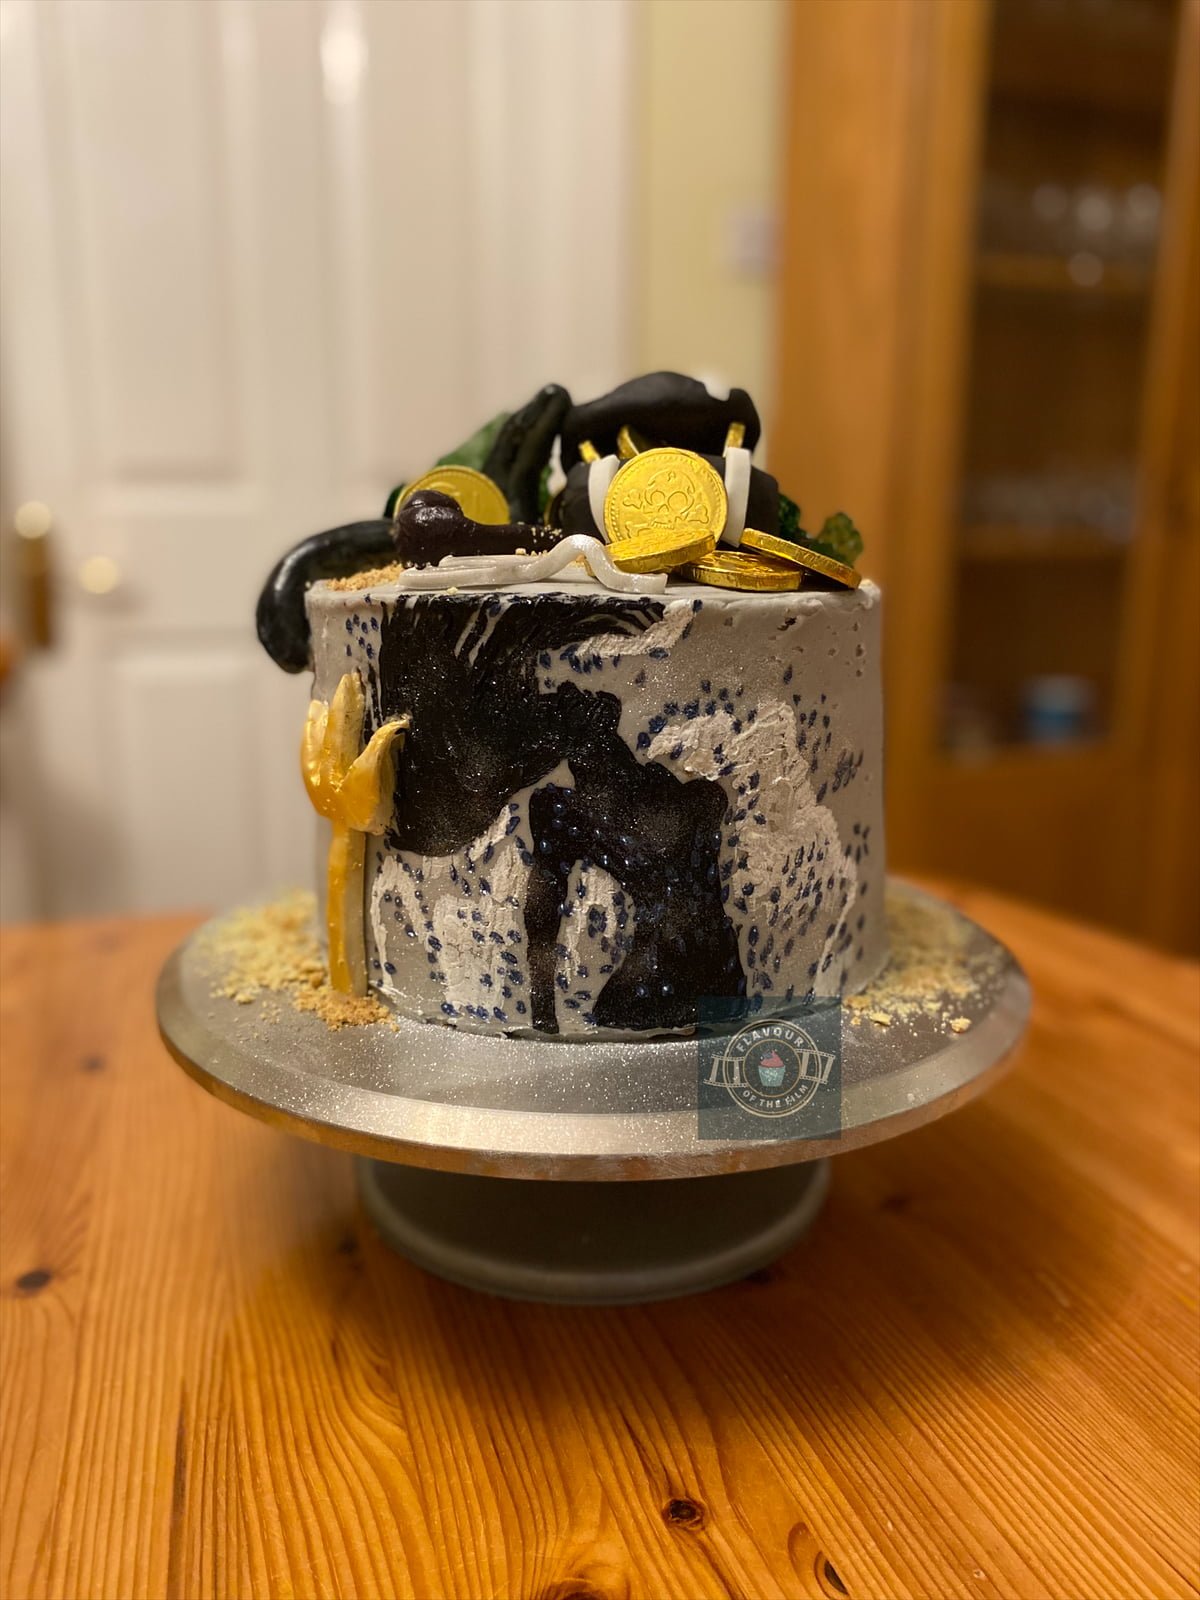
Delectable lemon and white chocolate celebration cake with American buttercream, chocolate coins, fondant decorations and glucose 'seaweed', celebrating Disney's The Little Mermaid (1989).
Ingredients
Lemon and white chocolate cake:
- 450 g [15.75 oz] unsalted butter room temperature
- 450 g [2¼ cups] golden caster sugar
- 450 g eggs about 8 medium
- 450 g [2¾ cups + 1 tbsp] self-raising flour
- Zest of 3 – 4 lemons
Buttercream:
- 400 g [14 oz] unsalted butter room temperature
- 800 g [5½ cups] icing [confectioners] sugar
- 3 rows white chocolate melted
- Lilac food colouring oil based
- Black food colouring oil based
- White food colouring oil based
- Purple food colouring oil based
Decorations:
- White fondant or sugar paste
- Brown fondant or sugar paste
- Silver food colouring oil based
- Gold food colouring oil based
- A plain biscuit i.e. Malted Milk or Nice biscuit
- Liquid glucose
- Green food colouring oil based
- Edible glitter optional
Instructions
- Preheat your oven to 180°C [350°F] or 160°C fan. Grease and line three 8 inch (20cm) cake tins with greaseproof paper/baking parchment. Set aside.
- Weigh out your eggs in their shells and get as close as you can to 450g. Whatever number you achieve (20g either way works), weigh out the rest of your ingredients to this exact number.
- Cream together the butter and sugar until light and fluffy.
- Beat in the eggs one at a time until fully combined.
- Beat in the lemon zest.
- Sieve in the flour and mix in until there is no flour left visible. Try not to overmix!
- Divide the batter equally into the three prepared tins and bake for 30 – 35 minutes.
- Your cakes will be ready when a skewer/cocktail stick comes out clean, the surface of the sponges bounce back when gently pressed on, and you hear little to no crackling/bubbling sound when you listen to them.
- Leave your cakes to cool in the tins for around 10 minutes before transferring upside down to a wire rack to cool completely.
- If making the seaweed, do so now. Turn your oven down to 150°C [300°C] or 130°C fan.
- Line a baking tray with greaseproof paper/baking parchment.
- Squeeze a few big blobs of liquid glucose onto the paper.
- Add a drop of green food colouring into each blob of liquid glucose.
- Place the tray in the oven for 1 hour, until the liquid glucose is completely green and has melted. Avoid opening the door if you want bubbles in your 'seaweed'.
- Once melted, leave to cool and harden.
- While your cakes are cooling and your seaweed is in the oven, prepare your buttercream.
- Melt the white chocolate in a microwavable safe bowl in the microwave in 20 second bursts, stirring in between until fully melted. Set aside.
- Beat the butter to loosen it, then add half of the icing sugar and beat in. Add the rest of the sugar and beat in completely.
- If needed, add a splash of milk to loosen if needed. It needs to be spreadable!
- Add the melted chocolate and beat in until fully combined.
- Add a few drops of the lilac food colouring and beat in until an even colour is achieved. Add more to reach the desired tint if necessary but start with a little!
- Place one sponge on a plate/cake board/cake stand and smother generously with buttercream.
- Lay the second sponge on the top and do the same, then lay the last sponge on the top.
- Smother the entire cake in the remaining buttercream, using a palette knife to smooth it over. If it is a particularly hot day, place the cake in the fridge to chill.
- Mould and paint/airbrush any of the fondant decorations that you are doing i.e. the fork (dinglehopper) and treasure chest.
- Retrieve your cake from the fridge. Crush the biscuit in patches on the cake and around the bottom for the ‘sand’.
- Arrange your fondant decorations on and around the cake. Place on the chocolate coins.
- Using a couple of small paint brushes and the black, purple and white food colourings, paint on the silhouette scene. If using a template, gently hold it up against the cake, being careful not to press it into the buttercream. If using an airbrush, do so now.
- Carefully peel the glucose ‘seaweed’ from the paper and break into shards if needed. Gently push these shards into the cake.
- Finish by spraying the buttercream scene and other elements with edible glitter, if using.
Notes
This tail-flipping lemon and white chocolate cake is so tasty, it’s sure to make you sing out in happiness. It’ll last around 4+ days in a cake stand/case with a lid or airtight container. The sponges can be frozen for up to 3 months. Enjoy!