
I’ve not seen a film with this much anticipation and this much hype in the lead up to its release in… well, I’m not sure I can actually say I remember there being so much build up to a solo film. The marketing campaign alone is something to behold. My Barbie cake is a winner for any Barbie and/or Ken. C’mon Barbie, let’s go party!
Contents
The Bake
I created my Barbie cake recipe well before the film was released, so my entire process was essentially based on the trailers. The general feel I got from the trailers was my main inspiration, alongside some research I did on the decade that the Barbie doll was first released.
The first ever Barbie doll was released in 1959 and, as it turns out, the most popular cake ordered in restaurants across America in this era was the pink champagne cake.
The pink champagne cake is incredibly soft, with champagne baked into the sponge (alcohol baked out, of course) and pink food colouring added to create the beautiful pink hue. Naturally, this was a golden choice as part of my Barbie inspired cake thanks to the pink sponges and fluffy texture!
I adapted this recipe from Lemon Blossom’s pink champagne cake recipe which looked too good not to try. All of the buttercream I made for this two-tier cake is American buttercream, simply because it’s the most simple.
It is important to note that you don’t necessarily need to use champagne in this Barbie cake.
Personally, I’m not a fan of the taste of champagne, so I used a raspberry and blood orange flavoured tonic in its place. You can swap the champagne out for a rose wine or something non-alcoholic as I did. A strawberry or raspberry soda would work well.
Just make sure whatever you choose is carbonated.
All of the alcohol is baked out when the sponges are in the oven so you don’t need to make a decision based on that; it’s more about a preference of flavour.
Once baked, the flavour of whatever drink you choose isn’t overly strong either. Just make sure to choose a drink that is either mostly clear or has a pink colour to it in order to avoid affecting the pink achieved by the food colouring.
On the topic of food colouring, I find that oil based food colouring works best for baking.
It means that the colour mixes far easier and is usually in a dropping bottle, making it easier to add to mixtures. High quality oil based food colouring is also usually very strong and develops over time so you can buy a bottle and it can last a good while.
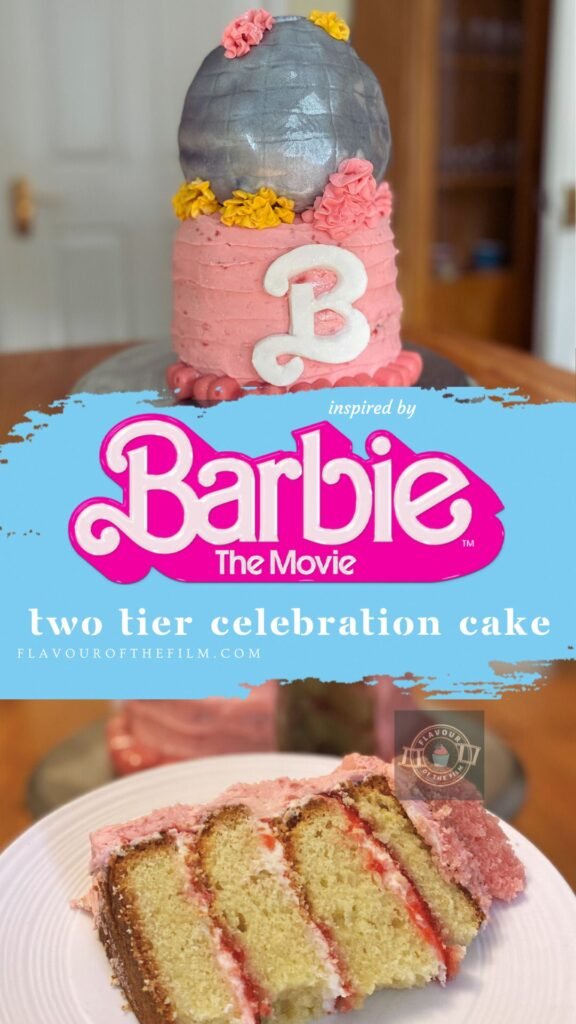
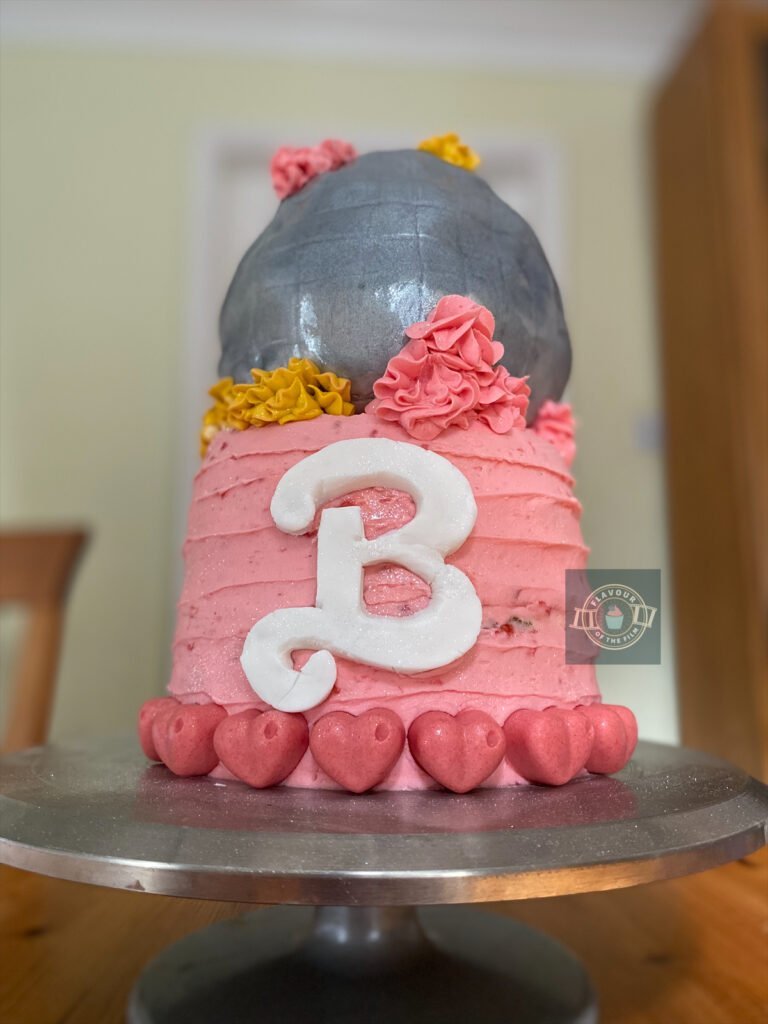
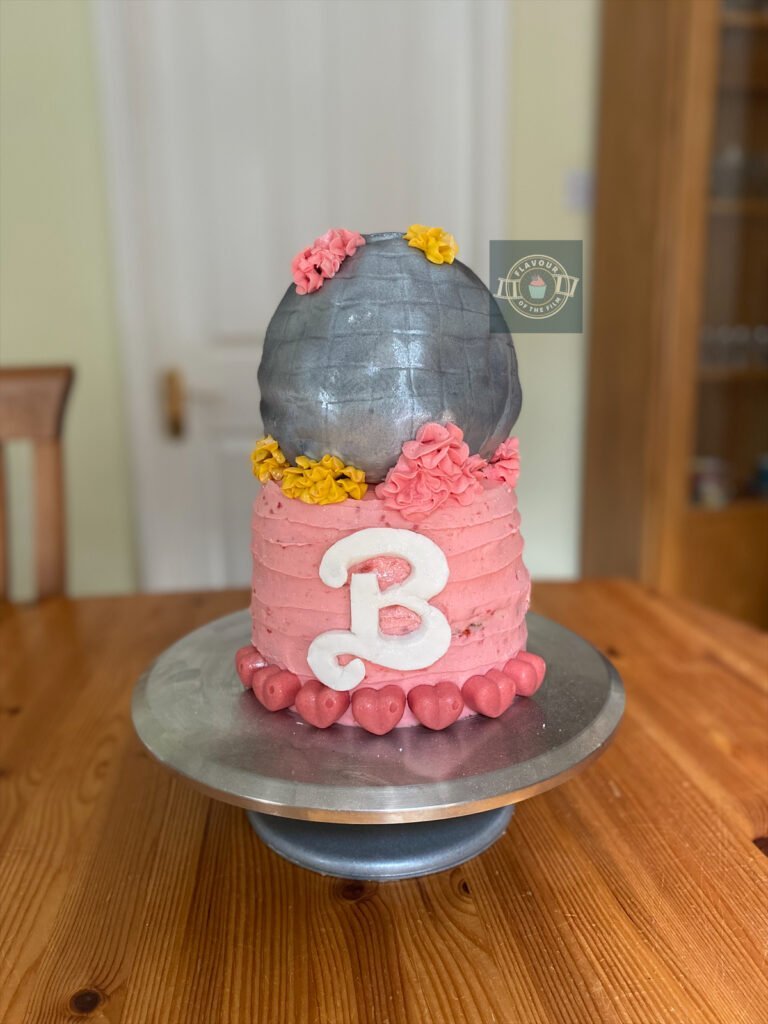
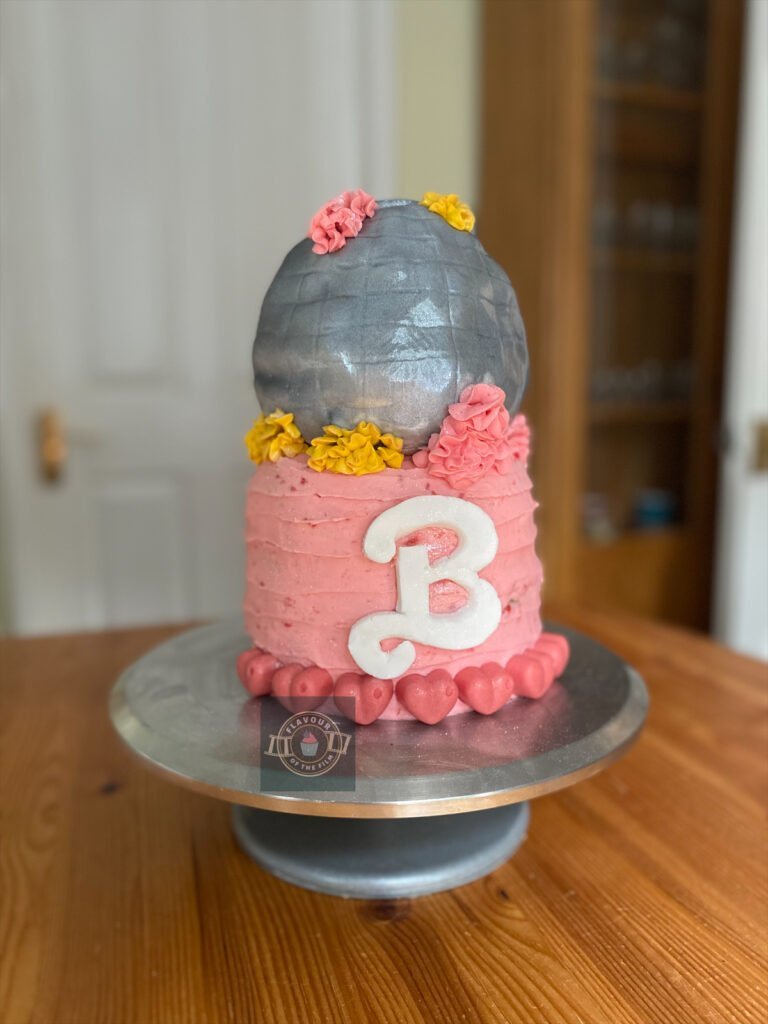
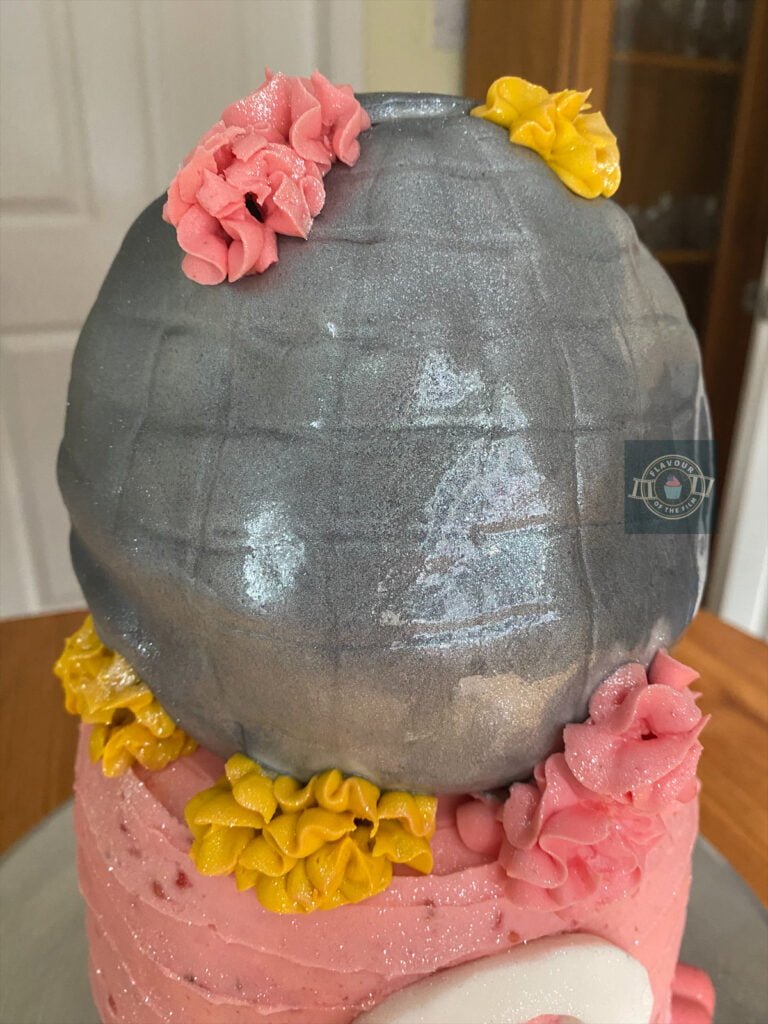
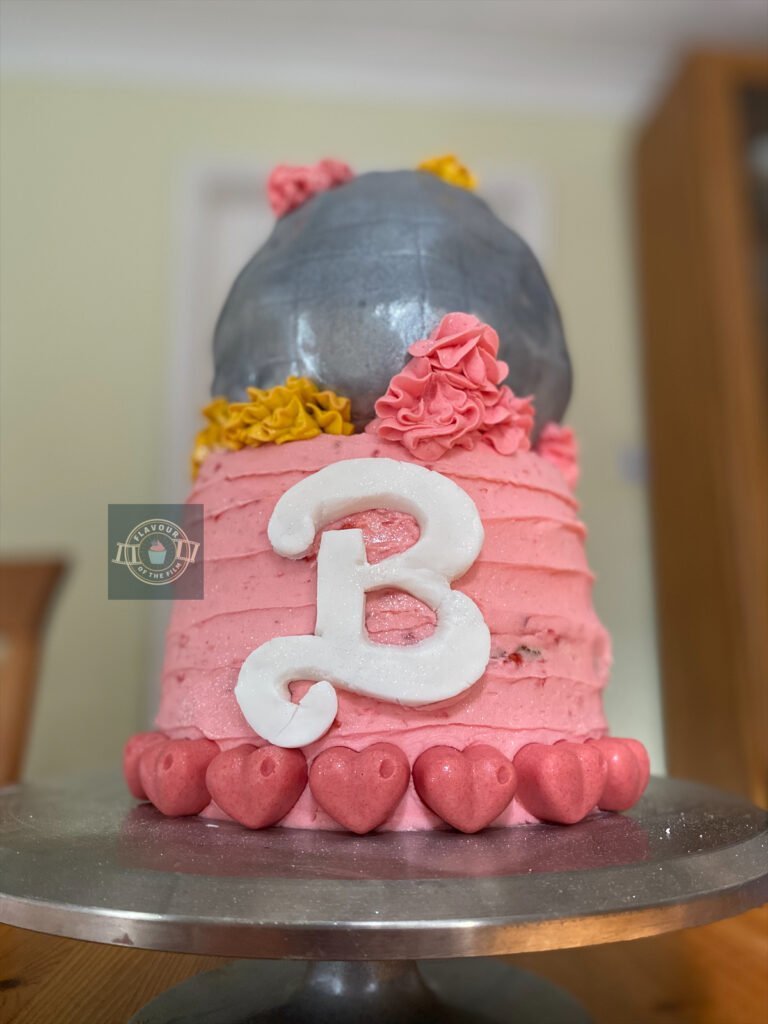
My pink champagne cake became the second tier for my Barbie cake design: the disco ball. I carved this into shape and covered it in buttercream, then white fondant which I then airbrushed with black (from a distance) and silver.
My recipe uses three six-inch cake tins, but if you have six-inch hemisphere cake tins then I highly recommend using these to create a rounder shape for the disco ball.
The mixture in my recipe below should fit just as well as it does in the three six-inch tins I used. It also saves time carving and is easier to cover with fondant, which is worth noting!
You can also use grey fondant instead of white and then spray it with glitter. This may well be easier, particularly if you don’t own an airbrush, nor do you have the time to paint an entire disco ball with silver food colouring.
To achieve the textured look, I gently drew lines into the fondant with a rounded sculpting tool, but you can just as easily achieve this with a chopstick or the rounded end of a kitchen utensil.
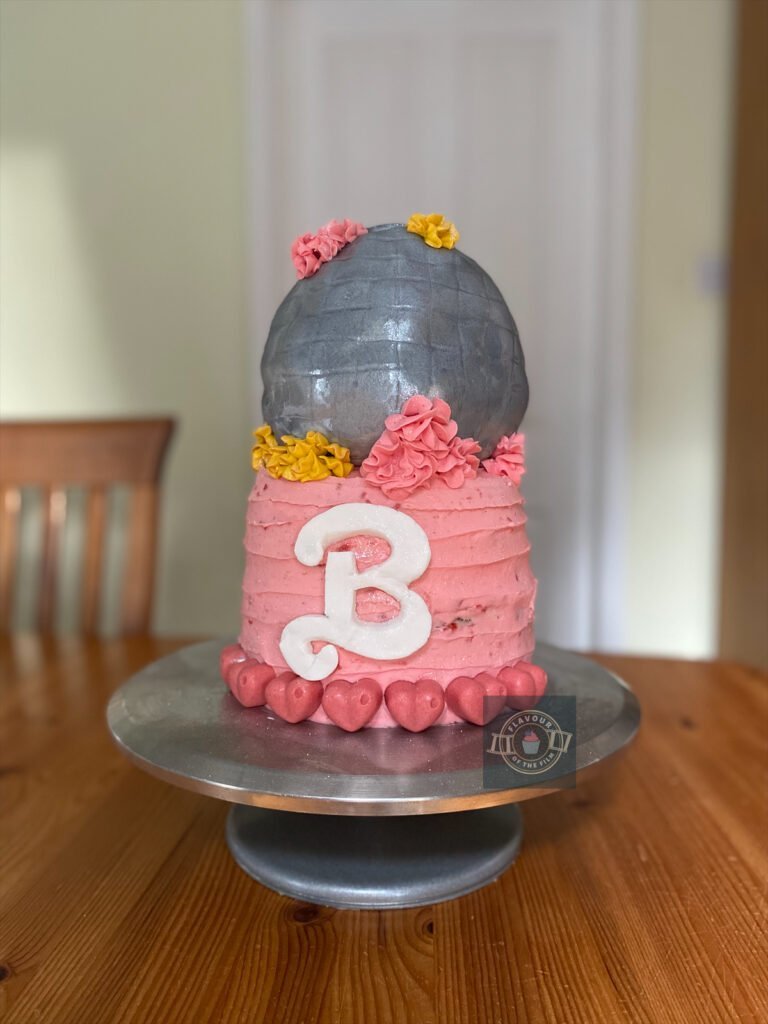
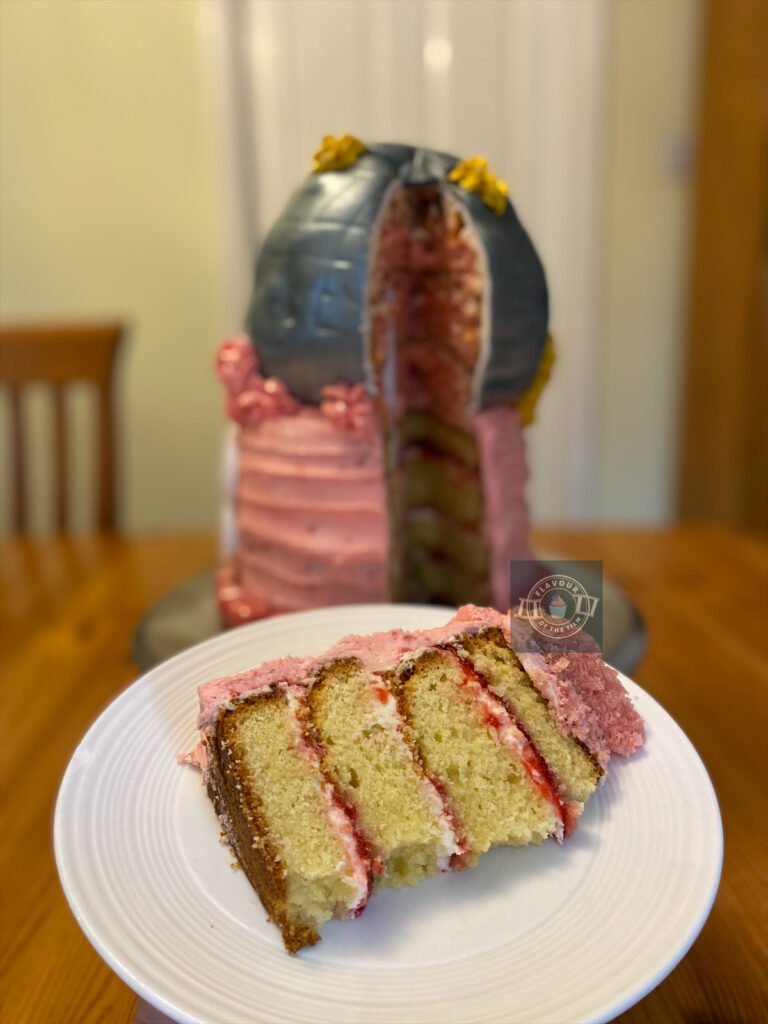
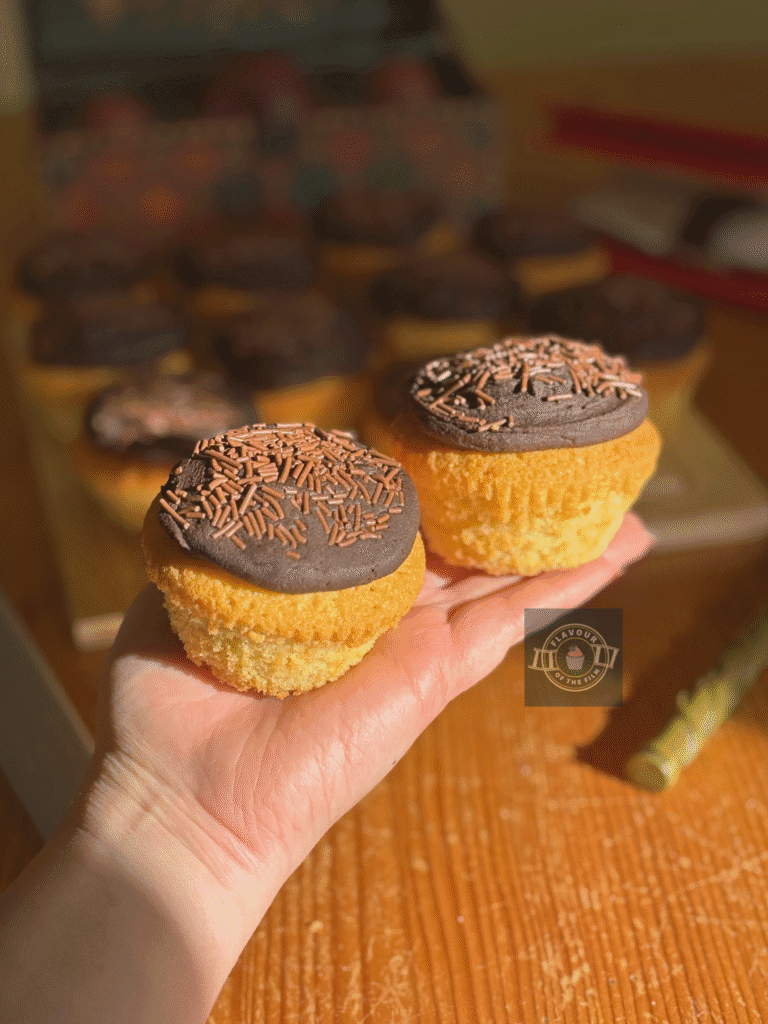
For the base tier of my Barbie cake, I chose a white chocolate and raspberry flavour combination.
This combination is so appropriate colour wise and utterly delicious. I used my own raspberry jam that I had made earlier in the week, which is the same recipe I noted in my cupcakes for The Powerpuff Girls recipe. It’s incredibly easy and quick to make, but if you are particularly short on time then by all means, buy a jar of raspberry jam from the shop.
The white chocolate is in the buttercream and the actual cake sponges are vanilla, so delicate flavours all around. This is a classic sponge cake and is a winner every time.
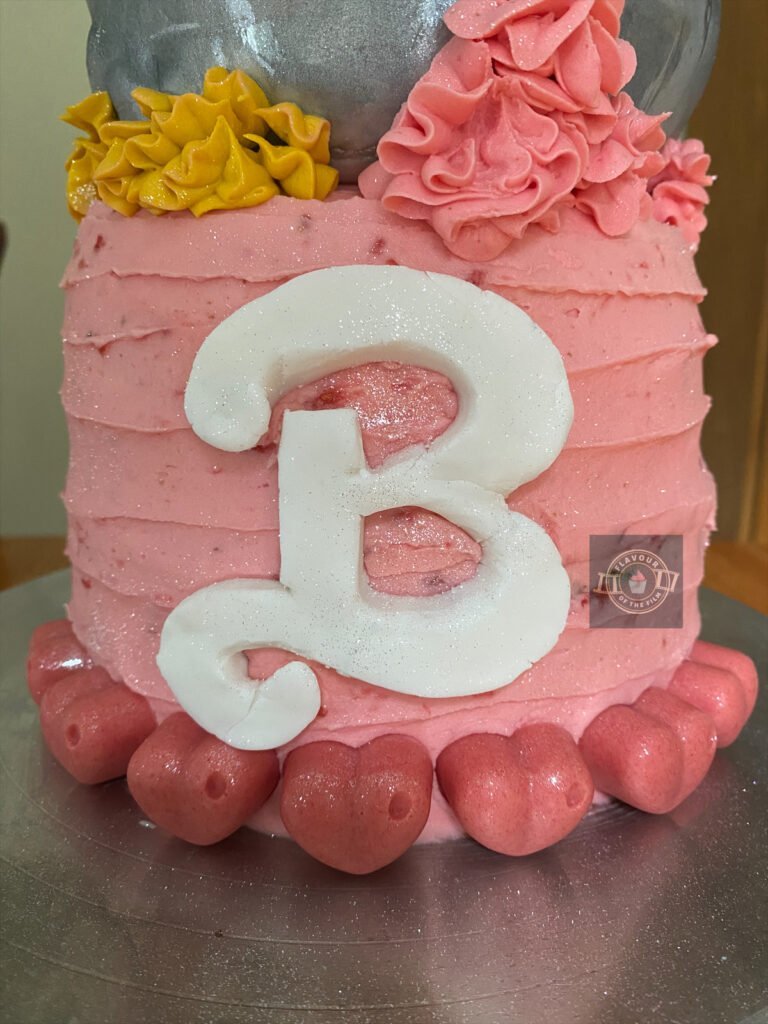
I coloured the buttercream pink (obviously) and allowed the jam between the layers to seep through to create a wonderful texture. That iconic Barbie ‘B’ was perfect for my Barbie birthday cake. It is cut out from white sugar paste, which I did free hand whilst using a poster from the film as a guide. By all means use a template here if necessary!

The pink hearts around the bottom are solid white chocolate that I tempered in the microwave and then tinted pink.
I happened to have a tray of heart-shaped moulds that had been given to me as part of a present, so it made sense to use them in my Barbie cake design.
You can easily get a hold of heart-shaped moulds from any online store and they aren’t expensive. They’re so cute so it’s worth getting one! My tray mould is made of silicone, which I recommend as it makes getting the hearts out much easier.
To finish the cake, I piped leftover buttercream in both Barbie pink and Barbie yellow in various places. I then sprayed the entire cake with edible silver glitter. It gives it that extra special Barbie-at-a-disco feel.
Plus… I love glitter.
Top Tips
- As always, try not to over mix the cake batters. You want that light, fluffy texture.
- It’s important to have dowels in this cake for extra support. I placed three in the centre of the base cake and sat the disco ball layer over them so that the dowels pierced through the disco ball tier and held it in place. It also means that the base cake isn’t weighed down as much by the top tier as the dowels help to distribute the weight more. Again, dowels are easily accessible and aren’t overly expensive.
- When carving the top tier, take off a little at a time using a sharp knife. Build the shape slowly. You can keep taking cake off, but it’s harder to glue the cake back on! Even with the help of buttercream.
- If the fondant rips or stretches, don’t stress. You can cover any marks with the rosettes of buttercream at the end.
- Chill as frequently as you can. After the crumb coats, after full layers of buttercream etc. This is especially important when making this cake in the warmer months.
- Don’t feel like you need to make the buttercream super smooth. That’s not the point – texture is great! Especially when jam is involved.
This Barbie cake is one that I am particularly proud of. It’s SO much fun to make and tastes absolutely incredible. It’s got the right vibe for the Barbie film and I loved making – and eating – it. It makes a great addition to any Barbie themed party. I hope you enjoy both Barbie the film and my Barbie inspired cake!
Happy baking, happy eating!
The Recipe
Ingredients
Barbie cake base:
- 300g [10.5 oz] unsalted butter
- 300g [1½ cups] caster sugar
- 300g eggs
- 300g [1¾ cups + 2 tbsp] self-raising flour
- 1 tsp vanilla extract
Base cake decoration:
- 250g [8.75 oz] unsalted butter
- 650g [4¼ cups + 3 tbsp] icing [confectioners] sugar
- 50g [1.75 oz] white chocolate melted
- 6 tbsp raspberry or strawberry jam
- Pink food colouring (oil based)
Barbie disco ball cake:
- 170g [6 oz] unsalted butter
- 325g [1½ cups] granulated sugar
- 5 large egg whites
- 360g [2¼ cups] plain flour
- 2 ½ tsp baking powder (check that it’s in date!)
- Pinch of salt
- 250ml [about 8.75 oz] champagne / sparkling rose wine / pink-coloured soda drink
- Pink food colouring (oil based)
Disco ball decoration:
- 130g [4.5 oz] unsalted butter
- 350g [2¼ cups + 2 tbsp] icing [confectioners] sugar
- 1 tsp vanilla extract
- 500g [at least 17.75 oz] white or grey fondant icing
- Black and silver airbrush colours if using an airbrush
Other decoration:
- 150g [5.25 oz] white chocolate
- Pink food colouring (oil based)
- Yellow food colouring (or colour of your choice – oil based)
- White sugarpaste/fondant icing for the ‘B’
- Edible silver glitter
Serves: 12 +
Preparation time: 40 minutes
Baking time: 1 hour 40 minutes total
Decorating time: 1 – 2 hours
Method
Chocolate hearts:
- Start with the white chocolate hearts so that they have time to set. Put ⅔ of the chocolate in a microwavable bowl and microwave in 20 second bursts, stirring in between each burst until melted.
- Add the remaining chocolate and stir in until melted.
- Put the chocolate back in the microwave for 10 seconds then stir again.
- Add the pink food colouring and stir in well.
- Pour the chocolate into your heart-shape moulds and allow to set fully in the freezer or fridge (depending on the material of your mould tray).
Disco ball cake:
- Next, make your pink champagne cake. Preheat your oven to 180°C [350°F] or 160°C fan. Grease and line 3 deep 6 inch cake tins or 2 6 inch hemisphere tins with baking parchment/greaseproof paper.
- Cream together the butter and sugar in a large mixing bowl.
- Separate one egg so that the white is in a small bowl and the yolk is in another. Add the white to your butter and sugar. Repeat this with all 5 eggs just in case the yolk spills into the white. This way you avoid getting yolk in all of the egg whites. Keep the yolks for another dish or bake.
- Beat in the egg whites until light and fluffy. Add the vanilla and beat until fully incorporated.
- Add half of the flour with the baking powder and salt into your mix and beat gently until combined.
- Add half of the carbonated drink you are using and beat in until fully incorporated.
- Pour in the other half of the flour and beat again.
- Add the rest of the carbonated drink and beat until fully combined.
- Add a few drops of the pink food colouring and beat until the entire mixture is pink. If more food colouring is necessary for a deeper pink, add a few more drops and mix again until the mixture is an even colour.
- Split the mixture evenly across the 3 tins or 2 hemisphere tins and bake for 30 – 35 minutes. If baking in hemisphere tins, this may take a little longer so check after 35 minutes.
- Your cakes will be ready when a skewer comes out clean, the surface of the sponge bounces back when pressed on gently and there is barely to no crackling/bubbling sound when you listen to your sponges.
- Leave to cool in the tins for 10 minutes before transferring to a wire rack upside down to cool fully.
- Whilst your pink champagne cakes are cooling, prepare your base cake.
Barbie base cake:
- If making the jam yourself, do so now using my cupcakes for The Powerpuff Girls recipe (linked above). Otherwise, make sure that your shop bought jam is accounted for.
- Set your oven to 170°C [325°F] or 160°C fan. Grease and line either 2 (and you can cut the sponges in half for 4 layers) or all 3 deep 6 inch tins again and set aside.
- Weigh your eggs in their shells and get as close to 300g as possible. Whatever weight your eggs are, the rest of your ingredients should be weighed out to that exact number. A little over 300g is better than a little under.
- Cream together the butter and sugar until light and fluffy.
- Add the eggs one at a time, beating in between until fully incorporated.
- Add the vanilla and beat in well.
- Sieve in the flour and mix until the flour is no longer visible.
- Split the mixture evenly across the 2 or 3 tins and bake. If baking 2 thick sponges, bake for 45 – 50 minutes. If baking 3 sponges, bake for 30 – 35 minutes.
- Your cakes will be ready when a skewer comes out clean, the surface of the sponge bounces back when pressed on gently and there is barely or no crackling/bubbling sound when you listen to your sponges.
- Once baked, leave to cool in the tins for 10 minutes before transferring to a wire rack upside down to cool fully.
- Time to decorate your disco ball!
Disco ball decoration:
- Cream together the butter and icing sugar. Add the vanilla and beat again. If a little stiff, add a splash of milk or water and beat until smooth.
- Place one pink layer on a chopping board and smother the top in buttercream. Repeat with the next two layers until your cake is fully stacked. Do the same if you have used the hemisphere tins: just be sure your cake is well balanced!
- Using the rest of the buttercream, smother a crumb coat over the entire cake. If it is particularly warm weather, chill the cake for 10 minutes in the fridge.
- If needing to carve the cake: using a small serrated knife, gently carve away the edges until you have achieved a relatively round shape. This cake is delicate so take your time and be gentle with it. Take a little off at time.
- When ready, roll out the fondant icing and lay over your disco ball, tucking the edges underneath. Don’t worry if you have creases! Flatten them as much as you can – you’ll be able to cover any of them with leftover buttercream.
- Using a rounded utensil or sculpting tool, gently draw in the lines down and then across to resemble the texture of a disco ball.
- If using an airbrush, spray with the black colouring from a distance so the colour you achieve is more of a light grey. Then spray with the silver and then the edible glitter.
- If the cake is covered in grey fondant, spray with as much edible glitter as you can!
- Begin building your base cake decoration.
Base cake decoration:
- Melt the white chocolate in the microwave. Do this in 20 second bursts, stirring in between until melted.
- Allow the chocolate to cool whilst you make the buttercream.
- Cream together the butter and sugar until smooth. Add in the cooled melted chocolate and beat in until combined.
- If cutting the 2 sponges in half, do so now. Use a large serrated knife and gently saw through each sponge, rotating the sponge around the knife rather than the knife around the sponge. Otherwise, begin building your cake with 3 sponges.
- Place the first sponge on a plate/cake board/cake stand and apply the buttercream generously over the top. On the underneath of the next layer, spread over a generous amount of jam, then place on the top of the bottom layer.
- Repeat this until all of your layers are stacked.
- Spoon a small amount of buttercream into a bowl and mix in the yellow food colouring. Set aside.
- Add a few drops of pink food colouring to the remaining buttercream and beat in until evenly coloured. Add more pink if needed then beat again.
- Spread generously over the entire cake, allowing the jam to seep out over the edges to create a texture if preferred. Leave a small amount of buttercream for piping decoration later.
- Smooth over the buttercream on the cake using a palette knife and use the tip of the knife to create a pattern.
- Chill in the fridge while you make that iconic ‘B’.
- Roll out the white sugarpaste a little, making sure it is still relatively thick.
- Using a small sharp knife, carve out the ‘B’. Use a paper template here if needed. Set aside.
Construction:
- Retrieve the cakes from the fridge. Push in 3 or 4 thick dowels into the base cake, leaving at least two inches poking out of the top of the cake.
- Lift the disco ball by placing your hands underneath the cake, avoiding touching the fondant around the outside.
- Sit the disco ball cake evenly over the base cake, making sure that the cake is as central as possible and that the dowels pierce the disco ball, holding it in place.
- Press the white chocolate hearts around the base of the cake and the ‘B’ in the centre of the front of the base cake.
- Using a piping bag or sandwich bag with a fun piping tip attached, pipe the remaining pink buttercream in swirls in various places on the cake. Do the same for the yellow (or whatever colour you chose) buttercream.
- Finish by spraying the entire cake with the edible glitter.
- Appreciate your masterpiece!
This delectable, fun-filled, two-tiered Barbie cake will last for around 4 days if covered or in an airtight container (aluminium foil works if you don’t have a big enough cake case!). Trust me when I say it won’t last that long, though. Keep in the fridge if it is warm/humid. Enjoy!
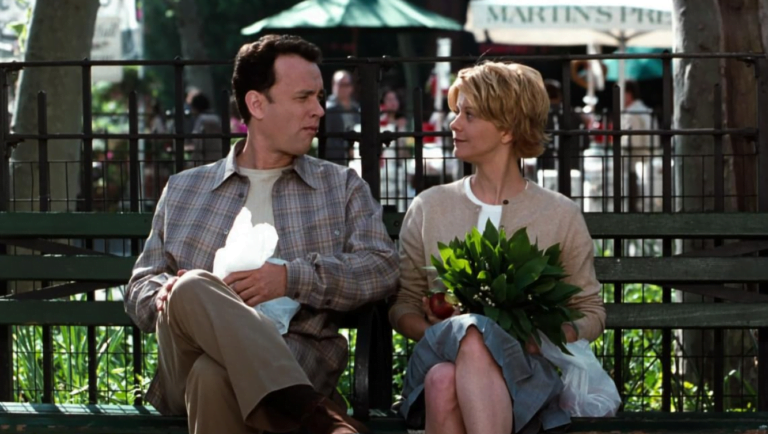
The Film
I am literally writing this section of the post having just got back from seeing Barbie (2023) in the cinema. What a RIDE. I was expecting an emotional element to it but this film has so much depth that I wasn’t anticipating! The tears were building, let me tell you.
I’m just glad I didn’t leave the cinema feeling disappointed. Greta Gerwig is one of my top five favourite directors so I went in with a certain level of hope. She did Barbie and Ken in all their glorious forms justice, and some.
The plot of the film begins with a brief history of the famous Mattel doll and the progression of Barbie as a figure (and toy), as narrated by the queen herself, Dame Helen Mirren. We then begin to see the cracks in Stereotypical Barbie, played exquisitely by Margot Robbie. She starts to ‘malfunction’, as it were, and is advised by some of the other Barbies to pay a visit to Weird Barbie.
Who else here had a Weird Barbie? Hands up. I definitely did.
Anyway, Weird Barbie provides an insight into why Stereotypical Barbie is suddenly having trouble being her usual, perfect self. It’s off to the real world that Stereotypical Barbie goes, in order to find the upset child that is playing with her and fix the rift before she can return Barbie Land – and herself – back to ‘perfection’. With Ken along for the ride, of course.

I have to say it… this cast is something else.
The Barbies! The Kens! The Mattel people! The cameos! AMERICA FERRERA! Yes, America deserves her name in all caps. What a performance.
What I loved most about this film is the depth of emotion it brought despite the actual subject being… well, made of plastic. It could have been all surface level, solely about the dolls and Barbie Land. Which, in all fairness, could have made a pretty good comedy. But this is SO much better because of its emotional intelligence.
There is purpose to the story. Awareness. Emotion. Heart. A range of perspectives.
I thoroughly enjoyed it. Plus, the soundtrack is great, too. It has a much deeper meaning to it than you may expect from a live action film about a famous toy doll. Excuse me, an iconic toy doll.
Oh, and don’t even get me started on the costumes and the colour scheme! Unreal. Literally.
I’ve got to mention the Kens. Each and every Ken deserves to be recognised just as much as the Barbies, and vice versa, and I’m here for it. An equal collective.
I won’t say anymore because I don’t want to potentially influence anyone’s reading or interpretation of the film.
What I will say is that there is far more emotional depth and meaning beyond the bright colours and dreamy vibes. Barbie has LAYERS.
It has to be up there with my favourite Barbie films, alongside Barbie as Rapunzel (2002), Barbie Swan Lake (2003) and Barbie as The Princess and the Pauper (2004). Hit me up on socials if you grew up with these classics!
If you haven’t seen Barbie then I hope you love it when you do get the chance. It’s definitely a film for everyone and has some proper funny moments in it. The production value is outstanding too. Thus, a film with outstanding production value deserves a celebratory cake that is larger than life, too.
Recipe Card

Barbie Cake Design | Two Tiered Celebration Cake
Ingredients
Base cake:
- 300 g [10.5 oz] unsalted butter
- 300 g [1½ cups] caster sugar
- 300 g eggs
- 300 g [1¾ cups + 2 tbsp] self-raising flour
- 1 tsp vanilla extract
Base cake decoration:
- 250 g [8.75 oz] unsalted butter
- 650 g [4¼ cups + 3 tbsp] icing [confectioners] sugar
- 50 g white chocolate melted
- 6 tbsp raspberry or strawberry jam
- Pink food colouring oil based
Disco ball cake:
- 170 g [6 oz] unsalted butter
- 325 g [1½ cups] granulated sugar
- 5 large egg whites
- 360 g [2¼ cups] plain flour
- 2 ½ tsp baking powder check that it’s in date!
- Pinch of salt
- 250 ml [about 8.75 oz] champagne / sparkling rose wine / pink-coloured soda drink
- Pink food colouring oil based
Disco ball decoration:
- 130 g [4.5 oz] unsalted butter
- 350 g [2¼ cups + 2 tbsp] icing [confectioners] sugar
- 1 tsp vanilla extract
- 500 g [at least 17.75 oz] white or grey fondant icing
- Black and silver airbrush colours if using an airbrush
Other decoration:
- 150 g [5.25 oz] white chocolate
- Pink food colouring oil based
- Yellow food colouring or colour of your choice – oil based
- White sugarpaste/fondant icing for the ‘B’
- Edible silver glitter
Instructions
- Start with the white chocolate hearts so that they have time to set. Put ⅔ of the chocolate in a microwavable bowl and microwave in 20 second bursts, stirring in between each burst until melted.
- Add the remaining chocolate and stir in until melted.
- Put the chocolate back in the microwave for 10 seconds then stir again.
- Add the pink food colouring and stir in well.
- Pour the chocolate into your heart-shape moulds and allow to set fully in the freezer or fridge (depending on the material of your mould tray).
- Next, make your pink champagne cake. Preheat your oven to 180°C [350°F] or 160°C fan. Grease and line 3 deep 6 inch cake tins or 2 6 inch hemisphere tins with baking parchment/greaseproof paper.
- Cream together the butter and sugar in a large mixing bowl.
- Separate one egg so that the white is in a small bowl and the yolk is in another. Add the white to your butter and sugar. Repeat this with all 5 eggs just in case the yolk spills into the white. This way you avoid getting yolk in all of the egg whites. Keep the yolks for another dish or bake.
- Beat in the egg whites until light and fluffy. Add the vanilla and beat until fully incorporated.
- Add half of the flour with the baking powder and salt into your mix and beat gently until combined.
- Add half of the carbonated drink you are using and beat in until fully incorporated.
- Pour in the other half of the flour and beat again.
- Add the rest of the carbonated drink and beat until fully combined.
- Add a few drops of the pink food colouring and beat until the entire mixture is pink. If more food colouring is necessary for a deeper pink, add a few more drops and mix again until the mixture is an even colour.
- Split the mixture evenly across the 3 tins or 2 hemisphere tins and bake for 30 – 35 minutes. If baking in hemisphere tins, this may take a little longer so check after 35 minutes.
- Your cakes will be ready when a skewer comes out clean, the surface of the sponge bounces back when pressed on gently and there is barely to no crackling/bubbling sound when you listen to your sponges.
- Leave to cool in the tins for 10 minutes before transferring to a wire rack upside down to cool fully.
- Whilst the pink champagne cake sponges are cooling, prepare your base cake.
- If making the jam yourself, do so now using my cupcakes for The Powerpuff Girls recipe. Otherwise, make sure that your shop bought jam is accounted for.
- Set your oven to 170°C [325°F] or 160°C fan. Grease and line either 2 (and you can cut the sponges in half for 4 layers) or all 3 deep 6 inch tins again and set aside.
- Weigh your eggs in their shells and get as close to 300g as possible. Whatever weight your eggs are, the rest of your ingredients should be weighed out to that exact number. A little over 300g is better than a little under.
- Cream together the butter and sugar until light and fluffy.
- Add the eggs one at a time, beating in between until fully incorporated.
- Add the vanilla and beat in well.
- Sieve in the flour and mix until the flour is no longer visible.
- Split the mixture evenly across the 2 or 3 tins and bake. If baking 2 thick sponges, bake for 45 – 50 minutes. If baking 3 sponges, bake for 30 – 35 minutes.
- Your cakes will be ready when a skewer comes out clean, the surface of the sponge bounces back when pressed on gently and there is barely or no crackling/bubbling sound when you listen to your sponges.
- Once baked, leave to cool in the tins for 10 minutes before transferring to a wire rack upside down to cool fully.
- Time to decorate your disco ball!
- Cream together the butter and icing sugar. Add the vanilla and beat again. If a little stiff, add a splash of milk or water and beat until smooth.
- Place one pink layer on a chopping board and smother the top in buttercream. Repeat with the next two layers until your cake is fully stacked. Do the same if you have used the hemisphere tins: just be sure your cake is well balanced!
- Using the rest of the buttercream, smother a crumb coat over the entire cake. If it is particularly warm weather, chill the cake for 10 minutes in the fridge.
- If needing to carve the cake: using a small serrated knife, gently carve away the edges until you have achieved a relatively round shape. This cake is delicate so take your time and be gentle with it. Take a little off at time.
- When ready, roll out the fondant icing and lay over your disco ball, tucking the edges underneath. Don’t worry if you have creases! Flatten them as much as you can – you’ll be able to cover any of them with leftover buttercream.
- Using a rounded utensil or sculpting tool, gently draw in the lines down and then across to resemble the texture of a disco ball.
- If using an airbrush, spray with the black colouring from a distance so the colour you achieve is more of a light grey. Then spray with the silver and then the edible glitter.
- If the cake is covered in grey fondant, spray with as much edible glitter as you can!
- Set the disco ball cake in the fridge and begin building your base cake.
- Melt the white chocolate in the microwave. Do this in 20 second bursts, stirring in between until melted.
- Allow the chocolate to cool whilst you make the buttercream.
- Cream together the butter and sugar until smooth. Add in the cooled melted chocolate and beat in until combined.
- If cutting the 2 sponges in half, do so now. Use a large serrated knife and gently saw through each sponge, rotating the sponge around the knife rather than the knife around the sponge. Otherwise, begin building your cake with 3 sponges.
- Place the first sponge on a plate/cake board/cake stand and apply the buttercream generously over the top. On the underneath of the next layer, spread over a generous amount of jam, then place on the top of the bottom layer.
- Repeat this until all of your layers are stacked.
- Spoon a small amount of buttercream into a bowl and mix in the yellow food colouring. Set aside.
- Add a few drops of pink food colouring to the remaining buttercream and beat in until evenly coloured. Add more pink if needed then beat again.
- Spread generously over the entire cake, allowing the jam to seep out over the edges to create a texture if preferred. Leave a small amount of buttercream for piping decoration later.
- Smooth over the buttercream on the cake using a palette knife and use the tip of the knife to create a pattern.
- Chill in the fridge while you make that iconic ‘B’.
- Roll out the white sugarpaste a little, making sure it is still relatively thick.
- Using a small sharp knife, carve out the ‘B’. Use a paper template here if needed. Set aside.
- Retrieve the cakes from the fridge. Push in 3 or 4 thick dowels into the base cake, leaving at least two inches poking out of the top of the cake.
- Lift the disco ball by placing your hands underneath the cake, avoiding touching the fondant around the outside.
- Sit the disco ball cake evenly over the base cake, making sure that the cake is as central as possible and that the dowels pierce the disco ball, holding it in place.
- Press the white chocolate hearts around the base of the cake and the ‘B’ in the centre of the front of the base cake.
- Using a piping bag or sandwich bag with a fun piping tip attached, pipe the remaining pink buttercream in swirls in various places on the cake. Do the same for the yellow (or whatever colour you chose) buttercream.
- Finish by spraying the entire cake with the edible glitter.
- Appreciate your masterpiece!
Notes
© Flavour of the Film. All content and imagery is copyright protected. Please do not use any of my images or written content without prior permission. If you would like to share any of the recipes or images on Flavour of the Film, please link back to the recipe in question and rewrite it in your own words, crediting Flavour of the Film as the original source.

3 Comments
Comments are closed.