Barbie Cake Design | Two Tiered Celebration Cake
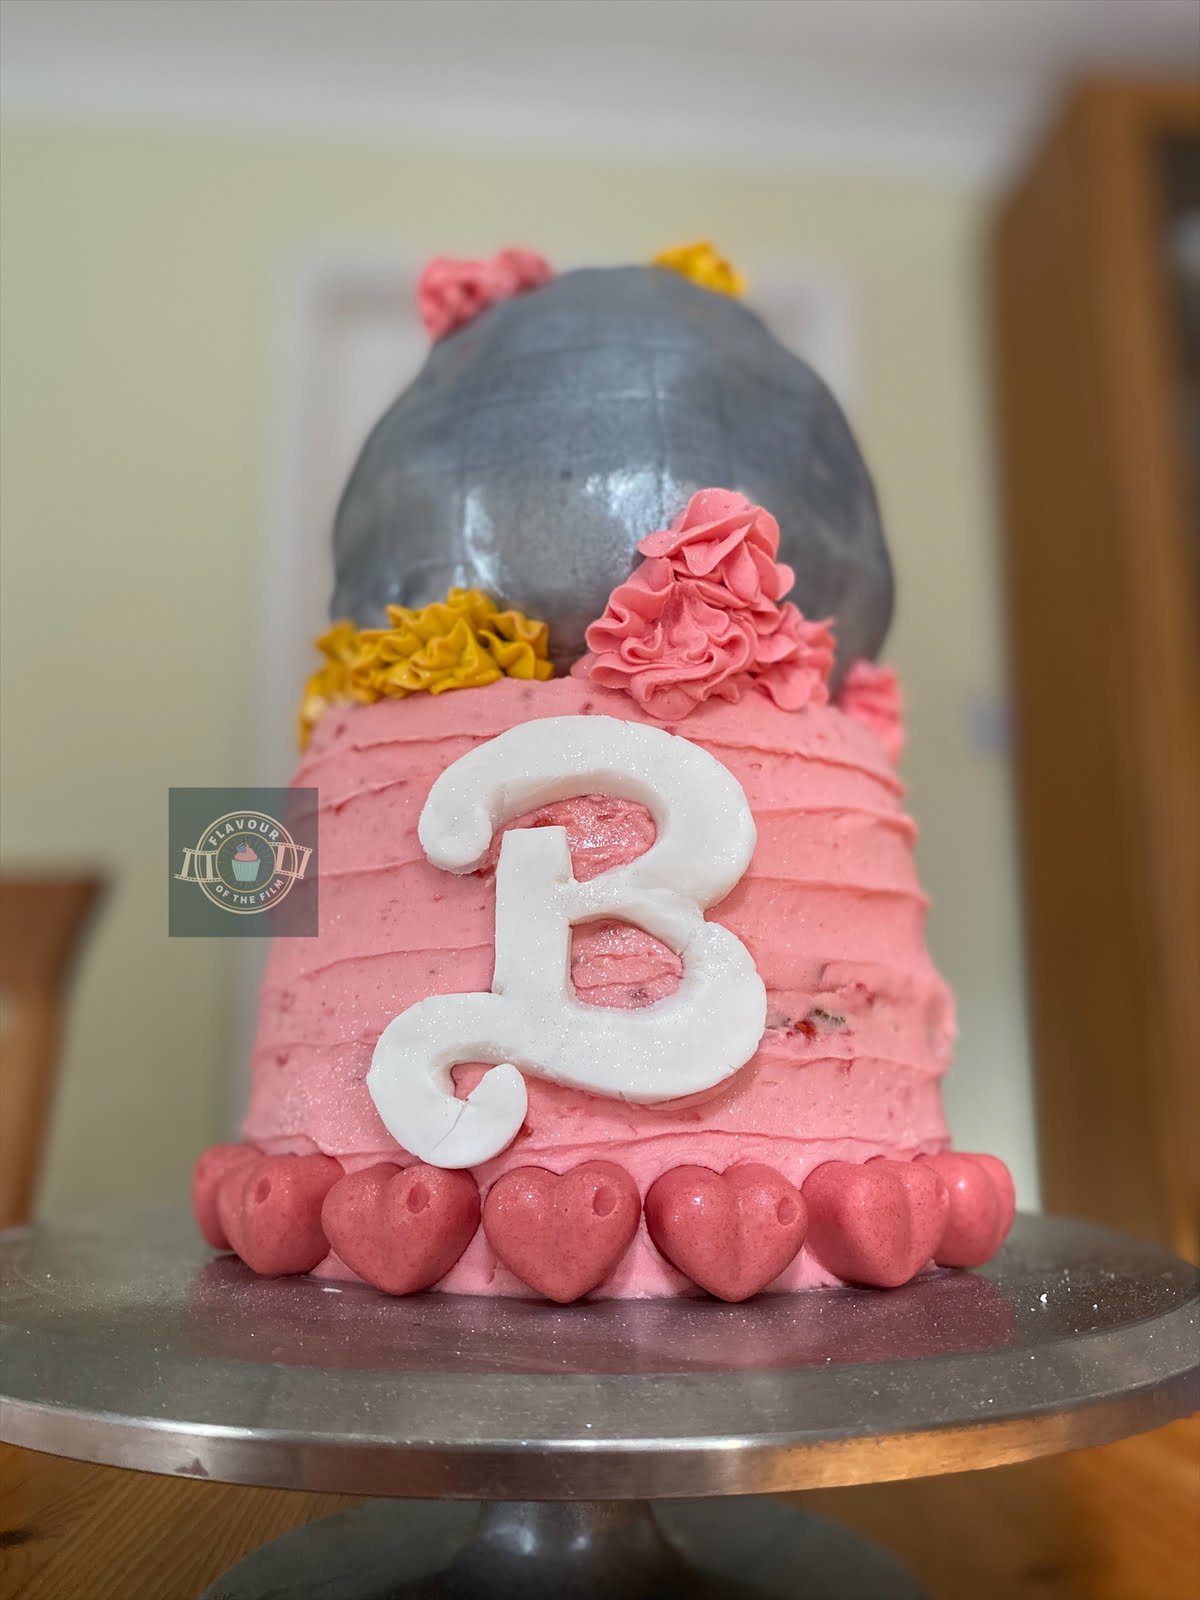
Two-tiered celebration cake with a white chocolate and raspberry base cake and a disco ball shaped pink champagne cake top tier, decorated with American buttercream and fondant icing, celebrating Barbie.
Ingredients
Base cake:
- 300 g [10.5 oz] unsalted butter
- 300 g [1½ cups] caster sugar
- 300 g eggs
- 300 g [1¾ cups + 2 tbsp] self-raising flour
- 1 tsp vanilla extract
Base cake decoration:
- 250 g [8.75 oz] unsalted butter
- 650 g [4¼ cups + 3 tbsp] icing [confectioners] sugar
- 50 g white chocolate melted
- 6 tbsp raspberry or strawberry jam
- Pink food colouring oil based
Disco ball cake:
- 170 g [6 oz] unsalted butter
- 325 g [1½ cups] granulated sugar
- 5 large egg whites
- 360 g [2¼ cups] plain flour
- 2 ½ tsp baking powder check that it’s in date!
- Pinch of salt
- 250 ml [about 8.75 oz] champagne / sparkling rose wine / pink-coloured soda drink
- Pink food colouring oil based
Disco ball decoration:
- 130 g [4.5 oz] unsalted butter
- 350 g [2¼ cups + 2 tbsp] icing [confectioners] sugar
- 1 tsp vanilla extract
- 500 g [at least 17.75 oz] white or grey fondant icing
- Black and silver airbrush colours if using an airbrush
Other decoration:
- 150 g [5.25 oz] white chocolate
- Pink food colouring oil based
- Yellow food colouring or colour of your choice – oil based
- White sugarpaste/fondant icing for the ‘B’
- Edible silver glitter
Instructions
- Start with the white chocolate hearts so that they have time to set. Put ⅔ of the chocolate in a microwavable bowl and microwave in 20 second bursts, stirring in between each burst until melted.
- Add the remaining chocolate and stir in until melted.
- Put the chocolate back in the microwave for 10 seconds then stir again.
- Add the pink food colouring and stir in well.
- Pour the chocolate into your heart-shape moulds and allow to set fully in the freezer or fridge (depending on the material of your mould tray).
- Next, make your pink champagne cake. Preheat your oven to 180°C [350°F] or 160°C fan. Grease and line 3 deep 6 inch cake tins or 2 6 inch hemisphere tins with baking parchment/greaseproof paper.
- Cream together the butter and sugar in a large mixing bowl.
- Separate one egg so that the white is in a small bowl and the yolk is in another. Add the white to your butter and sugar. Repeat this with all 5 eggs just in case the yolk spills into the white. This way you avoid getting yolk in all of the egg whites. Keep the yolks for another dish or bake.
- Beat in the egg whites until light and fluffy. Add the vanilla and beat until fully incorporated.
- Add half of the flour with the baking powder and salt into your mix and beat gently until combined.
- Add half of the carbonated drink you are using and beat in until fully incorporated.
- Pour in the other half of the flour and beat again.
- Add the rest of the carbonated drink and beat until fully combined.
- Add a few drops of the pink food colouring and beat until the entire mixture is pink. If more food colouring is necessary for a deeper pink, add a few more drops and mix again until the mixture is an even colour.
- Split the mixture evenly across the 3 tins or 2 hemisphere tins and bake for 30 – 35 minutes. If baking in hemisphere tins, this may take a little longer so check after 35 minutes.
- Your cakes will be ready when a skewer comes out clean, the surface of the sponge bounces back when pressed on gently and there is barely to no crackling/bubbling sound when you listen to your sponges.
- Leave to cool in the tins for 10 minutes before transferring to a wire rack upside down to cool fully.
- Whilst the pink champagne cake sponges are cooling, prepare your base cake.
- If making the jam yourself, do so now using my cupcakes for The Powerpuff Girls recipe. Otherwise, make sure that your shop bought jam is accounted for.
- Set your oven to 170°C [325°F] or 160°C fan. Grease and line either 2 (and you can cut the sponges in half for 4 layers) or all 3 deep 6 inch tins again and set aside.
- Weigh your eggs in their shells and get as close to 300g as possible. Whatever weight your eggs are, the rest of your ingredients should be weighed out to that exact number. A little over 300g is better than a little under.
- Cream together the butter and sugar until light and fluffy.
- Add the eggs one at a time, beating in between until fully incorporated.
- Add the vanilla and beat in well.
- Sieve in the flour and mix until the flour is no longer visible.
- Split the mixture evenly across the 2 or 3 tins and bake. If baking 2 thick sponges, bake for 45 – 50 minutes. If baking 3 sponges, bake for 30 – 35 minutes.
- Your cakes will be ready when a skewer comes out clean, the surface of the sponge bounces back when pressed on gently and there is barely or no crackling/bubbling sound when you listen to your sponges.
- Once baked, leave to cool in the tins for 10 minutes before transferring to a wire rack upside down to cool fully.
- Time to decorate your disco ball!
- Cream together the butter and icing sugar. Add the vanilla and beat again. If a little stiff, add a splash of milk or water and beat until smooth.
- Place one pink layer on a chopping board and smother the top in buttercream. Repeat with the next two layers until your cake is fully stacked. Do the same if you have used the hemisphere tins: just be sure your cake is well balanced!
- Using the rest of the buttercream, smother a crumb coat over the entire cake. If it is particularly warm weather, chill the cake for 10 minutes in the fridge.
- If needing to carve the cake: using a small serrated knife, gently carve away the edges until you have achieved a relatively round shape. This cake is delicate so take your time and be gentle with it. Take a little off at time.
- When ready, roll out the fondant icing and lay over your disco ball, tucking the edges underneath. Don’t worry if you have creases! Flatten them as much as you can – you’ll be able to cover any of them with leftover buttercream.
- Using a rounded utensil or sculpting tool, gently draw in the lines down and then across to resemble the texture of a disco ball.
- If using an airbrush, spray with the black colouring from a distance so the colour you achieve is more of a light grey. Then spray with the silver and then the edible glitter.
- If the cake is covered in grey fondant, spray with as much edible glitter as you can!
- Set the disco ball cake in the fridge and begin building your base cake.
- Melt the white chocolate in the microwave. Do this in 20 second bursts, stirring in between until melted.
- Allow the chocolate to cool whilst you make the buttercream.
- Cream together the butter and sugar until smooth. Add in the cooled melted chocolate and beat in until combined.
- If cutting the 2 sponges in half, do so now. Use a large serrated knife and gently saw through each sponge, rotating the sponge around the knife rather than the knife around the sponge. Otherwise, begin building your cake with 3 sponges.
- Place the first sponge on a plate/cake board/cake stand and apply the buttercream generously over the top. On the underneath of the next layer, spread over a generous amount of jam, then place on the top of the bottom layer.
- Repeat this until all of your layers are stacked.
- Spoon a small amount of buttercream into a bowl and mix in the yellow food colouring. Set aside.
- Add a few drops of pink food colouring to the remaining buttercream and beat in until evenly coloured. Add more pink if needed then beat again.
- Spread generously over the entire cake, allowing the jam to seep out over the edges to create a texture if preferred. Leave a small amount of buttercream for piping decoration later.
- Smooth over the buttercream on the cake using a palette knife and use the tip of the knife to create a pattern.
- Chill in the fridge while you make that iconic ‘B’.
- Roll out the white sugarpaste a little, making sure it is still relatively thick.
- Using a small sharp knife, carve out the ‘B’. Use a paper template here if needed. Set aside.
- Retrieve the cakes from the fridge. Push in 3 or 4 thick dowels into the base cake, leaving at least two inches poking out of the top of the cake.
- Lift the disco ball by placing your hands underneath the cake, avoiding touching the fondant around the outside.
- Sit the disco ball cake evenly over the base cake, making sure that the cake is as central as possible and that the dowels pierce the disco ball, holding it in place.
- Press the white chocolate hearts around the base of the cake and the ‘B’ in the centre of the front of the base cake.
- Using a piping bag or sandwich bag with a fun piping tip attached, pipe the remaining pink buttercream in swirls in various places on the cake. Do the same for the yellow (or whatever colour you chose) buttercream.
- Finish by spraying the entire cake with the edible glitter.
- Appreciate your masterpiece!
Notes
This delectable, fun-filled, two-tiered Barbie inspired cake will last for around 4 days if covered or in an airtight container (aluminium foil works if you don’t have a big enough cake case!). Trust me when I say it won’t last that long, though. Keep in the fridge if it is warm/humid. Enjoy!