
Out of all of the Disney films that I love, Big Hero 6 is a truly special one. An animation that combines different cultures with robotics, friendship and heroism. What more could you want? My melon pan (メロンパン) recipe celebrates one of the most iconic Disney characters from Big Hero 6. Feeling a little under the weather, friends? Allow Baymax to heal you with a sweet treat.
Contents
The Bake
Honestly, this one was a no brainer. I love when inspiration hits instantaneously. It’s a triumphant feeling, especially when you create something that looks just like it did in your mind. Even if it doesn’t but still tastes good, that’s also pretty triumphant.
My melon pan recipe is the perfect example of this.
Melon pan (メロンパン) is a Japanese sweet bread and is very popular across Japan.
It’s also a firm favourite in China and Taiwan. The name comes from the pattern on the top of the buns resembling a melon, rather than the flavour. Though melon flavoured bread sounds like a dream to me.
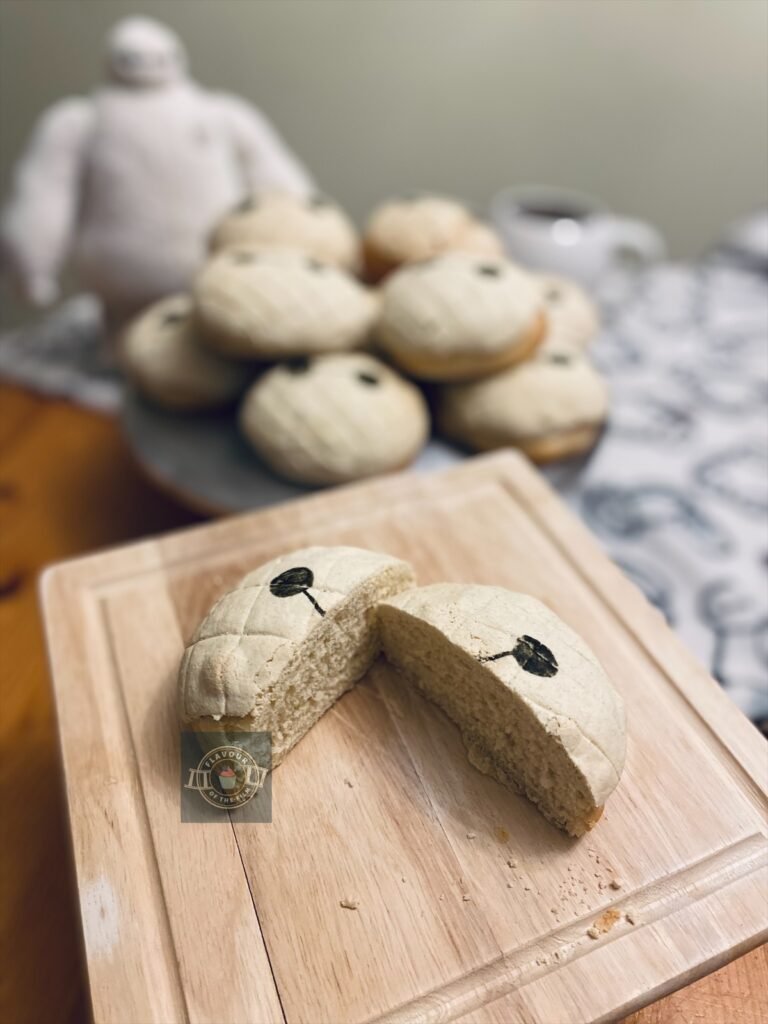
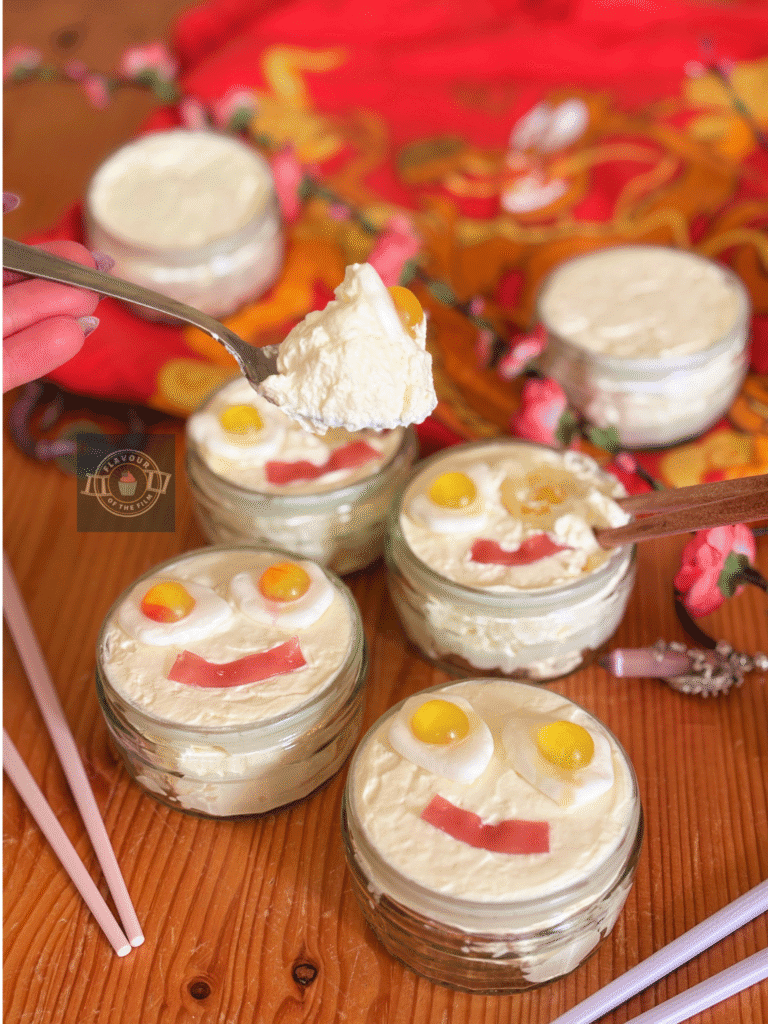
Melon pan is a soft, delicately sweet bread with a biscuit/cookie dough baked on top. The biscuit is what you score (and decorate in some cases, like this one!) to give the melon-like appearance. What is wonderful about this kind of biscuit is that it isn’t hard once baked on the bread, so whilst the textures do differ, an overall soft mouthful is what you get.
Delectable.

These buns are so incredibly light and oh-so-soft to eat.
They are also easier to make than one may assume! Sure, there’s a little kneading involved and they need some proving time. As with most breads, they need the extra time and muscle (if you don’t have a standing mixer with a dough hook), but they are SO worth it.
My easy melon pan recipe is adapted from and inspired by Kim-Joy’s recipe for melon pan space turtles, which I actually made a couple of years ago. Her adorable recipe is one from her books: Baking With Kim-Joy. As I had made the turtle version already, it made sense to draw from her method for guidance and authenticity.
There are lots of great recipes online for melon pan, too, but they are mostly using ingredients not used or not found in the U.K., so I had to adapt. Plus, I think Kim-Joy is wonderful. I have referenced her works in my other recipes, including my Grogu cake.
Aesthetically, I wanted to create a very cute but very impactful melon pan recipe.
One of the cultures that Big Hero 6 celebrates and draws from is Japanese. Hence why melon pan was an easy choice. That, and the fact that Hiro and Tadashi’s Aunt runs a cafe that sells sweet treats like buns.
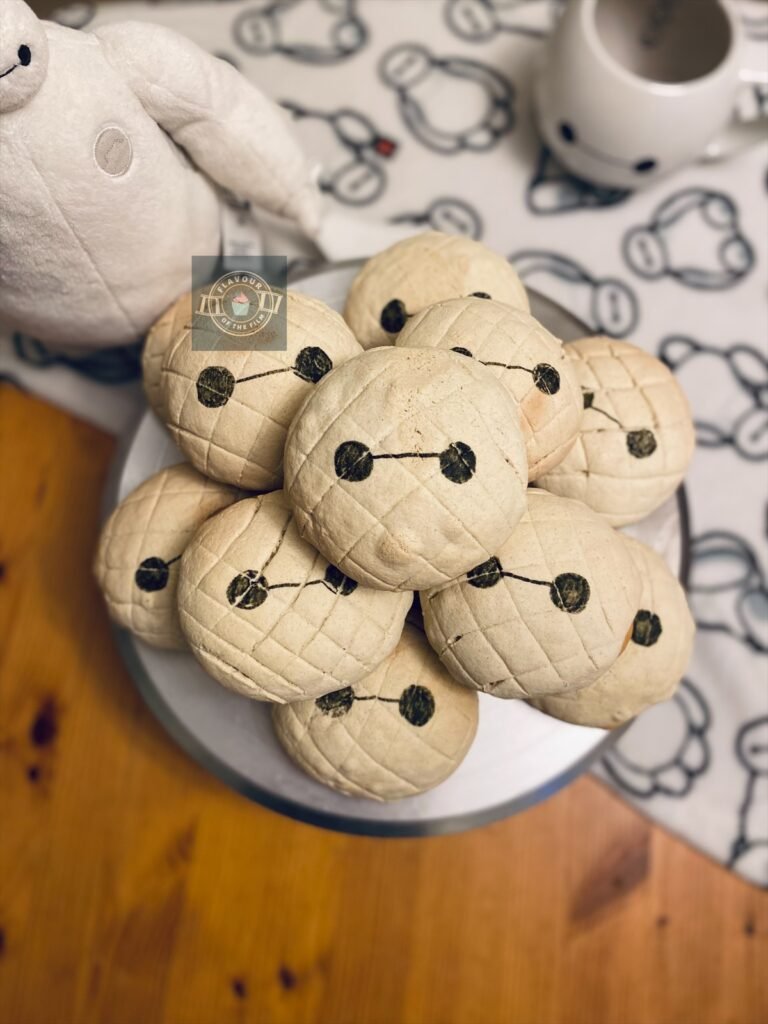
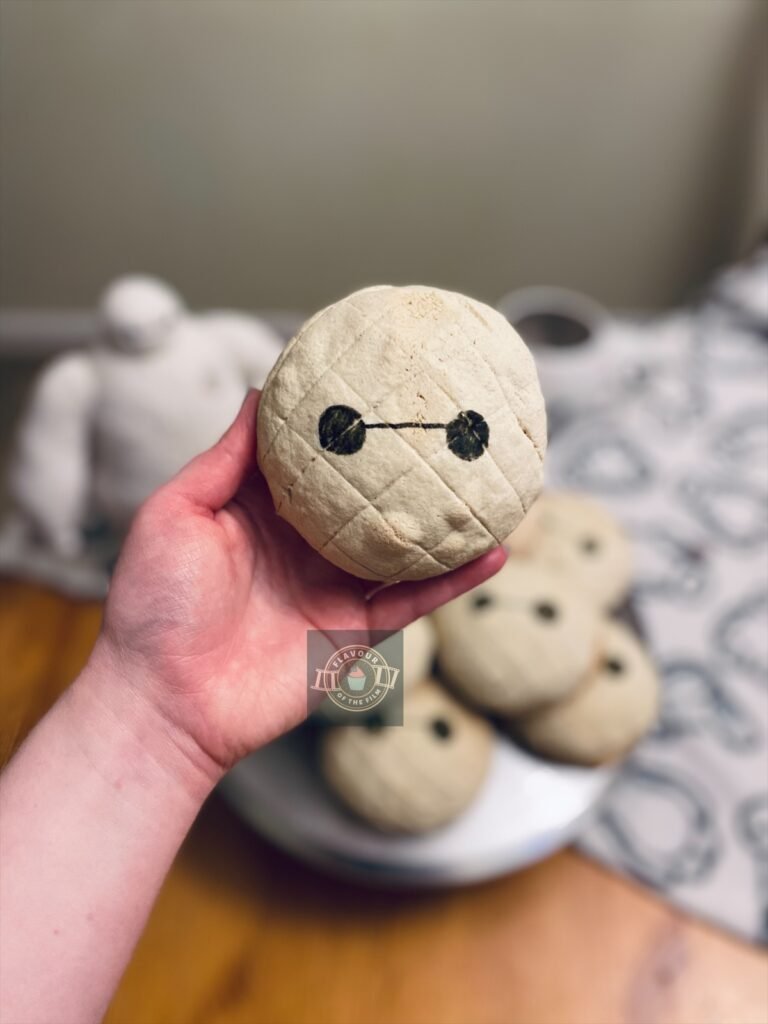
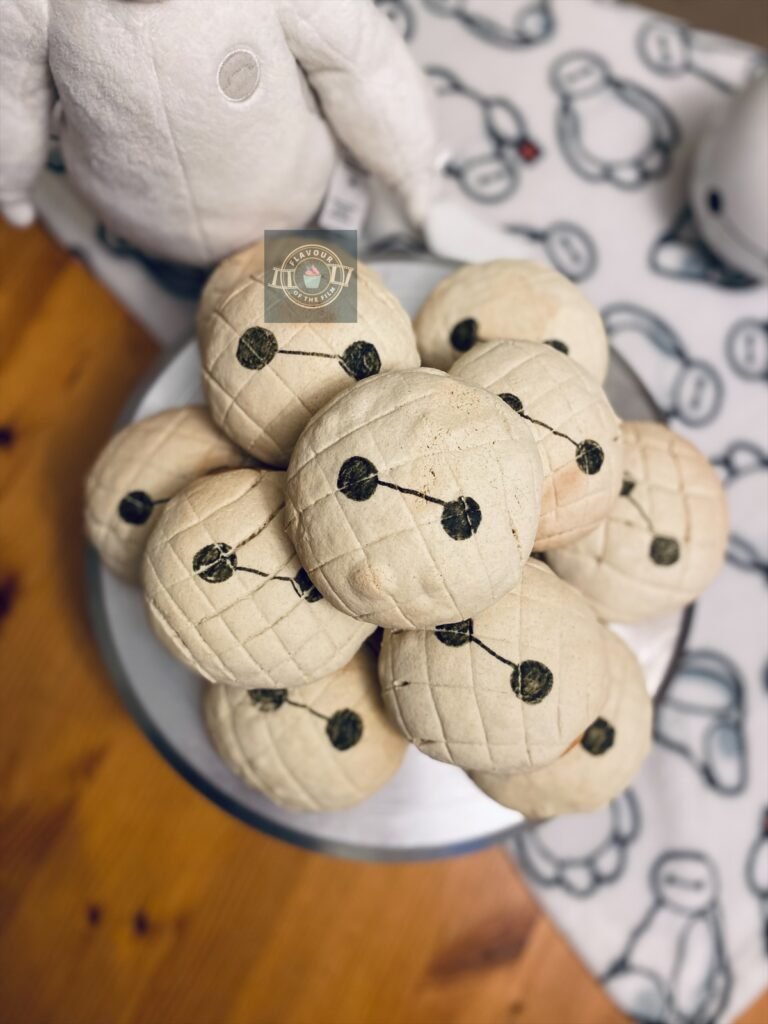
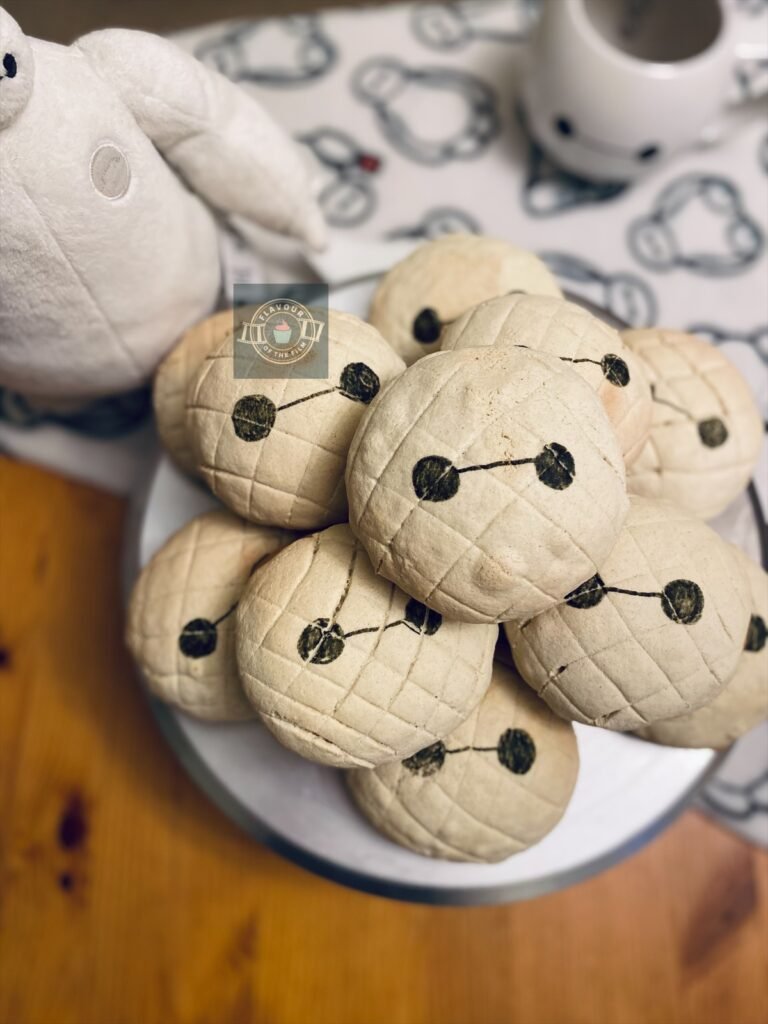
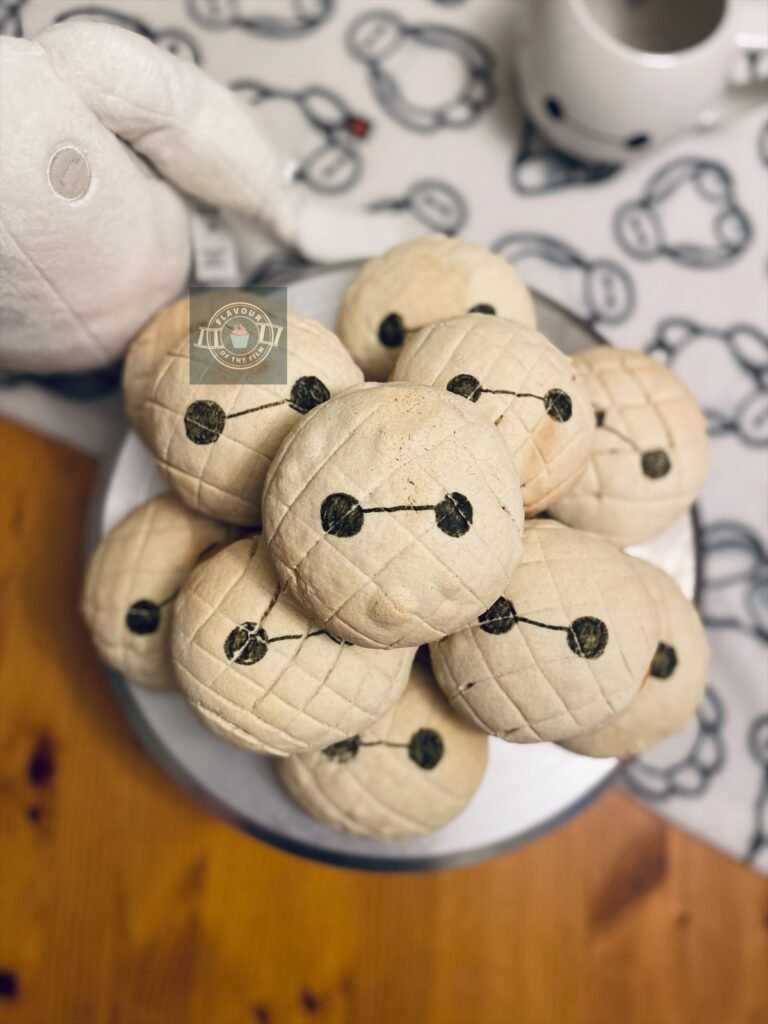
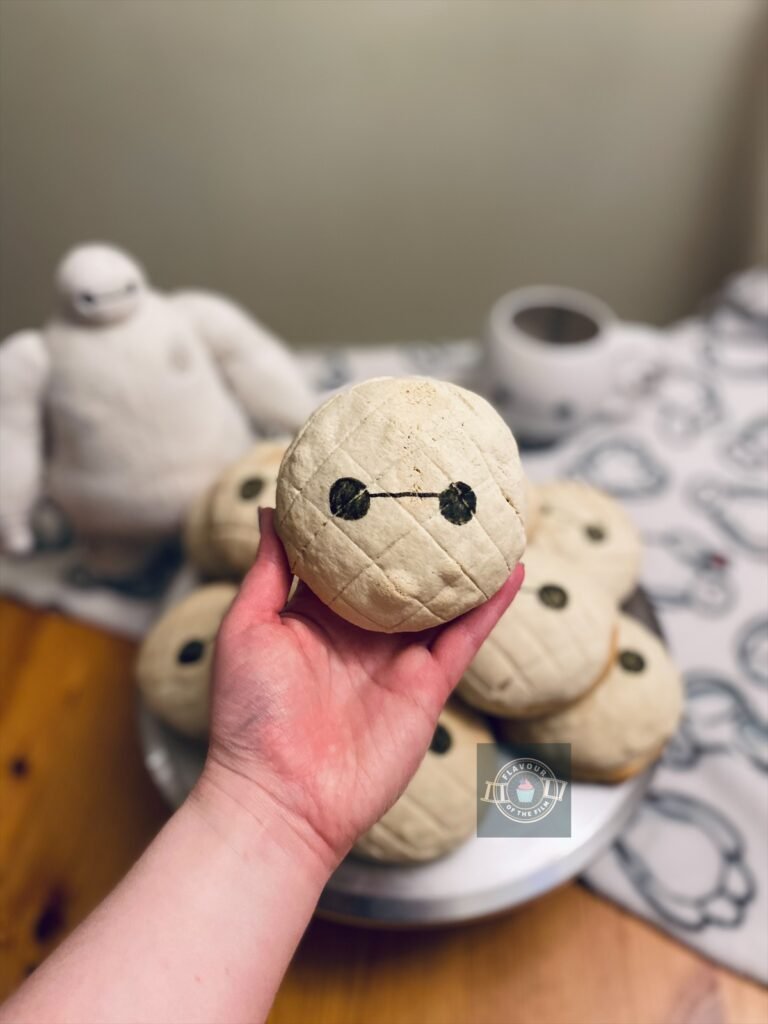
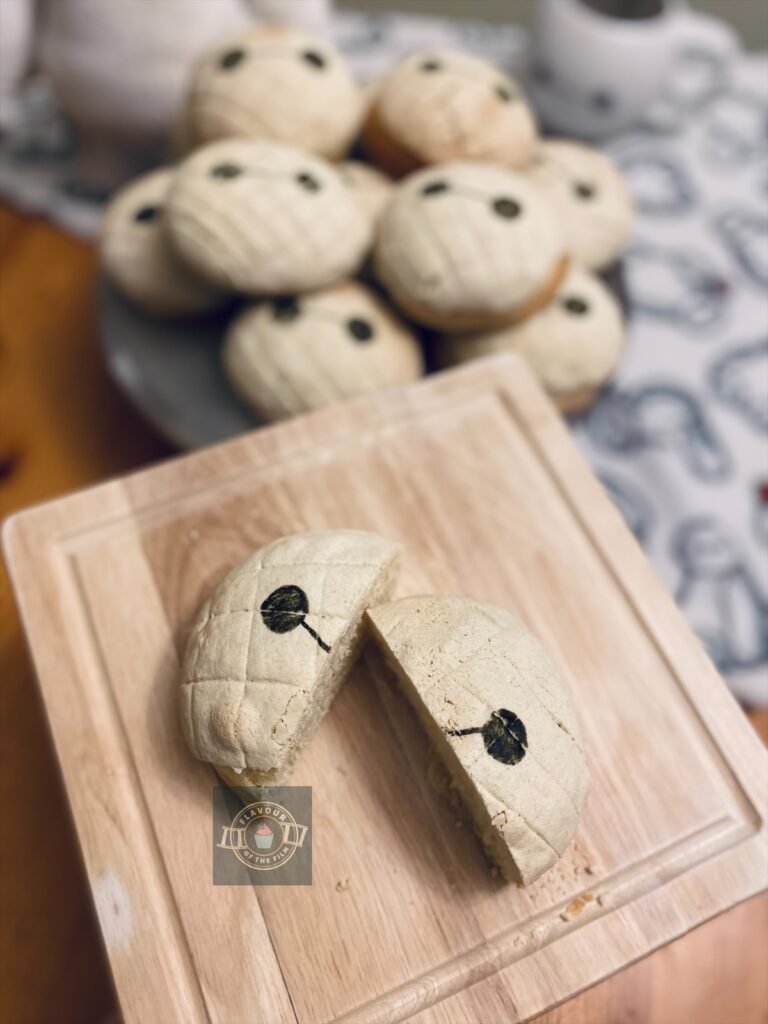
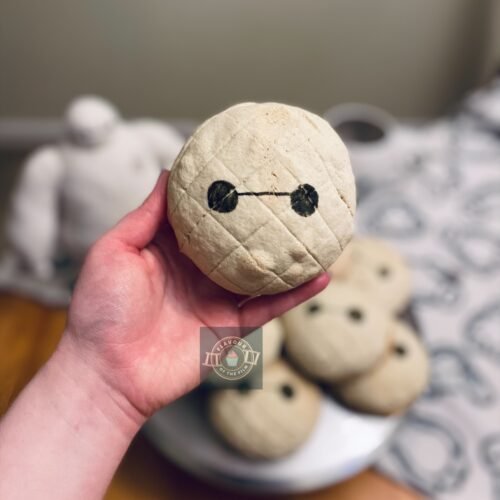
Baymax is pretty much at the centre of the whole story. He is what keeps the connection between Hiro and Tadashi alive. I wanted to celebrate that with my melon pan, so I chose to decorate my melon pan buns to look like Baymax.
Well, Baymax’s head, to be exact.
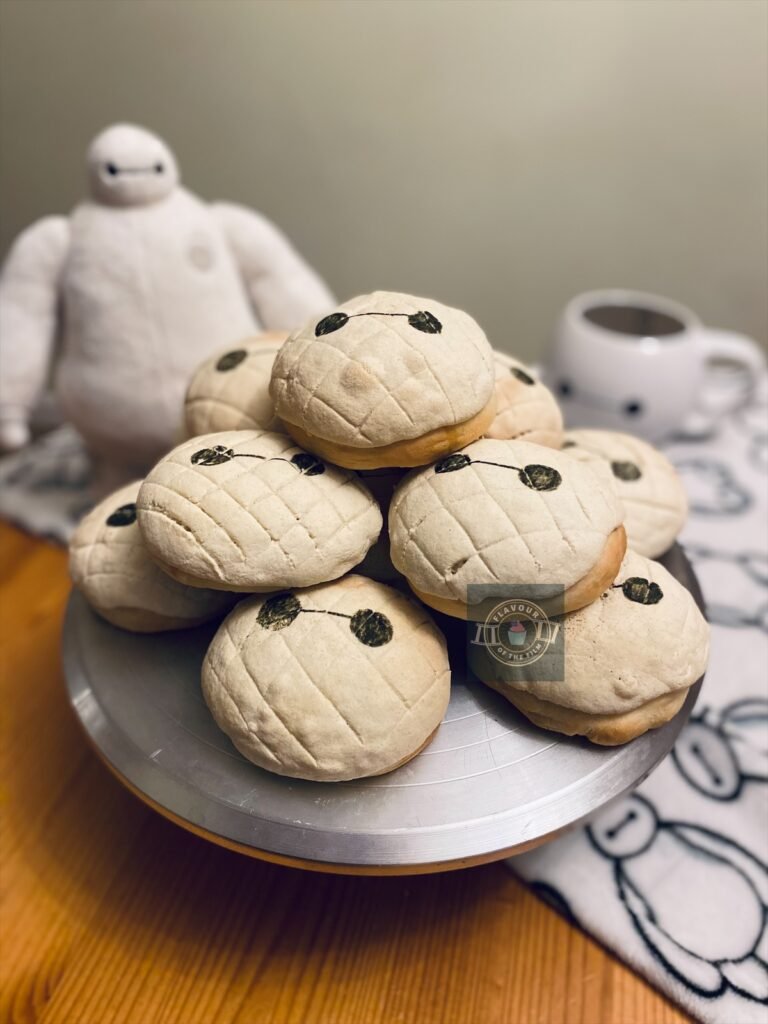
It also meant that the only decoration needed was Baymax’s minimalistic – but instantly recognisable – features.
I achieved this using a black edible ink pen, but you can just as easily paint them or even pipe them on in chocolate, if wanting that extra flavour in this melon pan recipe.
Top Tips
- Avoid over-flouring your work surface when needed. It can lead to a drier dough. Trust that the dough will come away from the surface it may stick to as you work with it.
- You’ll know your dough will be ready and the gluten well developed after kneading when the surface is smooth, and it springs back halfway when you gently press on it. It should feel a little bouncy once it’s ready.
- If your house is typically a little cold, place your dough in an airing cupboard or in the oven (turned off) to isolate some warmth and allow the dough to rise well. Just make sure to check it once an hour has passed! Over proving can affect the end result of your bread.
- If you don’t have strong bread flour, you can certainly use plain/all-purpose flour. Just be mindful that the texture of the bread will likely differ, but it will still be delicious.
- You’ll want to cover your buns with a layer of tin foil about 5 – 10 minutes into the baking process to avoid discolouration of their surface. This is particularly important with the white tint that we are wanting to achieve here!
- If there are a few bubbles or marks in your buns once baked, don’t stress! This gives them character. After all, Baymax gets a few marks after fights. It’s all good.
- Feel free to paint the detail of his features on each bun in this melon pan recipe, using a thin paintbrush and black liquid food colouring/paint if preferred. Or, if you want a shot of chocolate, melt some down and pipe it on using a piping bag or sandwich bag with a tiny bit of the end snipped off.
This melon pan recipe really is a delight. The buns are heavenly on the tongue and the perfect match for a Big Hero 6 viewing session. I kid you not, my brother ate three in a row. That’s how good they are! If this is your first time making bread, you chose the best recipe. If you’re re-watching Big Hero 6 for the first time in a while… I wish you luck. A friend I connected with whilst living in Japan named her son Tadashi and he is precious. I still struggle to emotionally disconnect the film from the child, though.
Happy baking, happy eating!
The Recipe
Ingredients
Melon pan dough:
- 600g [3¾ cups] strong white bread flour
- 40g [3 tbsp + 1 tsp] caster sugar
- 1 tsp salt
- 14g [4 ½ tsp or 2 sachets] fast action dried yeast
- 60g [2 oz] unsalted butter
- 140ml [5.25 oz] milk
- 1 large egg
- 140ml [5 oz] water
- Oil for greasing
- 1 medium egg lightly beaten for brushing
Melon pan biscuit/cookie dough:
- 100g [3.5 oz] unsalted butter
- 140g [½ cup + 3 tbsp] caster sugar
- 1 large egg
- White liquid food colouring oil based
- 320g [2 cups] plain [all-purpose] flour
- ½ tsp bicarbonate of soda [baking soda]
- Black edible ink pen / black liquid food colouring / melted chocolate
Serves: 12
Preparation time: 25 minutes
Proving time: 1 hour 45 minutes
Baking time: 20 – 25 minutes
Decorating time: 5 minutes
Method
Melon pan dough:
- Lightly grease a large mixing bowl with your oil. Set aside.
- In a small heatproof bowl, melt the butter in the microwave for 30 seconds until completely melted. Set aside.
- Sieve the flour into a large clean mixing bowl. Add the salt, sugar and yeast. Make sure the yeast and salt do NOT touch yet.
- In a heatproof bowl or jug, warm the milk in the microwave for 20 – 30 seconds. You want it to be warm to the touch, but not hot.
- Mix your dry ingredients in the bowl until evenly distributed. Add the melted butter, milk and water. Whisk the egg in a separate bowl and then add to the mix.
- If using a standing mixer with a dough hook attached, knead the dough on a medium speed for around 10 minutes. Your dough will be ready when it is smooth, shiny, less tacky to touch and bouncy.
- If kneading by hand, bring the mixture together into a shaggy ball of dough using a wooden spoon. Then, tip out onto a clean and lightly floured surface. Avoid adding too much flour as you knead – use a scraper or large knife to pull the dough away from the surface as needed.
- Knead by hand for around 10 minutes. The gluten in your dough will be well developed once the dough is smooth, shiny and bouncy. If you press your finger into the dough lightly and it springs back half or most of the way back, it’s ready.
- Place your ball of dough into your lightly oiled bowl. Cover with cling film/plastic wrap/beeswax paper and leave to prove for 1 hour, until well risen and doubled in size. This will depend on the temperature of your kitchen. If your kitchen feels quite cold, place the bowl of dough in an airing cupboard or in the oven (turned off) for more isolated heat.
Shaping:
- When your dough has doubled in size, tip it out onto a clean and lightly floured surface. Knock the air out by kneading it very briefly.
- Line 2 baking trays with greaseproof paper/baking parchment and set aside.
- Begin dividing your dough equally into 12 pieces. Each should weigh around 84g.
- Shape the dough into balls by smoothing over with your thumb and tucking the dough in underneath itself so that you have a smooth surface. This doesn’t have to be perfect!
- Place 6 balls onto each tray. Cover with cling film/plastic wrap/beeswax paper and leave to rise again for around 45 minutes. Again, this depends on the temperature of your kitchen. Feel free to put them back in the airing cupboard/oven (turned off) if needed.
Melon pan biscuit/cookie dough:
- While your buns are in their second prove, make your biscuit dough.
- In a large mixing bowl, cream together the butter and sugar until light and fluffy.
- Add the egg and beat in until fully incorporated.
- Squeeze in some white food colouring and mix in. Add as much as you want – just be mindful that the colour will develop over time. I put around 2 tsp in.
- Sieve in the flour. Add the bicarbonate of soda and mix in until a dough has formed.
- Gather the dough and wrap it in cling film/plastic wrap/beeswax paper. Set aside. This dough does not need to be refrigerated.
Construction:
- Nearing the end of the second prove, preheat your oven to 170°C [340°] or 150°C fan.
- The buns should have doubled in size when ready and spring back halfway when pressed on lightly with your finger.
- On a clean and lightly floured surface, roll out your cookie dough until around ¼ inch in thickness. Find a round cookie cutter that is the closest size you can match to the size of your buns. Don’t worry if it’s a little smaller, we can adapt. If it’s a little bigger, that works too!
- Cut 12 circles out of your cookie dough. If they are a little small, very gently roll them out with a rolling pin until they are a little bigger. Don’t stress if they aren’t perfect circles anymore!
- Remove the covering from your buns. Beat an egg in a small bowl lightly and then brush the egg over each bun. Try to keep the egg from running down the sides – start lightly with the egg, then add more if needed.
- Very carefully lift the biscuit circles from your work surface and place each one onto a bun, pressing down onto the egg to secure the biscuit to the bread dough. If needed, use a knife angled down to the work surface under the biscuit to ease it from the surface.
- Tuck the biscuit dough gently around the bun. Avoid pulling and pressing too hard here as you could easily rip the biscuit dough.
- Using a very sharp knife, gently score a criss cross pattern across the biscuit dough on each bun. Start with stripes going down, then stripes going across.
Baking:
- Sprinkle the buns with caster or granulated sugar if desired, then bake on the middle shelves of your preheated oven for 20 – 25 minutes. Make sure to cover the buns with a sheet of tin [aluminium] foil about 5 minutes into the baking process to prevent discolouration!
- Your buns will be ready when the biscuit feels dry to the touch; the buns (underneath the biscuit) are a golden colour, and you hear a hollow sound when you tap the top and underneath sides of the buns.
- Once baked, leave to cool for a couple of minutes on the trays before transferring to a wire rack to cool completely. This won’t take long!
- When your buns are completely cool, draw/paint/pipe Baymax’s features onto each bun. If piping, pour the melted chocolate into a piping bag or sandwich bag with a very small part of the end cut off for precision.
This delicious melon pan recipe yields 12 perfectly sized sweet buns. They are best enjoyed on the day of baking, but will last for around 3 more days. With each day that passes, the buns will lose their light texture and the biscuit will soften more so try to consume them within 2 days. Eat your melon pan buns as they are, friends. They are tasty in the traditional way of eating: nothing extra added. Enjoy!
The Film
Fair enough, I’ve already talked about certain Disney films being very special to me. My recipe celebrating Pixar’s Onward springs to mind here. Then there are the Disney films that connect me to my childhood like Lilo & Stitch, or the Disney works that helped shape part of my personality and persona for a while, like Tangled.
Big Hero 6? Now, that’s another one that I hold deep in my heart. I went to see it at the cinema when it was released and I’m pretty sure it was the first animated film that I saw on the big screen that had me ugly crying by the time the credits were rolling.
In 2014, big screens across the world were graced with another Disney animated film.
Big Hero 6 brought us a story about grief, perseverance, justice and friendship. It also showed audiences – particularly younger audiences – how grief looks different for everyone, and that that’s okay.
How some things that you think are the right thing to do can lead you to realise something completely different. Something that you finally understand brings you the peace and love and everything else that you were looking for, just in the wrong place at first.
Set in an imaginary combined city by the name San Fransokyo, lead protagonist Hiro Hamada navigates all of this and more throughout the film. He forms a special bond with a robot that his brother invented. An inflatable robot designed to help and heal those who need it… who just so happens to resemble a giant marshmallow and goes by the name Baymax.
When tragedy occurs, Hiro loses his way and suddenly finds himself relying on Baymax to help him find justice, and ultimately closure.
A tech prodigy himself, Hiro ‘upgrades’ Baymax. He then reconnects with his fellow robotics-skilled friends to form a team of heroes, each providing their own strengths and skills within (and outside) the world of robotics engineering.
Every character is so distinct in Big Hero 6, which is one of the many reasons why it’s so wonderful to watch. You find different personalities, different preferences, different styles all blending together to work as a team on the mission for resolution. As a result, this story is simultaneously eye-opening and relatable.
I love Big Hero 6 for so many reasons. The deep-rooted theme of friendship; the beautiful colour palette and animation design; the character development! This film is abundant in purity, second chances and reconciliation. Whether that reconciliation be between the characters, within themselves, or with the past.
Watching it is like being wrapped up in a warm hug.
Big Hero 6 was written by Jordan Roberts, Daniel Gerson and Robert L. Baird, with Don Hall and Chris Williams in the directors’ chairs.
The original creators of the Big Hero 6 characters were Steven T. Seagle and Duncan Rouleau as Man of Action.
Yep, you guessed it… the Art Department on this film was monumental. In both size and talent! With that being said, I won’t list every single person here, but they are responsible for the beautiful visuals of Big Hero 6, which deserves all the respect I can give.
Oh, and the music. This soundtrack by Henry Jackman has to be one of my favourites out of all of his original scores.
As for the cast, Ryan Potter gave Hiro his voice. Alongside him were Scott Adsit as Baymax; Daniel Henney, Jamie Chung, Daymon Wayans Jr., T.J. Miller and Genesis Rodriguez.
Plus, Maya Rudolph; James Cromwell, Alan Tudyk and more.
Does anyone else think that Alan Tudyk has voiced a character in every Disney animated film since, what, 2010? It seems like he’s everywhere. But, his talent allows it. What a performer.
Whenever I need a boost, I put Big Hero 6 on. It’s a comfort film for me. I wrap up in a blanket (weather permitting) and watch this film to feel the warm fuzzies.
Recipe Card
Melon Pan Recipe | Disney’s Big Hero 6
Ingredients
Melon pan dough:
- 600 g [3¾ cups] strong white bread flour
- 40 g [3 tbsp + 1 tsp] caster sugar
- 1 tsp salt
- 14 g [4 ½ tsp or 2 sachets] fast action dried yeast
- 60 g [2 oz] unsalted butter
- 140 ml [5.25 oz] milk
- 1 large egg
- 140 ml [5 oz] water
- Oil for greasing
- 1 medium egg lightly beaten for brushing
Melon pan biscuit/cookie dough:
- 100 g [3.5 oz] unsalted butter
- 140 g [½ cup + 3 tbsp] caster sugar
- 1 large egg
- White liquid food colouring oil based
- 320 g [2 cups] plain [all-purpose] flour
- ½ tsp bicarbonate of soda [baking soda]
- Black edible ink pen / black liquid food colouring / melted chocolate
Instructions
Melon pan dough:
- Lightly grease a large mixing bowl with your oil. Set aside.
- In a small heatproof bowl, melt the butter in the microwave for 30 seconds until completely melted. Set aside.
- Sieve the flour into a large clean mixing bowl. Add the salt, sugar and yeast. Make sure the yeast and salt do NOT touch yet.
- In a heatproof bowl or jug, warm the milk in the microwave for 20 – 30 seconds. You want it to be warm to the touch, but not hot.
- Mix your dry ingredients in the bowl until evenly distributed. Add the melted butter, milk and water. Whisk the egg in a separate bowl and then add to the mix.
- If using a standing mixer with a dough hook attached, knead the dough on a medium speed for around 10 minutes. Your dough will be ready when it is smooth, shiny, less tacky to touch and bouncy.
- If kneading by hand, bring the mixture together into a shaggy ball of dough using a wooden spoon. Then, tip out onto a clean and lightly floured surface. Avoid adding too much flour as you knead – use a scraper or large knife to pull the dough away from the surface as needed.
- Knead by hand for around 10 minutes. The gluten in your dough will be well developed once the dough is smooth, shiny and bouncy. If you press your finger into the dough lightly and it springs back half or most of the way back, it’s ready.
- Place your ball of dough into your lightly oiled bowl. Cover with cling film/plastic wrap/beeswax paper and leave to prove for 1 hour, until well risen and doubled in size. This will depend on the temperature of your kitchen. If your kitchen feels quite cold, place the bowl of dough in an airing cupboard or in the oven (turned off) for more isolated heat.
Shaping:
- When your dough has doubled in size, tip it out onto a clean and lightly floured surface. Knock the air out by kneading it very briefly.
- Line 2 baking trays with greaseproof paper/baking parchment and set aside.
- Begin dividing your dough equally into 12 pieces. Each should weigh around 84g.
- Shape the dough into balls by smoothing over with your thumb and tucking the dough in underneath itself so that you have a smooth surface. This doesn’t have to be perfect!
- Place 6 balls onto each tray. Cover with cling film/plastic wrap/beeswax paper and leave to rise again for around 45 minutes. Again, this depends on the temperature of your kitchen. Feel free to put them back in the airing cupboard/oven (turned off) if needed.
Melon pan biscuit/cookie dough:
- While your buns are in their second prove, make your biscuit dough.
- In a large mixing bowl, cream together the butter and sugar until light and fluffy.
- Add the egg and beat in until fully incorporated.
- Squeeze in some white food colouring and mix in. Add as much as you want – just be mindful that the colour will develop over time. I put around 2 tsp in.
- Sieve in the flour. Add the bicarbonate of soda and mix in until a dough has formed.
- Gather the dough and wrap it in cling film/plastic wrap/beeswax paper. Set aside. This dough does not need to be refrigerated.
Construction:
- Nearing the end of the second prove, preheat your oven to 170°C [340°] or 150°C fan.
- The buns should have doubled in size when ready and spring back halfway when pressed on lightly with your finger.
- On a clean and lightly floured surface, roll out your cookie dough until around ¼ inch in thickness. Find a round cookie cutter that is the closest size you can match to the size of your buns. Don’t worry if it’s a little smaller, we can adapt. If it’s a little bigger, that works too!
- Cut 12 circles out of your cookie dough. If they are a little small, very gently roll them out with a rolling pin until they are a little bigger. Don’t stress if they aren’t perfect circles anymore!
- Remove the covering from your buns. Beat an egg in a small bowl lightly and then brush the egg over each bun. Try to keep the egg from running down the sides – start lightly with the egg, then add more if needed.
- Very carefully lift the biscuit circles from your work surface and place each one onto a bun, pressing down onto the egg to secure the biscuit to the bread dough. If needed, use a knife angled down to the work surface under the biscuit to ease it from the surface.
- Tuck the biscuit dough gently around the bun. Avoid pulling and pressing too hard here as you could easily rip the biscuit dough.
- Using a very sharp knife, gently score a criss cross pattern across the biscuit dough on each bun. Start with stripes going down, then stripes going across.
Baking:
- Sprinkle the buns with caster or granulated sugar if desired, then bake on the middle shelves of your preheated oven for 20 – 25 minutes. Make sure to cover the buns with a sheet of tin [aluminium] foil about 5 minutes into the baking process to prevent discolouration!
- Your buns will be ready when the biscuit feels dry to the touch; the buns (underneath the biscuit) are a golden colour, and you hear a hollow sound when you tap the top and underneath sides of the buns.
- Once baked, leave to cool for a couple of minutes on the trays before transferring to a wire rack to cool completely. This won’t take long!
- When your buns are completely cool, draw/paint/pipe Baymax’s features onto each bun. If piping, pour the melted chocolate into a piping bag or sandwich bag with a very small part of the end cut off for precision.
Notes
© Flavour of the Film. All content and imagery is copyright protected. Please do not use any of my images or written content without prior permission. If you would like to share any of the recipes or images on Flavour of the Film, please link back to the recipe in question and rewrite it in your own words, crediting Flavour of the Film as the original source.


8 Comments
Comments are closed.