
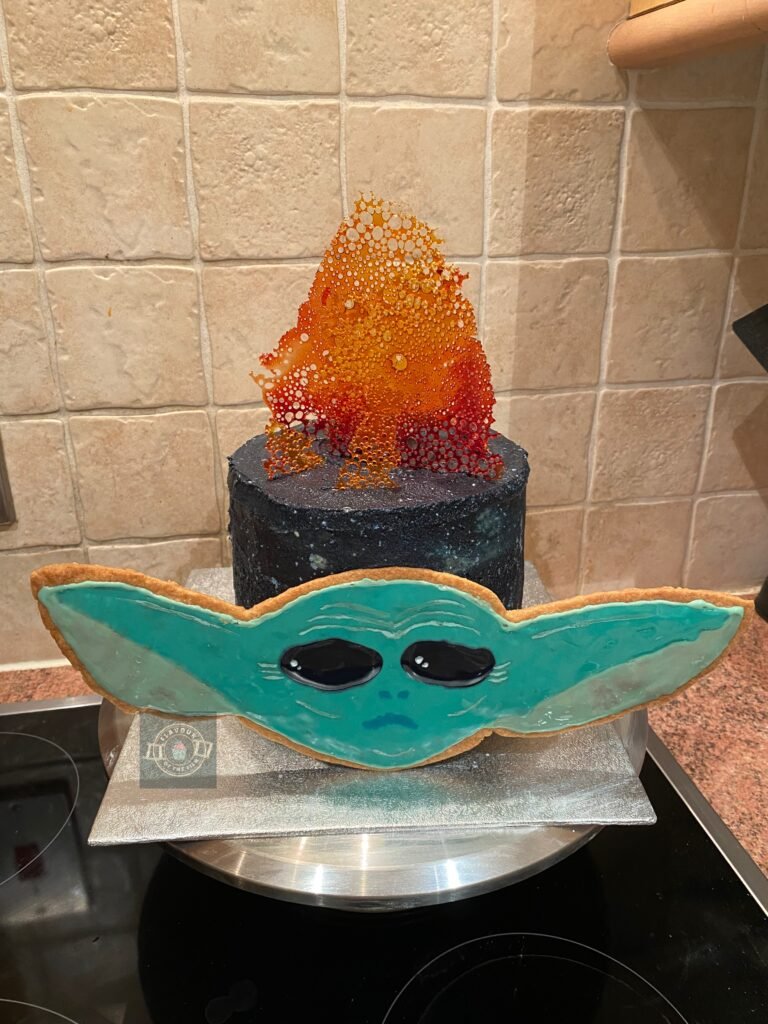
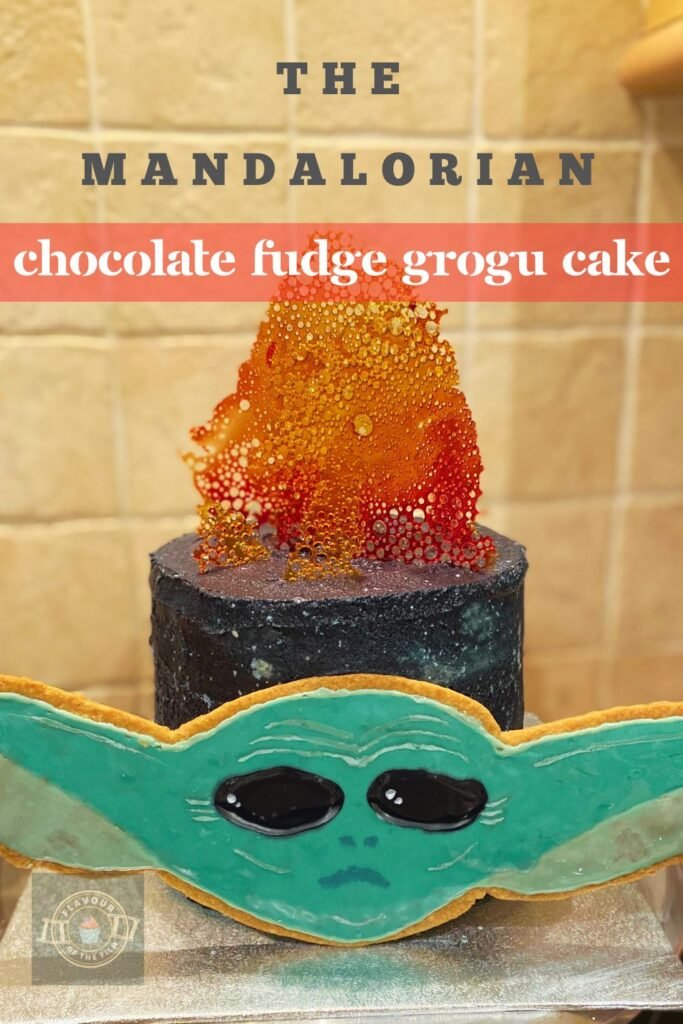
Greetings, scrumptious chocolate Grogu cake with galaxy-themed salted caramel buttercream and shortbread decoration. You are most welcome here. My Grogu inspired cake makes a great addition to any Star Wars or The Mandalorian themed party. I’m ready to fly. Are you?
Contents
The Bake
Now, this particular cake was for my life-long friend. I offered to make a cake this year for her to gift and she gladly accepted, giving me creative freedom to pursue my Star Wars inspired vision for a fellow Jedi. As per her request, the cake sponges are an indulgent chocolate fudge flavour and the buttercream is salted caramel.
Chocolate cake seems to be a theme for my Star Wars inspired recipes so far – my Star Wars cake pops are also chocolate flavour!
The sponges of this Grogu cake are adapted from a delicious Jane’s Patisserie’s ‘Death By Chocolate Cake’ from her book (as it’s the best chocolate fudge cake recipe I’ve come across).
I made my own caramel for this cake but for the purpose of ease, I will recommend using shop-bought caramel that comes in a tin i.e. Carnations. If you are comfortable making your own from scratch, then by all means go for it! It’s certainly worth the effort.
Any caramel sauce recipe would suffice, so long as you season it with sea salt and the texture is nice and thick but still pours well.
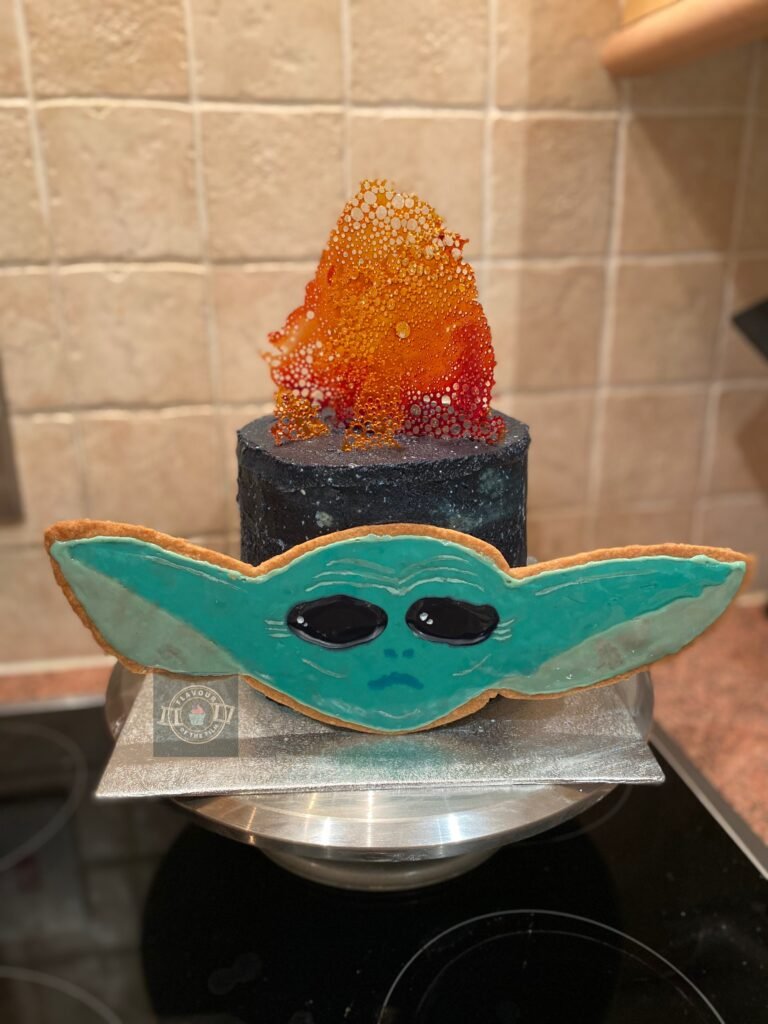
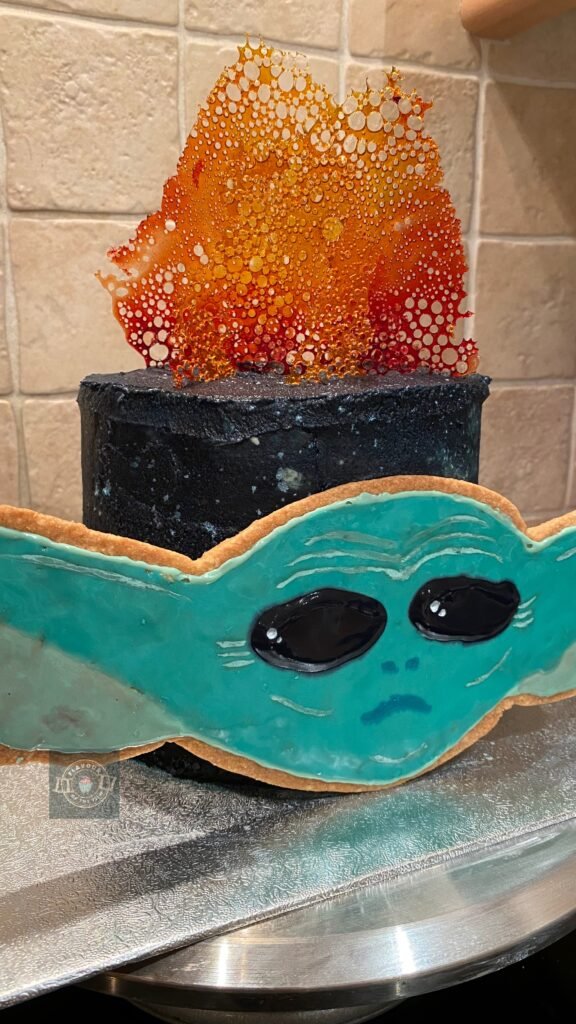
The Grogu head is made from a deliciously buttery shortbread, as requested by my friend.
If you’ve read my first recipe post, you’ll know that I don’t usually recommend making decorations like this to go with a cake as shortbread is so delicate, but I can confidently say that, in this case, Grogu’s head survived easily until he was devoured by my friends.
Thus, shortbread for this purpose gets a green light from me… and a green head.
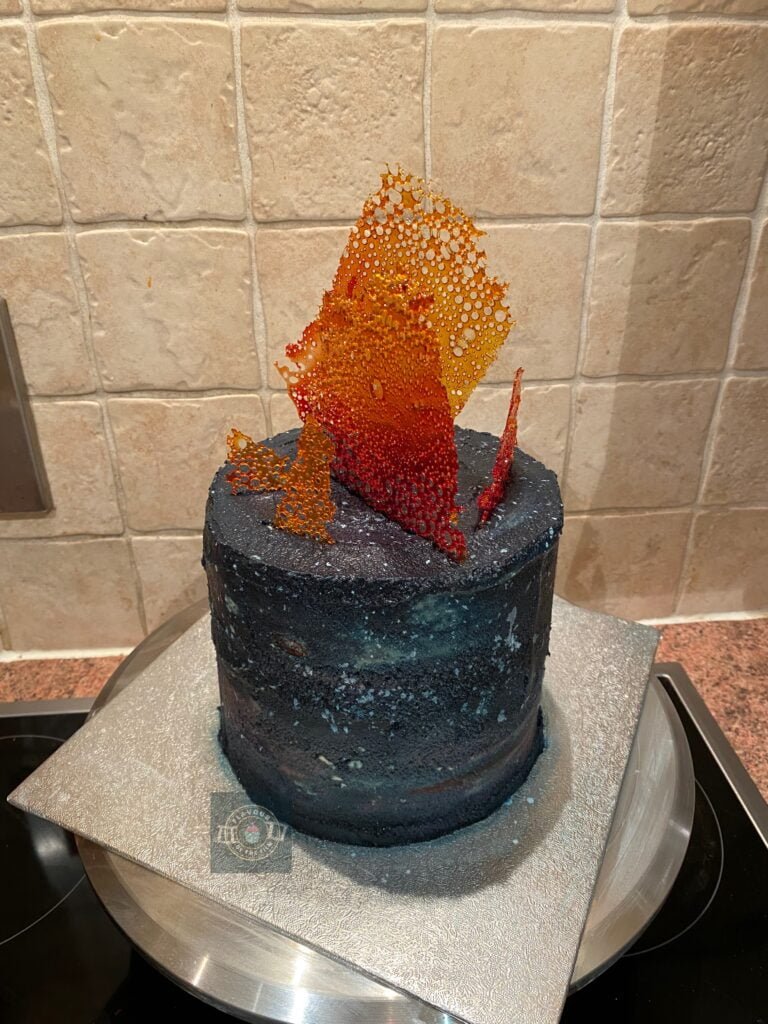
For the buttercream, I went for a galaxy vibe. I mean, if you’re going to do a Star Wars theme and make it pretty epic, then this is the way to go. I made up a deep shade of navy, some light pink and a purple shade and applied them in a pattern that resembled the wispy vibes of the Universe.
I also went for a mixture of a smooth finish and a rough finish for the entire look of the buttercream, as space isn’t all smooth so perfection is not the goal. Plus, each time you do it, you get a different end result which I think is rather cool.
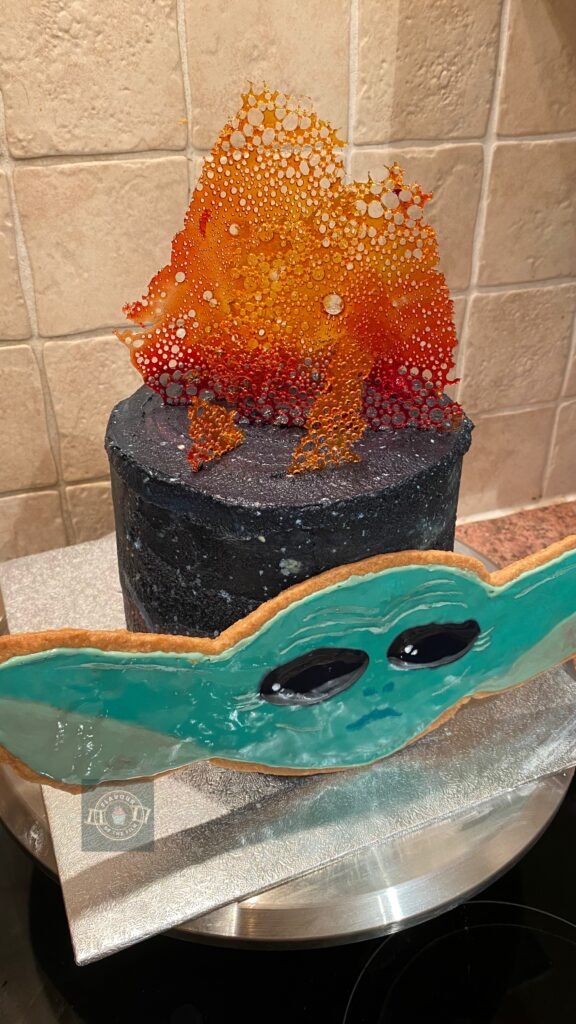
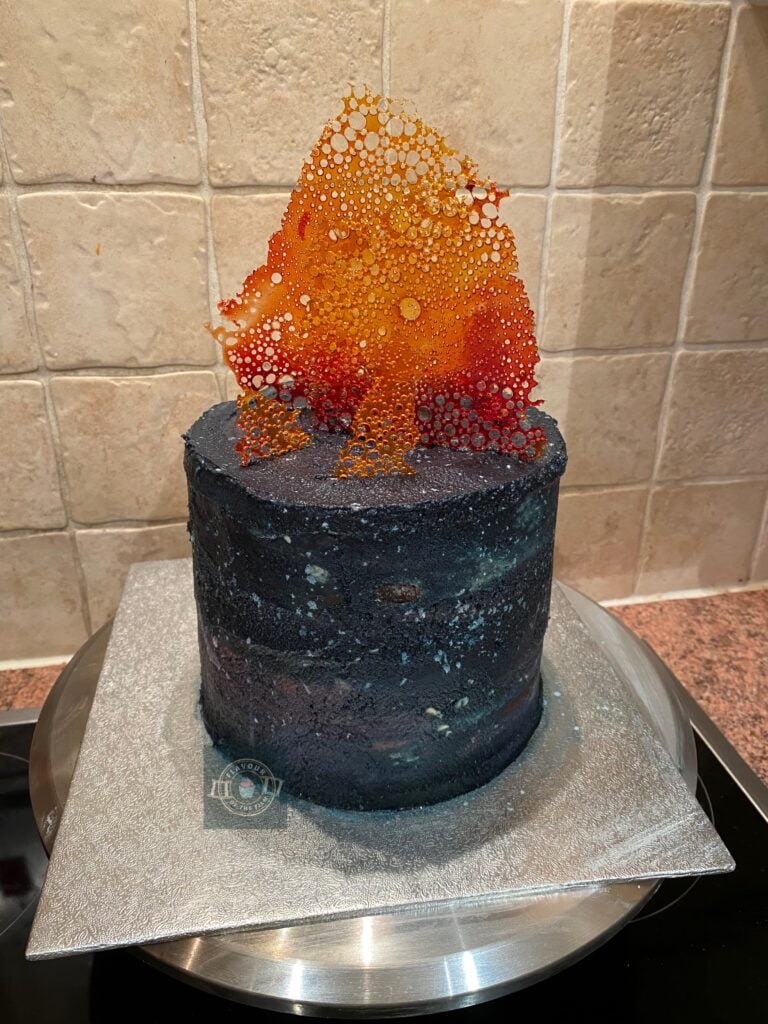
Now, the final element to this Grogu cake is the ‘lava’ shards.
This particular technique is one I learned from the ever-inspiring Kim-Joy (Bake Off fans anyone?). It’s so utterly simple but gives a real impact. The only thing I would say is maybe don’t eat it. It’s completely edible, it just might not taste all that nice considering it’s made from liquid glucose. But it looks fantastic.
I chose a lava look for this element of the cake because, genuinely, I just wanted to make the “higher ground” joke (if you know, you know). And I can tell you, that joke hit the mark when I delivered it along with the cake.
I know this Grogu cake is dedicated to The Mandalorian and the “higher ground” scene is in Revenge of the Sith but I couldn’t help myself.
It’s not completely off key, right?
Top Tips
- Include the coffee in the recipe if no allergies are preventing it. It really lifts the chocolate flavour, so is worth adding in. If you are wanting to leave it out, still add the boiling water so that the texture remains.
- Keep an eye on the timings of your sponges. They can change from moist cake to moist brownie texture in just a few minutes.
- Get creative with your buttercream colours. Galaxies are glorious mixtures of colours so don’t hold back.
- The glucose doesn’t take long to bubble up so avoid leaving it. Go by eye more than the timer – you’ll know when it’s ready. Leaving it could risk burning it.
- As with all shortbread decorations, handle with care! Shortbread is a delicate biscuit and easily breakable.
- Utilise the cocktail stick here. It’s the ideal tool for tidying and spreading your royal icing decoration.
There we have it, friends. If you’re looking for a Star Wars cake that is fun, creative and has a real artsy impact, have a go at making this one. Enjoy!
Happy baking, happy eating!

The Recipe
Ingredients
Grogu shortbread:
- 100g [3.5 oz] unsalted butter
- 50g [¼ cup] caster sugar
- 150g [1¼ cups] plain [all-purpose] flour
- 6 tbsp royal icing sugar
- 1 tbsp cool water
- Peppermint green food colouring
- Jade green food colouring
- Black food colouring
- White food colouring
‘Lava’ shards:
- Liquid glucose
- Red food colouring to drop
- Orange food colouring to drop
- Yellow food colouring to drop
Grogu cake:
- 205g [1 cup + 2 tbsp in chips] dark chocolate (75% or higher)
- 205g [7.25 oz] unsalted butter
- 10g (1tbsp) coffee granules (optional)
- 95ml [3oz] boiling water
- 190g eggs (about three medium sized eggs)
- 75ml [2.5 oz] buttermilk
- 150g [¾ cup] caster sugar
- 230g [1¼ cup] light brown sugar
- 190g [1¾ cups] plain [all-purpose] flour
- 30g [¼ cup] cocoa powder
- ½ tsp baking powder
- ¼ tsp bicarbonate of soda [baking soda]
Buttercream:
- 200g [7 oz] unsalted butter
- 400g [4 cups] icing [confectioners] sugar
- 2 heaped tbsp of tinned caramel sauce
- ½ tsp sea salt
- 4 tbsp whole milk
- Navy food colouring
- Rose pink food colouring
- Purple food colouring
- White food colouring
Serves: 12+
Preparation time: 1 hour
Chilling time: 30 minutes + in between stages
Baking time: 1 hour 50 minutes total
Method
Shortbread:
- Make the shortbread first. Beat the butter to loosen it a little. Beat in the sugar until soft and fluffy. Add the flour and mix until a dough is formed.
- Roll your dough out until around 1-2 cm thick. It is important to have a sturdy biscuit for this recipe so don’t be afraid to make a slightly thicker biscuit. This shortbread will bake well even when thick so long as you bake it for a little longer.
- Cut out your Grogu head. I drew a stencil on baking parchment first, cut it out and then traced around it in the dough with a sharp knife.
- If you have any dough left, feel free to cut out more shapes i.e. stars.
- Carefully transfer your shapes onto a tray lined with baking parchment.
- Chill in the fridge for 30 minutes. Do not skip this step or you may end up with very flat, shapeless biscuits!
Grogu cake:
- Whilst your shortbread is chilling, make your cake mix.
- Preheat your oven to 180°C [350°F] or 160°C fan. Grease and line three 6 inch cake tins and set aside.
- Melt the dark chocolate and butter together either in a microwave in 20 second bursts – mixing in between bursts – or over a bain marie (a glass bowl sitting over a pot of boiling water).
- Sieve the flour into a bowl. Add the cocoa powder, baking powder, bicarbonate of soda and both sugars to the bowl and mix well. Set aside.
- Mix the coffee granules and boiling water together until the granules have dissolved. Stir this coffee mix into the melted chocolate/butter mix until combined.
- In a separate bowl, whisk together the buttermilk and eggs.
- Combine the dry ingredients with the melted chocolate/butter, folding in with a spatula. Fold in the whisked eggs and buttermilk until combined.
- Split the mixture evenly between your three tins.
- First, bake the shortbread for 12-15 minutes until golden brown. Depending on the thickness of your biscuit, it may need a little longer so keep an eye on it.
- When your shortbread is baked, allow it to cool on the tray completely.
- Turn the oven down to 160°C [320°F] or 140°C fan and wait until it has reached this temperature.
- Bake your sponges for 30 to 35 minutes until a skewer or cocktail stick comes out clean when you test your sponges.
- Allow your sponges to cool in the tins for 10 or so minutes before transferring to a wire rack to cool completely.
‘Lava’ shards:
- Turn your oven down to 150°C [300°F] or 130°C fan.
- Squeeze some blobs of liquid glucose on a tray lined with baking parchment or a silicone sheet.
- Drop in the red food colouring at the bottom of each blob, orange in the middle and yellow at the top.
- Leave to bubble up in the oven for around 1 hour. Refrain from opening the oven door before this point (unless the shards look close to burning) as you risk popping any bubbles.
- Once bubbly and hardened, take out of the oven and leave your ‘lava’ to cool on the tray.
- While your ‘lava’ is doing its thing, decorate Grogu.
- Mix together the royal icing sugar, water and peppermint green food colouring.
- Use this and a piping bag with a very small tip cut off to pipe the outline of Grogu’s head. Simply follow the shape of your biscuit, leaving a small gap from the outside to avoid it spilling over. Then, draw the indents of his ears and pipe the outlines of his eyes.
- Leave for a few minutes to dry. “Flood” the bottoms of his ears with the peppermint icing.
- Darken the remainder of your icing mix with the jade green food colouring and use this to “flood” the rest of his head, using a cocktail stick to help spread it up to the outline.
- Place the shortbread in the fridge to help it set quicker.
Decoration:
- Make the buttercream for your cake. Beat the butter to loosen it, then beat the icing [confectioners] sugar in a bit at a time.
- Add in your caramel and sea salt (adjust to taste) then beat again.
- If the buttercream feels a bit stiff, add the milk 1 tbsp at a time until it’s softer. This cake is very soft so you don’t want the buttercream being too stiff and ripping it while you are decorating.
- When your sponges are cool, begin decorating the cake.
- Spread the buttercream on one sponge. Add the second one on the top and repeat. Finally, add the last sponge on and spread a thin layer of buttercream over the whole cake, forming a crumb coat. Make sure to fill in any gaps between the layers.
- Chill your cake in the fridge.
- Add the black food colouring into the remaining royal icing sugar mix (it will turn black even though the base is already green). Use this to “flood” Grogu’s eyes and place the shortbread back in the fridge.
- Separate your buttercream into three bowls, leaving most of the buttercream in its original bowl for the navy base and smaller amounts for the pink and purple elements in the two new bowls.
- Mix in your separate food dyes to create your desired shades and tints of colour.
- Apply the navy buttercream first as this will make up the majority of the cake’s colour. Smooth with a palette knife warmed with boiling hot water.
- Then apply the pink and purple in patches around the cake. Smooth the warm palette knife around again to create the wispy effect.
- Put the cake back in the fridge to chill again.
Finishing touches:
- If Grogu’s eyes are solid enough, apply small dots in his eyes for the ‘shine’. Apply some pink food colouring mixed with a splash of vodka or brush some edible pink dust to the bottoms of his ears for a fleshy look. Use edible green paint or the peppermint food dye to paint on details like his nose, mouth, cheekbones and wrinkles.
- Put Grogu back in the fridge and leave to set.
- For the last element of the cake, flick edible white paint or white food colouring mixed with a splash of vodka over the cake to create a star-like effect.
- Gently release your lava from the baking parchment, if cool enough to do so, and break into pieces differing in sizes.
- Very carefully push the ‘lava’ shards into the top of your cake in whatever pattern you fancy.
- When Grogu is completely set, press him gently into the front of your cake. You don’t need to push too hard here as the biscuit will ‘stick’ to the buttercream easily and you don’t want to risk breaking your masterpiece!
This wonderfully delicious Grogu cake is best enjoyed on the day but will last in an airtight container/cake box for 3-4 days. Enjoy!
The TV Show
Okay, so you will quickly learn on this blog that I am a massive nerd. So, now that has been established, it may not come as a surprise that I am a BIG Star Wars fan. I’ve seen every film more times than I can count and I’m all up to date on all of the new Disney+ series. So far, my favourite has to be The Mandalorian or Andor. SO GOOD.
Naturally, this meant I wanted to dedicate at least one bake (there will be more!) to this wondrous world created by the brilliant mind of George Lucas. As this particular cake features a great big Grogu head as the main focus point (despite it being a cake), I’m going to dedicate this post to The Mandalorian.

Inspired by George Lucas’s Star Wars Universe, The Mandalorian was created by proud Star Wars fan; John Favreau.
A multitude of directors put their mark on each episode, including the likes of Taika Waititi, Dave Filoni, Rick Famuyiwa, Deborah Chow, Bryce Dallas Howard, Peyton Reed, Carl Weathers, Robert Rodriguez and John Favreau himself. As for The Mandalorian character AKA Grogu’s best pal, he is brought to life by the impeccable Pedro Pascal.
Most people, even those who haven’t seen The Mandalorian, will know Grogu. Whether by his cute personality and appearance, or the way he is known (inaccurately) as “Baby Yoda”, Grogu is the most recognisable character aside from The Mandalorian himself. That’s why I wanted to make him the star of my cake.
Recipe Card

Grogu Cake | The Mandalorian
Ingredients
For the Grogu shortbread:
- 100 g [3.5 oz] unsalted butter
- 50 g [¼ cup] caster sugar
- 150 g [1¼ cups] plain [all-purpose] flour
- 6 tbsp royal icing sugar
- 1 tbsp cool water
- Peppermint green food colouring
- Jade green food colouring
- Black food colouring
- White food colouring
For the ‘lava’ shards:
- Liquid glucose
- Red food colouring to drop
- Orange food colouring to drop
- Yellow food colouring to drop
For the cake:
- 205 g [1 cup + 2 tbsp] dark chocolate 75% or higher
- 205 g [7.25 oz] unsalted butter
- 10 g 1tbsp coffee granules (optional)
- 95 ml [3oz] boiling water
- 190 g eggs about three medium sized eggs
- 75 ml [2.5 oz] buttermilk
- 150 g [¾ cup] caster sugar
- 230 g [1¼ cup] light brown sugar
- 190 g [1¾ cups] plain [all-purpose] flour
- 30 g [¼ cup] cocoa powder
- ½ tsp baking powder
- ¼ tsp bicarbonate of soda [baking soda]
For the buttercream:
- 200 g [7 oz] unsalted butter
- 400 g [4 cups] icing [confectioners] sugar
- 2 tbsp tbsp of tinned caramel sauce heaped
- ½ tsp sea salt
- 4 tbsp whole milk
- Navy food colouring
- Rose pink food colouring
- Purple food colouring
- White food colouring
Instructions
- Make the shortbread first. Beat the butter to loosen it a little. Beat in the sugar until soft and fluffy. Add the flour and mix until a dough is formed.
- Roll your dough out until around 1-2 cm thick. It is important to have a sturdy biscuit for this recipe so don’t be afraid to make a slightly thicker biscuit. This shortbread will bake well even when thick so long as you bake it for a little longer.
- Cut out your Grogu head. I drew a stencil on baking parchment first, cut it out and then traced around it in the dough with a sharp knife.
- If you have any dough left, feel free to cut out more shapes i.e. stars.
- Carefully transfer your shapes onto a tray lined with baking parchment.
- Chill in the fridge for 30 minutes. Do not skip this step or you may end up with very flat, shapeless biscuits!
- Whilst your shortbread is chilling, make your cake mix.
- Preheat your oven to 180°C [350°F] or 160°C fan. Grease and line three 6 inch cake tins and set aside.
- Melt the dark chocolate and butter together either in a microwave in 20 second bursts – mixing in between bursts – or over a bain marie (a glass bowl sitting over a pot of boiling water).
- Sieve the flour into a bowl. Add the cocoa powder, baking powder, bicarbonate of soda and both sugars to the bowl and mix well. Set aside.
- Mix the coffee granules and boiling water together until the granules have dissolved. Stir this coffee mix into the melted chocolate/butter mix until combined.
- In a separate bowl, whisk together the buttermilk and eggs.
- Combine the dry ingredients with the melted chocolate/butter, folding in with a spatula. Fold in the whisked eggs and buttermilk until combined.
- Split the mixture evenly between your three tins.
- First, bake the shortbread for 12-15 minutes until golden brown. Depending on the thickness of your biscuit, it may need a little longer so keep an eye on it.
- When your shortbread is baked, allow it to cool on the tray completely.
- Turn the oven down to 160°C [320°F] or 140°C fan and wait until it has reached this temperature.
- Bake your sponges for 30 to 35 minutes until a skewer or cocktail stick comes out clean when you test your sponges.
- Allow your sponges to cool in the tins for 10 or so minutes before transferring to a wire rack to cool completely.
- Turn your oven down to 150°C [300°F] or 130°C fan.
- Squeeze some blobs of liquid glucose on a tray lined with baking parchment or a silicone sheet.
- Drop in the red food colouring at the bottom of each blob, orange in the middle and yellow at the top.
- Leave to bubble up in the oven for around 1 hour. Refrain from opening the oven door before this point (unless the shards look close to burning) as you risk popping any bubbles.
- Once bubbly and hardened, take out of the oven and leave your ‘lava’ to cool on the tray.
- While your ‘lava’ is doing its thing, decorate Grogu.
- Mix together the royal icing sugar, water and peppermint green food colouring.
- Use this and a piping bag with a very small tip cut off to pipe the outline of Grogu’s head. Simply follow the shape of your biscuit, leaving a small gap from the outside to avoid it spilling over. Then, draw the indents of his ears and pipe the outlines of his eyes.
- Leave for a few minutes to dry. “Flood” the bottoms of his ears with the peppermint icing.
- Darken the remainder of your icing mix with the jade green food colouring and use this to “flood” the rest of his head, using a cocktail stick to help spread it up to the outline.
- Place the shortbread in the fridge to help it set quicker.
- Make the buttercream for your cake. Beat the butter to loosen it, then beat the icing [confectioners] sugar in a bit at a time.
- Add in your caramel and sea salt (adjust to taste) then beat again.
- If the buttercream feels a bit stiff, add the milk 1 tbsp at a time until it’s softer. This cake is very soft so you don’t want the buttercream being too stiff and ripping it while you are decorating.
- When your sponges are cool, begin decorating the cake.
- Spread the buttercream on one sponge. Add the second one on the top and repeat. Finally, add the last sponge on and spread a thin layer of buttercream over the whole cake, forming a crumb coat. Make sure to fill in any gaps between the layers.
- Chill your cake in the fridge.
- Add the black food colouring into the remaining royal icing sugar mix (it will turn black even though the base is already green). Use this to “flood” Grogu’s eyes and place the shortbread back in the fridge.
- Separate your buttercream into three bowls, leaving most of the buttercream in its original bowl for the navy base and smaller amounts for the pink and purple elements in the two new bowls.
- Mix in your separate food dyes to create your desired shades and tints of colour.
- Apply the navy buttercream first as this will make up the majority of the cake’s colour. Smooth with a palette knife warmed with boiling hot water.
- Then apply the pink and purple in patches around the cake. Smooth the warm palette knife around again to create the wispy effect.
- Put the cake back in the fridge to chill again.
- If Grogu’s eyes are solid enough, apply small dots in his eyes for the ‘shine’. Apply some pink food colouring mixed with a splash of vodka or brush some edible pink dust to the bottoms of his ears for a fleshy look. Use edible green paint or the peppermint food dye to paint on details like his nose, mouth, cheekbones and wrinkles.
- Put Grogu back in the fridge and leave to set.
- For the last element of the cake, flick edible white paint or white food colouring mixed with a splash of vodka over the cake to create a star-like effect.
- Gently release your lava from the baking parchment, if cool enough to do so, and break into pieces differing in sizes.
- Very carefully push the ‘lava’ shards into the top of your cake in whatever pattern you fancy.
- When Grogu is completely set, press him gently into the front of your cake. You don’t need to push too hard here as the biscuit will ‘stick’ to the buttercream easily and you don’t want to risk breaking your masterpiece!
Notes
© Flavour of the Film. All content and imagery is copyright protected. Please do not use any of my images or written content without prior permission. If you would like to share any of the recipes or images on Flavour of the Film, please link back to the recipe in question and rewrite it in your own words, crediting Flavour of the Film as the original source.


4 Comments
Comments are closed.