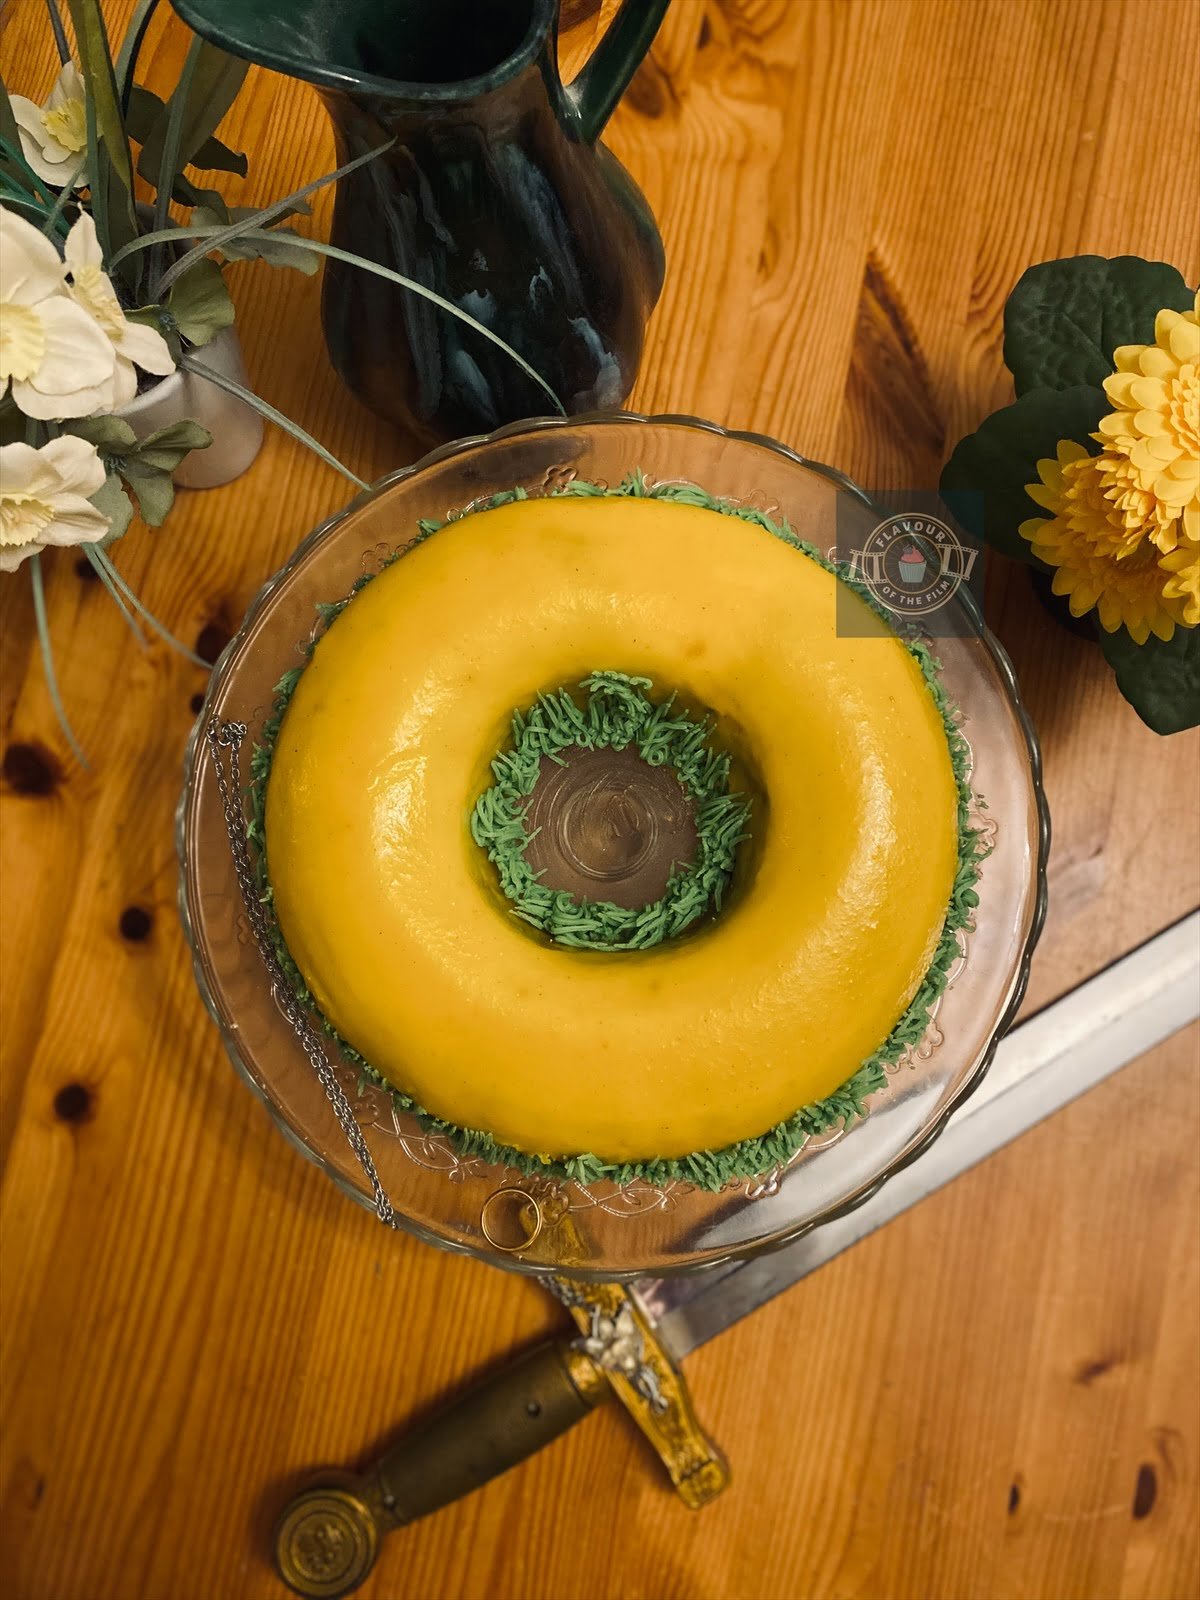
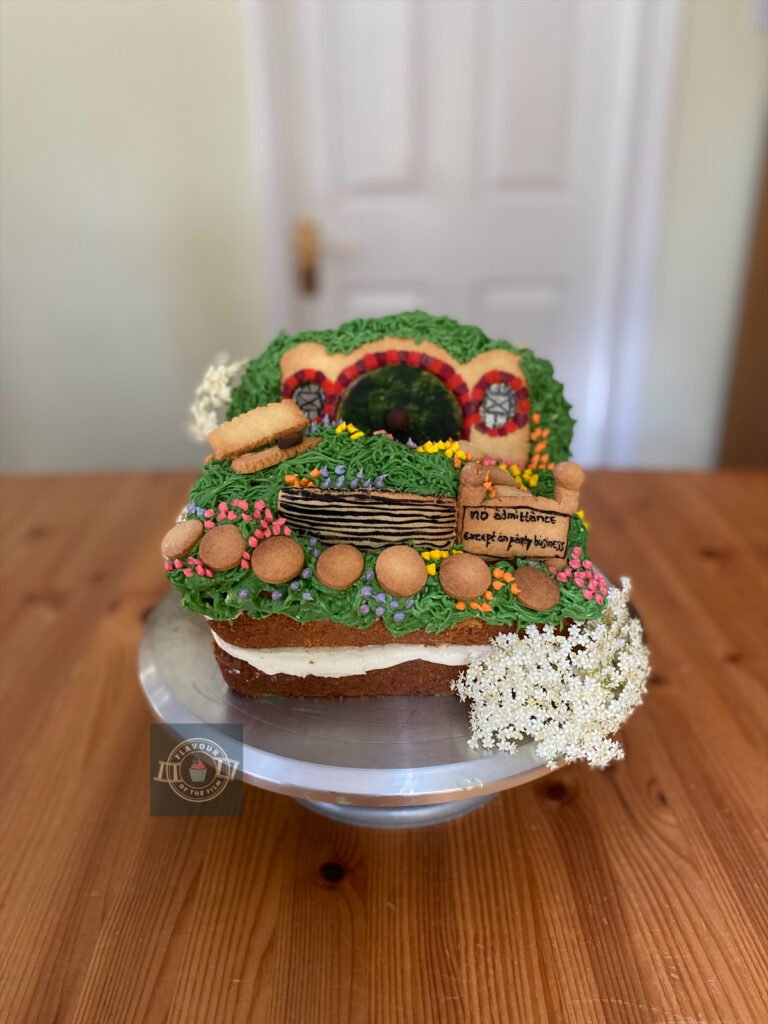
Didn’t I say in my The Hobbit landscape cake post that I would create some recipes inspired by The Lord of the Rings, too? Well, here we are, friends. The beginning. My white chocolate mirror glaze carrot cake encapsulates idyllic Shire-inspired flavours with the catalyst for the story: the One Ring. One cake to rule them all? Perhaps. Pack your sacks, friends. There’s a long journey ahead of us.
Contents
The Bake
“It began long ago…”
From the moment that I decided I was creating a Fellowship of the Ring recipe, I knew it was going to be a carrot cake of some kind. I’m not entirely sure why, but I reckon it’s because carrots give me Shire vibes. Plus, it’s a place that gives you the warm fuzzies.
Is there really a better cake than carrot cake that can bring on the same warm fuzzy feelings? With all of the sweetness marrying with a delicate balance of uplifting spices?
I never used to like carrot cake. Growing up, I couldn’t wrap my child mind around the idea of a vegetable in a cake tasting nice. Now? Now, I LOVE it. So many beautiful flavours dancing around in every bite. Wonderful.


Aesthetically, there was no other inspiration to be drawn from but the One Ring for me.
It’s the catalyst for the journey. It’s what brings the whole company together and sets them on this adventure of a lifetime. How could a bake celebrating Fellowship of the Ring be anything else?
To create the shape, I used a donut shaped silicone cake tin. I have a Bundt tin, but to create the smooth effect of a gold ring, I needed a smooth cake tin. That’s why a donut shaped cake tin is ideal. Plus, you can make cakes that look like donuts for other occasions, which is pretty cool.

Carrot cake is usually served with a cream cheese frosting, so I covered the cake in a thin layer of it.
However, because I wanted to get a proper shine on my The Lord of the Rings cake, I needed to change the ratios of the ingredients in a cream cheese frosting to make it sturdier. The reason being is because I created a white chocolate mirror glaze to go over the top of it.
A mirror glaze is created using heat and it is warm when you pour it over your bake. This means that whatever is underneath needs to be solid and cool enough so that the mirror glaze doesn’t melt through.
When researching various methods of creating a mirror glaze, I came across this one by Nagi of RecipeTinEats. I loved that she created a mirror glaze without using condensed milk or glucose, meaning her glaze was less likely to be rubbery and more melt-in-the-mouth.

I went to her recipe for guidance and created my own white chocolate mirror glaze.
White chocolate because it’s delicious with carrot cake, but also because you can add colour to it. I wanted to achieve a shiny gold vibe for this cake, so I needed to be able to add food colouring. Nagi’s website is great, so I was happy to see a very detailed post on something that is a little technical. I also referred to this one on BBC Good Foods for method guidance.
Different mirror glazes require different things. The key for a white chocolate mirror glaze is to track the temperature with a food grade thermometer. This is a tool I have mentioned in a few of my other recipes, like my The Nightmare Before Christmas cake and my Avatar: The Last Airbender cupcakes because it’s a useful tool for tempering chocolate successfully.
Don’t stress, you can use a meat thermometer if you don’t have or want a sugar thermometer! Just so long as you can measure the temperature up to 103°C [217°F].


The other important thing is to make sure you use the right amount of gelatine in your white chocolate mirror glaze.
Whether that be in powder form or sheet/leaf form. Using too much can make for a rubbery mirror glaze. Using too little can result in the mirror glaze not setting properly once on your cake. Blooming the gelatine is a key step; this simply means hydrating the gelatine before using it.

To finish, I piped some buttercream grass around my One Ring cake.
I wanted to give an extra effect with my white chocolate mirror glaze cake and anyone who has tried piping on mirror glaze will know it isn’t the easiest thing to do, especially when trying to pipe on the sides of the glaze. Gravity is not our friend in that instance.
Piping grass gives it a simple but striking look. Plus, it pays homage to the fact that though the One Ring was found by Smeagle at the bottom of a river, it had been kept secret in the Shire for a long time after that. Sneaky Bilbo.
I considered airbrushing some of the elvish inscription onto the mirror glaze.
I got as far as creating a paper template and then realised the template would just ruin the surface of the glaze once stuck to it, so I aborted the idea. Whilst it would have been a cool effect, the inscription is only visible when the One Ring is subjected to heat, so it wasn’t a necessity.
I was pretty sad about it, though. If the cake was covered in just frosting, that would have worked a lot better for an airbrushed inscription. I wanted the shine of the white chocolate mirror glaze, though, so I compromised.
**Note: If you’re super keen to include the elvish inscription, you can colour the frosting of this cake and airbrush/pipe/paint onto it instead of including the white chocolate mirror glaze. You won’t get the shine, but it does mean you can personalise the cake if desired. If doing this, make sure to double the cream cheese frosting ingredient measurements and chill before doing the inscription.
Top Tips
- Blooming the gelatine with water is a crucial step, so do not skip it! The ratio of gelatine powder to water is usually 1:6, i.e. 1g of gelatine to 6g (ml) water. Note: vegan gelatine alternatives vary in their water ratio; some require more than a regular gelatine blooming. Agar-agar powder is what I recommend, but if you choose a different alternative, be sure to follow the packet instructions.
- I recommend getting yourself a food grade thermometer if you don’t already have one. This can be a meat thermometer or a sugar one!
- As always, be careful not to over mix the cake batter so that you can achieve a light and fluffy result.
- Grease your donut tin well before adding the cake batter, whether that be a metal or a silicone one. You want to make sure that the cake comes out in one piece!
- Pay extra attention to the cooling and straining process in the making of the white chocolate mirror glaze. It’s necessary to get the best results. See Nagi’s recipe linked in the ‘About the bake’ section for further troubleshooting tips.
- Be patient when making the white chocolate mirror glaze. Resist the urge to whisk or vigorously mix the glaze at any point. This can affect the shine and smoothness, not to mention increasing the risk of bubbles forming.
- I used white chocolate with vanilla running through it for my glaze because I love the way the tiny specks of vanilla come through the gold tone. It hints at the true darkness the One Ring brings.
- Do not underestimate the chilling stages of this bake. They are crucial!
- Best results are achieved when you can pour the glaze over in one go and cover the entire cake. The shape makes it easier to cover everything, so pour with confidence and with a thick stream.
- Slide a large knife and a large palette knife underneath the cake to lift it when needed. This makes transferring it to a cake stand much easier. Do this as soon as you have glazed your cake!
- To pipe the buttercream grass, use a multiple hole piping tip. Squeeze at the base of the cake, release and pull up to ‘drop’ the shards of grass up the sides of the cake.
This One Ring The Lord of the Rings cake really is something special. It’s a wonderful bake for any occasion, but especially great for when you want to celebrate any The Lord of the Rings fans that you know and love. Feel free to personalise it if that floats your boat. Enjoy!
Happy baking, happy eating!
The Recipe
Ingredients
Carrot cake:
- 135g [½ cup + 3 tbsp] light brown sugar
- 115ml [3.5 oz] sunflower oil
- 2 large eggs
- 150g [roughly 1 large carrot] grated carrots
- 135g [¾ cup + 1 tbsp] self-raising flour
- ¾ tsp bicarbonate of soda [baking soda]
- ½ tsp ginger
- ½ tsp nutmeg
- ½ tsp sweet cinnamon
- 1 tsp mixed spice
Cream cheese frosting:
- 75g [2.75 oz] unsalted butter softened or room temperature
- 75g [2.75 oz] full fat cream cheese
- 200g [1¼ cup + 2 tbsp] icing [confectioners] sugar
- ½ tsp vanilla extract optional
White chocolate mirror glaze:
- 200g [1 cup] caster sugar
- 100ml [3.5 oz] cold water
- 150ml [5.25 oz] double cream
- 150g [5.25 oz] white chocolate chopped
- 2 tsp gelatine or agar-agar powder bloomed with 100ml [3.5 oz] cold water
- Gold or yellow liquid food colouring oil based
‘Grass’ buttercream (optional):
- 50g [1.75 oz] unsalted butter softened or room temperature
- 100g [½ cup + 3 tbsp] icing [confectioners] sugar
- ½ tsp vanilla extract
- Green liquid food colouring oil based
Serves: 8 – 10
Preparation time: 45 minutes
Baking time: 30 – 35 minutes
Chilling time: Up to 3 hours
Decorating time: 30 minutes
Method
The Lord of the Rings cake:
- Preheat your oven to 180°C [325°F] or 160°C fan. Generously grease a 9 inch donut tin (silicone or metal) with sunflower oil or butter.
- If needing to, grate whole carrots to the weight of 150g with a cheese grater now.
- In a large mixing bowl, mix together the sugar and sunflower oil gently with a wooden spoon.
- Add the eggs and mix in with the wooden spoon. No need to beat vigorously here.
- Gently mix in the grated carrot until well incorporated.
- Sieve the flour into your mixture. Add the bicarbonate of soda. Spoon in the ginger, nutmeg, cinnamon and mixed spice. Mix everything together with your wooden spoon until the flour is no longer visible. Be careful not to over mix.
- Pour the mixture into the greased donut shaped tin. Place the tin onto a baking tray for easier manoeuvring. Slide the tray onto the middle shelf of your oven and bake for 30 – 35 minutes until baked.
- Your cake will be ready when a skewer/cocktail stick comes out clean when tested; the surface springs back when gently pressed on with your finger, and you hear little to no bubbling/crackling sound when you listen to your cake.
- Once baked, leave the cake to cool on the tray for 10 minutes, then leave to cool completely in the tin on a wire rack before removing.
Cream cheese frosting:
- While your cake is cooling, make your cream cheese frosting.
- In a large mixing bowl, beat the butter until it is nice and smooth. Add the cream cheese and beat into the butter until smooth.
- Add half of the icing sugar and beat in. Add the remaining sugar and beat in until your frosting is light and fluffy.
- When your cake is cool, remove it from the tin upside down. Place it on a flat plate or chopping board.
- Spread the frosting over the surface of the cake. I found this easiest when using an offset palette knife, then a rubber scraper to spread the frosting evenly over the curves of the cake. Make the frosting as smooth as you possibly can so that your white chocolate mirror glaze will be as smooth as possible on application! If needed, pour boiling hot water on the palette knife you are using to smooth your frosting, wipe it dry and very gently press this onto the frosting to smooth it over.
- Put your cake in the fridge to chill for at least 1 hour.
Gelatine/agar-agar powder:
- Bloom the gelatine. Measure the water out and sprinkle the gelatine or agar-agar powder on the top. Mix briefly, then pour into a small heavy duty saucepan. Bring to the boil over a medium heat. Remove from the heat as soon as the mixture reaches a boil.
- Pour the gelatine mix into a small bowl and leave on the side or refrigerate for around 10 minutes, until set.
White chocolate mirror glaze:
- If needed, chop your white chocolate into smaller pieces. Add the chocolate to a medium sized bowl and drop in the food colouring. You don’t need much to achieve a yellow/gold colour.
- In a heavy duty saucepan, mix together the sugar and water until dissolved. Bring to the boil, keeping track of the temperature with your thermometer. Once the temperature reaches 103°C [217°F], remove the syrup from the heat. Mix in the cream briefly, then add the set gelatine/agar-agar. Break the gelatine up into smaller pieces, then mix in with a wooden spoon gently and patiently until dissolved. Do not mix vigorously or whisk here.
- If your gelatine/agar-agar mix is struggling to dissolve, place it back over a low heat and mix in figure-of-eight motions until dissolved.
- Pour the mixture over the chocolate and food colouring. Mix briefly, then leave to melt for around 5 minutes. Be sure to mix every now and again during this time to prevent a ‘skin’ from forming on the top of the mixture.
- After the chocolate has melted fully, use an emulsion blender to blend the mixture briefly until smooth. Make sure to keep the entire end of the blender under the surface of the mixture to prevent bubbles forming.
- Pour the white chocolate mirror glaze through a sieve and into a clean bowl. Be sure to pour the mixture through the sieve while holding the sieve as close to the clean bowl as possible. If you pour the mixture from a height, you risk bubbles forming.
- Rapidly twist the bowl in your hands to check for any bubbles. If any come up, use a cocktail stick to gently pop them individually.
Chilling:
- Cover the white chocolate mirror glaze with cling film/plastic wrap, making sure to gently press the cling film/plastic wrap to the surface of the glaze to prevent a ‘skin’ from forming.
- Allow the glaze to cool on the side for up to 2 hours or until the glaze reaches 30°C [87°F]. My glaze cooled to this temperature in less than an hour, so it depends on the temperature of your kitchen. Do not let it get much cooler than 30°C as it will be harder to pour smoothly.
- If wanting to chill the glaze overnight, leave on the side for 30 minutes, then place in the fridge. When ready to use it, heat it up in a bain marie [double boiler] to the above temperature and strain through a sieve into a jug.
Glazing:
- When your glaze is at the right working temperature, retrieve your cake from the fridge. Carefully slide two large knives or palette knives under your cake. Lift it from the plate/chopping board and put it back on your wire rack. Slide a clean baking tray underneath the wire rack. This will catch the excess glaze as you pour it.
- Strain your glaze one more time into a jug, making sure to minimise the height of the glaze falling as much as possible.
- Pour the glaze from the jug confidently over your cake in circular motions until the cake is completely covered.
- Once the cake has stopped dripping, slide your two large knives or palette knives under the cake carefully – trimming the drips in the process – and lift onto a cake stand/board/plate.
- Chill in the fridge while you make your ‘grass’ buttercream.
‘Grass’ buttercream:
- Beat the butter in a bowl to loosen it. Add half of the icing sugar and beat in until smooth. Beat in the remaining icing sugar and beat until the buttercream is light and fluffy.
- Squeeze in a few drops of the green food colouring and beat into the buttercream until an even colour is achieved. Add more here if necessary.
- Spoon the buttercream into a piping bag/sandwich bag with a multiple-hole piping tip attached.
- Retrieve your white chocolate mirror glaze cake from the fridge. Pipe the buttercream around the cake to create the ‘grass’ of the Shire. Squeeze at the base of the cake, then release and pull at the same time to ‘drag’ the buttercream ‘grass’ shards up onto the sides of the cake. Be careful not to touch the glaze with your piping tip by accident!
This deliciously moist One Ring The Lord of the Rings cake is best eaten on the day of making as the glaze may soften over time. But, it can be kept covered in the fridge and consumed for up to 2 more days. It’s the perfect cake for a small TLOTR celebration or marathon session. Enjoy!
The Film
My love for The Lord of the Rings began long ago, that’s for sure. Similarly with my annual Harry Potter marathon, I make sure to watch The Lord of the Rings trilogy at least once a year.
One of my marathons even took place whilst I was living in Japan. Now that was magical. Really, really magical.
My Dad has been a huge fan of the books – and the films – for as long as I can remember, and when I found my way to both, it brought us closer. I’m a big fan, but I’d still say that my Dad is an even bigger one.
We went to see Return of the King together when it was replaying in cinemas for the twentieth anniversary. I even wore a glow-in-the-dark Gandalf T-shirt. Don’t worry, it wasn’t distractingly bright.
In 2001, Peter Jackson brought us the first of a series of adaptations of J.R.R. Tolkien’s original work – one that would quickly be realised as a game changer.
The Lord of the Rings: Fellowship of the Ring is the first of a long and fantastical trilogy. It begins with Frodo, a hobbit from the Shire, who finds himself responsible for destroying an item his uncle had had in his possession: the One Ring. An item that means only evil and dark power and death in Middle Earth.
Frodo, alongside eight companions of all walks of Middle Earth life, set out on the long journey to Mordor to destroy the One Ring once and for all. Doing so with the intention of protecting Middle Earth from the darkest of them all: Sauron.
What I love about The Lord of the Rings trilogy is how detailed and complex the world is. I said it in my The Hobbit post, but it’s worth repeating: Middle Earth is one of the best fantasy worlds ever created.


It’s such a simplistic concept: some hobbits, men, a wizard, an elf and a dwarf travel across their world to destroy a gold ring.
It sounds like the start of a Dad joke… but, the simplicity of it means that so much complexity and depth can be layered into it. Which, The Lord of the Rings does so beautifully.
The characters, the places, the trials and tribulations. The PURE HEART! Connections between the characters are everything in this story and it plays out so well. My favourite has to be Samwise and his unfaltering loyalty to Frodo. Sam is about as pure as one can get.
The characters are what make the story what it is and the casting was spot on for this big screen trilogy. The likes of which include Elijah Wood; Sir Ian McKellan, Sean Astin, Cate Blanchett, Viggo Mortensen, Billy Boyd, Dominic Monaghan, Sean Bean, Orlando Bloom and John Rhys-Davies.
Not to mention the legend that is Christopher Lee, plus Ian Holm, Liv Tyler, Hugo Weaving, Andy Serkis, Sala Baker, Alan Howard and so many more.
A massive cast for a massive first instalment.

Then there’s the setting. New Zealand was the perfect place to represent Middle Earth.
Peter Jackson and the crew really emphasised the beauty of this country in The Lord of the Rings. The cinematography is part of what makes this film series so memorable. It even earned Fellowship of the Ring an Academy Award. No surprise there if you know just how many awards the entire trilogy was both nominated for and won in the early 2000s.
Peter Jackson also co-wrote the screenplay alongside Fran Walsh and Philippa Boyens. Together, they were nominated for several awards for Best Writing. I could go on about just how many awards Fellowship of the Ring was nominated for and won, but I won’t.
The most important thing is that the fans love this adaptation.
Both new fans and fans of the books. That’s a relatively rare achievement in the world of cinema, especially these days. There are a plethora of reasons why The Lord of the Rings still remains to be some of the most well-loved films, especially among fantasy fans.
Which is why it was even more important that I got this bake right.
Recipe Card

White Chocolate Mirror Glaze Carrot Cake | The Lord of the Rings: Fellowship of the Ring
Equipment
- 1 9 inch donut shaped tin
- 1 Food grade thermometer (meat or sugar)
Ingredients
Carrot cake:
- 135 g [½ cup + 3 tbsp] light brown sugar
- 115 ml [3.5 oz] sunflower oil
- 2 large eggs
- 150 g [roughly 1 large carrot] grated carrots
- 135 g [¾ cup + 1 tbsp] self-raising flour
- ¾ tsp bicarbonate of soda [baking soda]
- ½ tsp ginger
- ½ tsp nutmeg
- ½ tsp sweet cinnamon
- 1 tsp mixed spice
Cream cheese frosting:
- 75 g [2.75 oz] unsalted butter softened or room temperature
- 75 g [2.75 oz] full fat cream cheese
- 200 g [1¼ cup + 2 tbsp] icing [confectioners] sugar
- ½ tsp vanilla extract optional
White chocolate mirror glaze:
- 200 g [1 cup] caster sugar
- 100 ml [3.5 oz] cold water
- 150 ml [5.25 oz] double cream
- 150 g [5.25 oz] white chocolate chopped
- 2 tsp gelatine or agar-agar powder bloomed with 100ml [3.5 oz] cold water
- Gold or yellow liquid food colouring oil based
‘Grass’ buttercream (optional):
- 50 g [1.75 oz] unsalted butter softened or room temperature
- 100 g [½ cup + 3 tbsp] icing [confectioners] sugar
- ½ tsp vanilla extract
- Green liquid food colouring oil based
Instructions
Carrot cake:
- Preheat your oven to 180°C [325°F] or 160°C fan. Generously grease a 9 inch donut tin (silicone or metal) with sunflower oil or butter.
- If needing to, grate whole carrots to the weight of 150g with a cheese grater now.
- In a large mixing bowl, mix together the sugar and sunflower oil gently with a wooden spoon.
- Add the eggs and mix in with the wooden spoon. No need to beat vigorously here.
- Gently mix in the grated carrot until well incorporated.
- Sieve the flour into your mixture. Add the bicarbonate of soda. Spoon in the ginger, nutmeg, cinnamon and mixed spice. Mix everything together with your wooden spoon until the flour is no longer visible. Be careful not to over mix.
- Pour the mixture into the greased donut shaped tin. Place the tin onto a baking tray for easier manoeuvring. Slide the tray onto the middle shelf of your oven and bake for 30 – 35 minutes until baked.
- Your cake will be ready when a skewer/cocktail stick comes out clean when tested; the surface springs back when gently pressed on with your finger, and you hear little to no bubbling/crackling sound when you listen to your cake.
- Once baked, leave the cake to cool on the tray for 10 minutes, then leave to cool completely in the tin on a wire rack before removing.
Cream cheese frosting:
- While your cake is cooling, make your cream cheese frosting.
- In a large mixing bowl, beat the butter until it is nice and smooth. Add the cream cheese and beat into the butter until smooth.
- Add half of the icing sugar and beat in. Add the remaining sugar and beat in until your frosting is light and fluffy.
- When your cake is cool, remove it from the tin upside down. Place it on a flat plate or chopping board.
- Spread the frosting over the surface of the cake. I found this easiest when using an offset palette knife, then a rubber scraper to spread the frosting evenly over the curves of the cake. Make the frosting as smooth as you possibly can so that your white chocolate mirror glaze will be as smooth as possible on application! If needed, pour boiling hot water on the palette knife you are using to smooth your frosting, wipe it dry and very gently press this onto the frosting to smooth it over.
- Put your cake in the fridge to chill for at least 1 hour.
Gelatine/agar-agar powder:
- Bloom the gelatine. Measure the water out and sprinkle the gelatine/agar-agar powder on the top. Mix briefly, then pour into a small heavy duty saucepan. Bring to the boil over a medium heat. Remove from the heat as soon as the mixture reaches a boil.
- Pour the gelatine/agar-argar powder mix into a small bowl and leave on the side or refrigerate for around 10 minutes, until set.
White chocolate mirror glaze:
- If needed, chop your white chocolate into smaller pieces. Add the chocolate to a medium sized bowl and drop in the food colouring. You don’t need much to achieve a yellow/gold colour.
- In a heavy duty saucepan, mix together the sugar and water until dissolved. Bring to the boil, keeping track of the temperature with your thermometer. Once the temperature reaches 103°C [217°F], remove the syrup from the heat. Mix in the cream briefly, then add the set gelatine/agar-agar powder mix. Break the gelatine up into smaller pieces, then mix in with a wooden spoon gently and patiently until dissolved. Do not mix vigorously or whisk here.
- If your gelatine/agar-agar powder is struggling to dissolve, place it back over a low heat and mix in figure-of-eight motions until it has dissolved.
- Pour the mixture over the chocolate and food colouring. Mix briefly, then leave to melt for around 5 minutes. Be sure to mix every now and again during this time to prevent a ‘skin’ from forming on the top of the mixture.
- After the chocolate has melted fully, use an emulsion blender to blend the mixture briefly until smooth. Make sure to keep the entire end of the blender under the surface of the mixture to prevent bubbles forming.
- Pour the white chocolate mirror glaze through a sieve and into a clean bowl. Be sure to pour the mixture through the sieve while holding the sieve as close to the clean bowl as possible. If you pour the mixture from a height, you risk bubbles forming.
- Rapidly twist the bowl in your hands to check for any bubbles. If any come up, use a cocktail stick to gently pop them individually.
- Cover the white chocolate mirror glaze with cling film/plastic wrap, making sure to gently press the cling film/plastic wrap to the surface of the glaze to prevent a ‘skin’ from forming.
- Allow the glaze to cool on the side for up to 2 hours or until the glaze reaches 30°C [87°F]. My glaze cooled to this temperature in less than an hour, so it depends on the temperature of your kitchen. Do not let it get much cooler than 30°C as it will be harder to pour smoothly.
- If wanting to chill the glaze overnight, leave on the side for 30 minutes, then place in the fridge. When ready to use it, heat it up in a bain marie [double boiler] to the above temperature and strain through a sieve into a jug.
Glazing:
- When your glaze is at the right working temperature, retrieve your cake from the fridge. Carefully slide two large knives or palette knives under your cake. Lift it from the plate/chopping board and put it back on your wire rack. Slide a clean baking tray underneath the wire rack. This will catch the excess glaze as you pour it.
- Strain your glaze one more time into a jug, making sure to minimise the height of the glaze falling as much as possible.
- Pour the glaze from the jug confidently over your cake in circular motions until the cake is completely covered.
- Once the cake has stopped dripping, slide your two large knives or palette knives under the cake carefully – trimming the drips in the process – and lift onto a cake stand/board/plate.
- Chill in the fridge while you make your ‘grass’ buttercream.
‘Grass’ buttercream:
- Beat the butter in a bowl to loosen it. Add half of the icing sugar and beat in until smooth. Beat in the remaining icing sugar and beat until the buttercream is light and fluffy.
- Squeeze in a few drops of the green food colouring and beat into the buttercream until an even colour is achieved. Add more here if necessary.
- Spoon the buttercream into a piping bag/sandwich bag with a multiple-hole piping tip attached.
- Retrieve your white chocolate mirror glaze cake from the fridge. Pipe the buttercream around the cake to create the ‘grass’ of the Shire. Squeeze at the base of the cake, then release and pull at the same time to ‘drag’ the buttercream ‘grass’ shards up onto the sides of the cake. Be careful not to touch the glaze with your piping tip by accident!
Notes
© Flavour of the Film. All content and imagery is copyright protected. Please do not use any of my images or written content without prior permission. If you would like to share any of the recipes or images on Flavour of the Film, please link back to the recipe in question and rewrite it in your own words, crediting Flavour of the Film as the original source.
4 Comments
Comments are closed.