Spider-Man Cake | Chocolate Celebration Cake
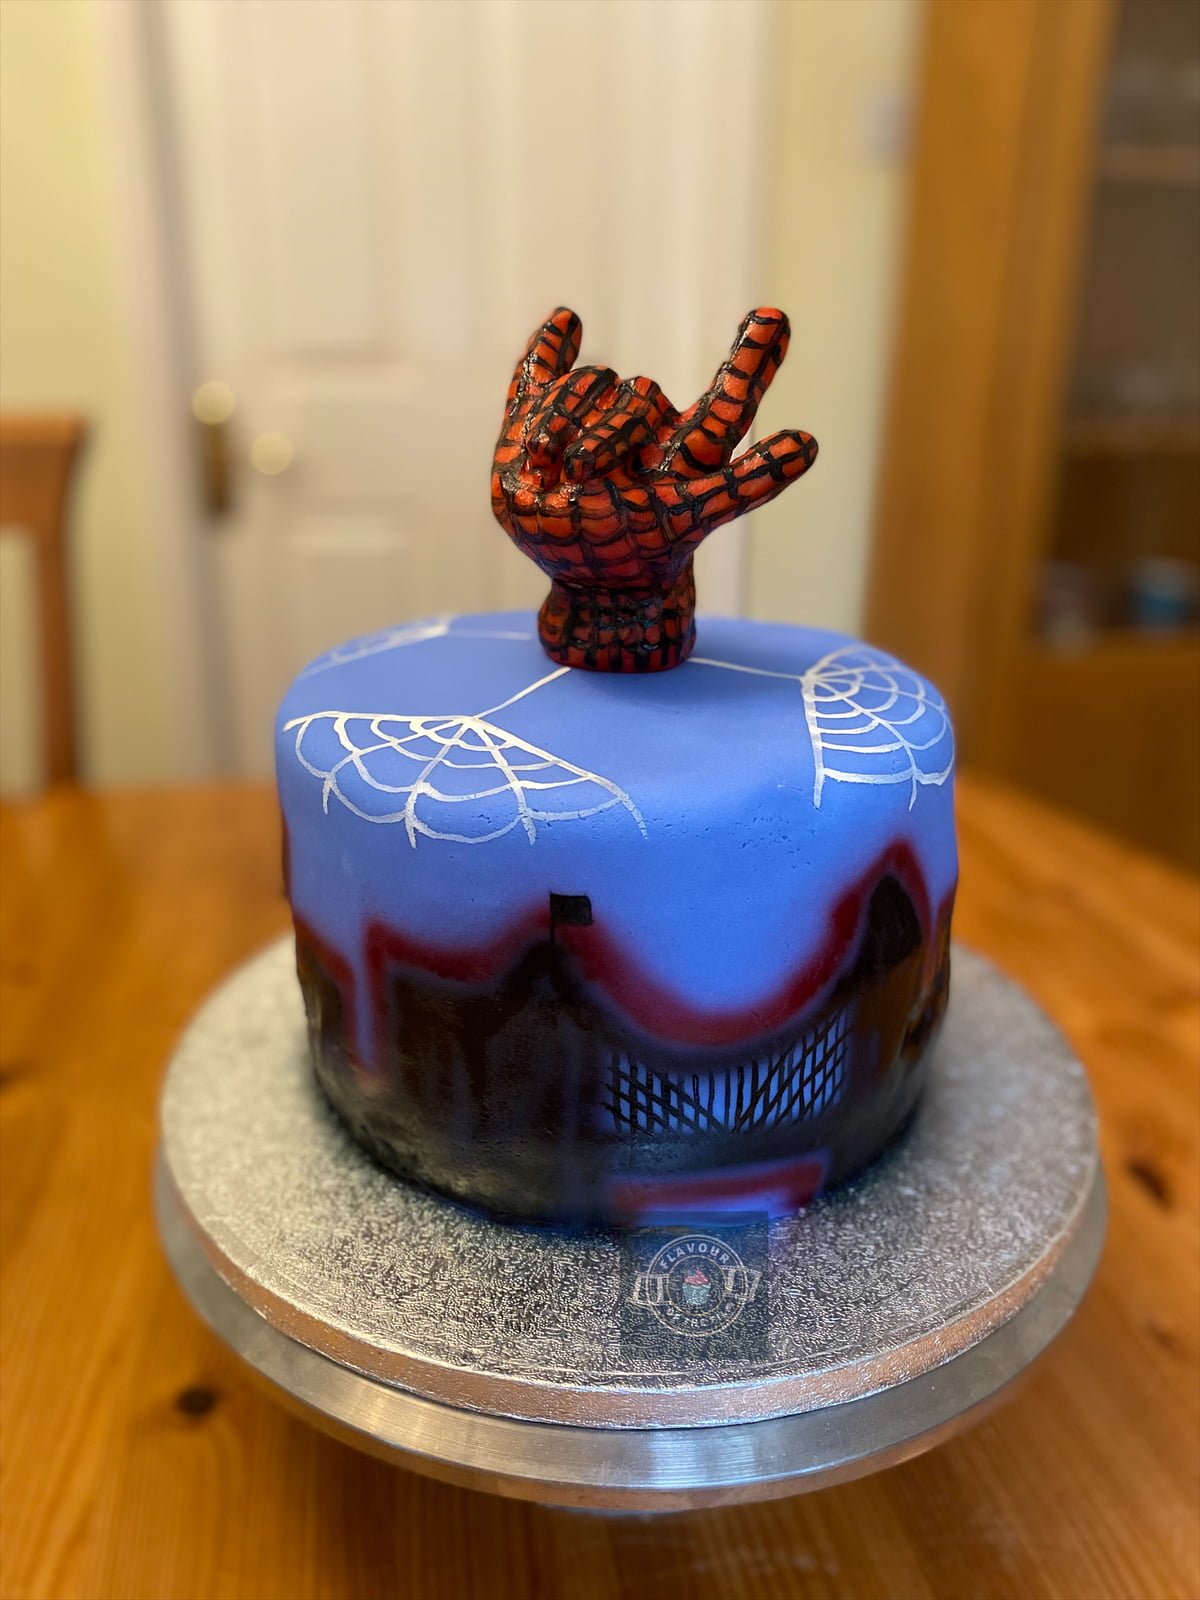
Deliciously chocolatey celebration cake covered in chocolate American buttercream and fondant icing airbrushed with a silhouette skyline of Brooklyn, NYC, topped with a sculpted modelling chocolate figure, celebrating the various Spider-Man films.
Ingredients
Spider-Man cake:
- 500 g [17.75 oz] unsalted butter room temperature
- 500 g [2½ cups] caster sugar
- 500 g eggs about 8 large eggs
- 425 g [2½ cups + 2 tbsp] self-raising flour
- 75 g [½ cup + 3 tbsp] high quality cocoa powder
Decoration:
- 150 g [5.25 oz] unsalted butter room temperature
- 550 g [3¾ cups] icing [confectioners] sugar
- 1 tbsp high quality cocoa powder or 2 rows dark chocolate melted
- 250 g [around 8.75 oz] white modelling chocolate or 500g [around 17.75 oz] red fondant icing/sugar paste
- White food colouring
- Black food colouring
- Red food colouring or airbrush colouring if using an airbrush
- Black airbrush colouring if using an airbrush
- 1 kg [around 35.25 oz] blue fondant icing/sugar paste
Instructions
- Preheat your oven to 180°C [350°F] or 160°C fan. Grease and line three 8 inch (20 cm) cake tins and set aside.
- Weigh out your eggs in their shells and find a weight as near to 500g as possible. For example, my eggs weighed 511g, so I weighed the rest of my ingredients accordingly. Whatever your eggs weigh, match the rest of the ingredients to that weight. Keep the cocoa powder at 75g and simply take 75g from the weight of your flour i.e. eggs weigh 511g so flour will be 511g – 75g cocoa powder = 436g flour.
- Beat together the butter and sugar in a large bowl until light and creamy.
- Add the eggs in one at a time and beat in until fully combined.
- Add the flour and cocoa powder and mix in just until you can no longer see any flour.
- Split the mixture evenly into the three cake tins and bake for 40 – 45 minutes, until a skewer/cocktail stick comes out clean, the surface of the cakes spring back when pressed on gently and there is little to no bubbling/crackling sound when you listen to your sponges.
- Allow the sponges to cool in the tins for around 10 minutes, then transfer to a wire rack upside down to cool completely.
- Whilst your cakes are cooling, start moulding your hand topper. If using modelling chocolate, be sure to chill every few minutes if it is a particularly warm day. Allow to solidify in the fridge (either fondant or modelling chocolate). It’s easier to mould the hand from the whole piece of chocolate or fondant rather than trying to stick multiple parts of it together!
- Make the buttercream. Beat the butter to loosen it and add half the sugar. Beat well, then add the other half of the sugar. Add the cocoa powder and beat together until light and fluffy. If needed, add 1 tbsp – 2 tbsp of water to bring together the mixture.
- Once the sponges are cool, spread a smear of buttercream on a plate/cake board/cake stand and place the bottom sponge over it. Add a generous helping of buttercream over the top of that sponge, then lay the next one on top. Repeat until all three sponges are stacked. Make sure to stack the top sponge upside down for the flattest surface possible!
- Smother the remaining buttercream over the entire cake for the fondant to stick to. Place your cake in the fridge to chill.
- On a clean surface, sprinkle some icing [confectioners] sugar over the top. Knead your blue fondant a little to soften, then roll it out using a rolling pin, making sure to keep it around 1 inch in thickness to reduce possible tearing. Roll it out as big as you can as it’s better to trim excess off than to try and patch up where the fondant didn’t quite reach.
- Retrieve your cake from the fridge. Roll the fondant over the rolling pin and use this to lay the fondant over the cake. Smooth down with your hands and trim any excess around the bottom with a sharp knife. Try not to pull and stretch it as it will rip easily.
- If necessary, airbrush or paint your hand topper with red food colouring/airbrush colouring and leave to dry in the fridge.
- Either airbrush or paint your Brooklyn cityscape in black across the blue fondant around the cake. Use a small paint brush for detail like the Brooklyn bridge elements.
- Go around the outline of the cityscape with red to give another dimension effect.
- Attach the hand onto the top of the cake using cocktail sticks as dowels.
- Using a small paintbrush, paint the webbing over the top of the cake in white food colouring.
- Using black food colouring and a small paint brush, paint the suit detailing on the hand topper and leave the cake to set completely in the fridge.
- Remove from the fridge 15 or so minutes before serving for peak cake texture!
Notes
This incredibly indulgent super Spider-Mancake will last for around 4 or so days in an airtight container or cake case/box, once the cake has been cut into. It can stay in the fridge overnight before the cake is cut. I especially recommend keeping it in the fridge during the warmer months. Enjoy!