Dark flavours for a dark TV show. This is my biggest cake to date. My The Last of Us cake brings together rum, blood orange and dark chocolate for a flavour combo you won’t forget. No fear, this is a clicker-free zone.
Contents

The Bake
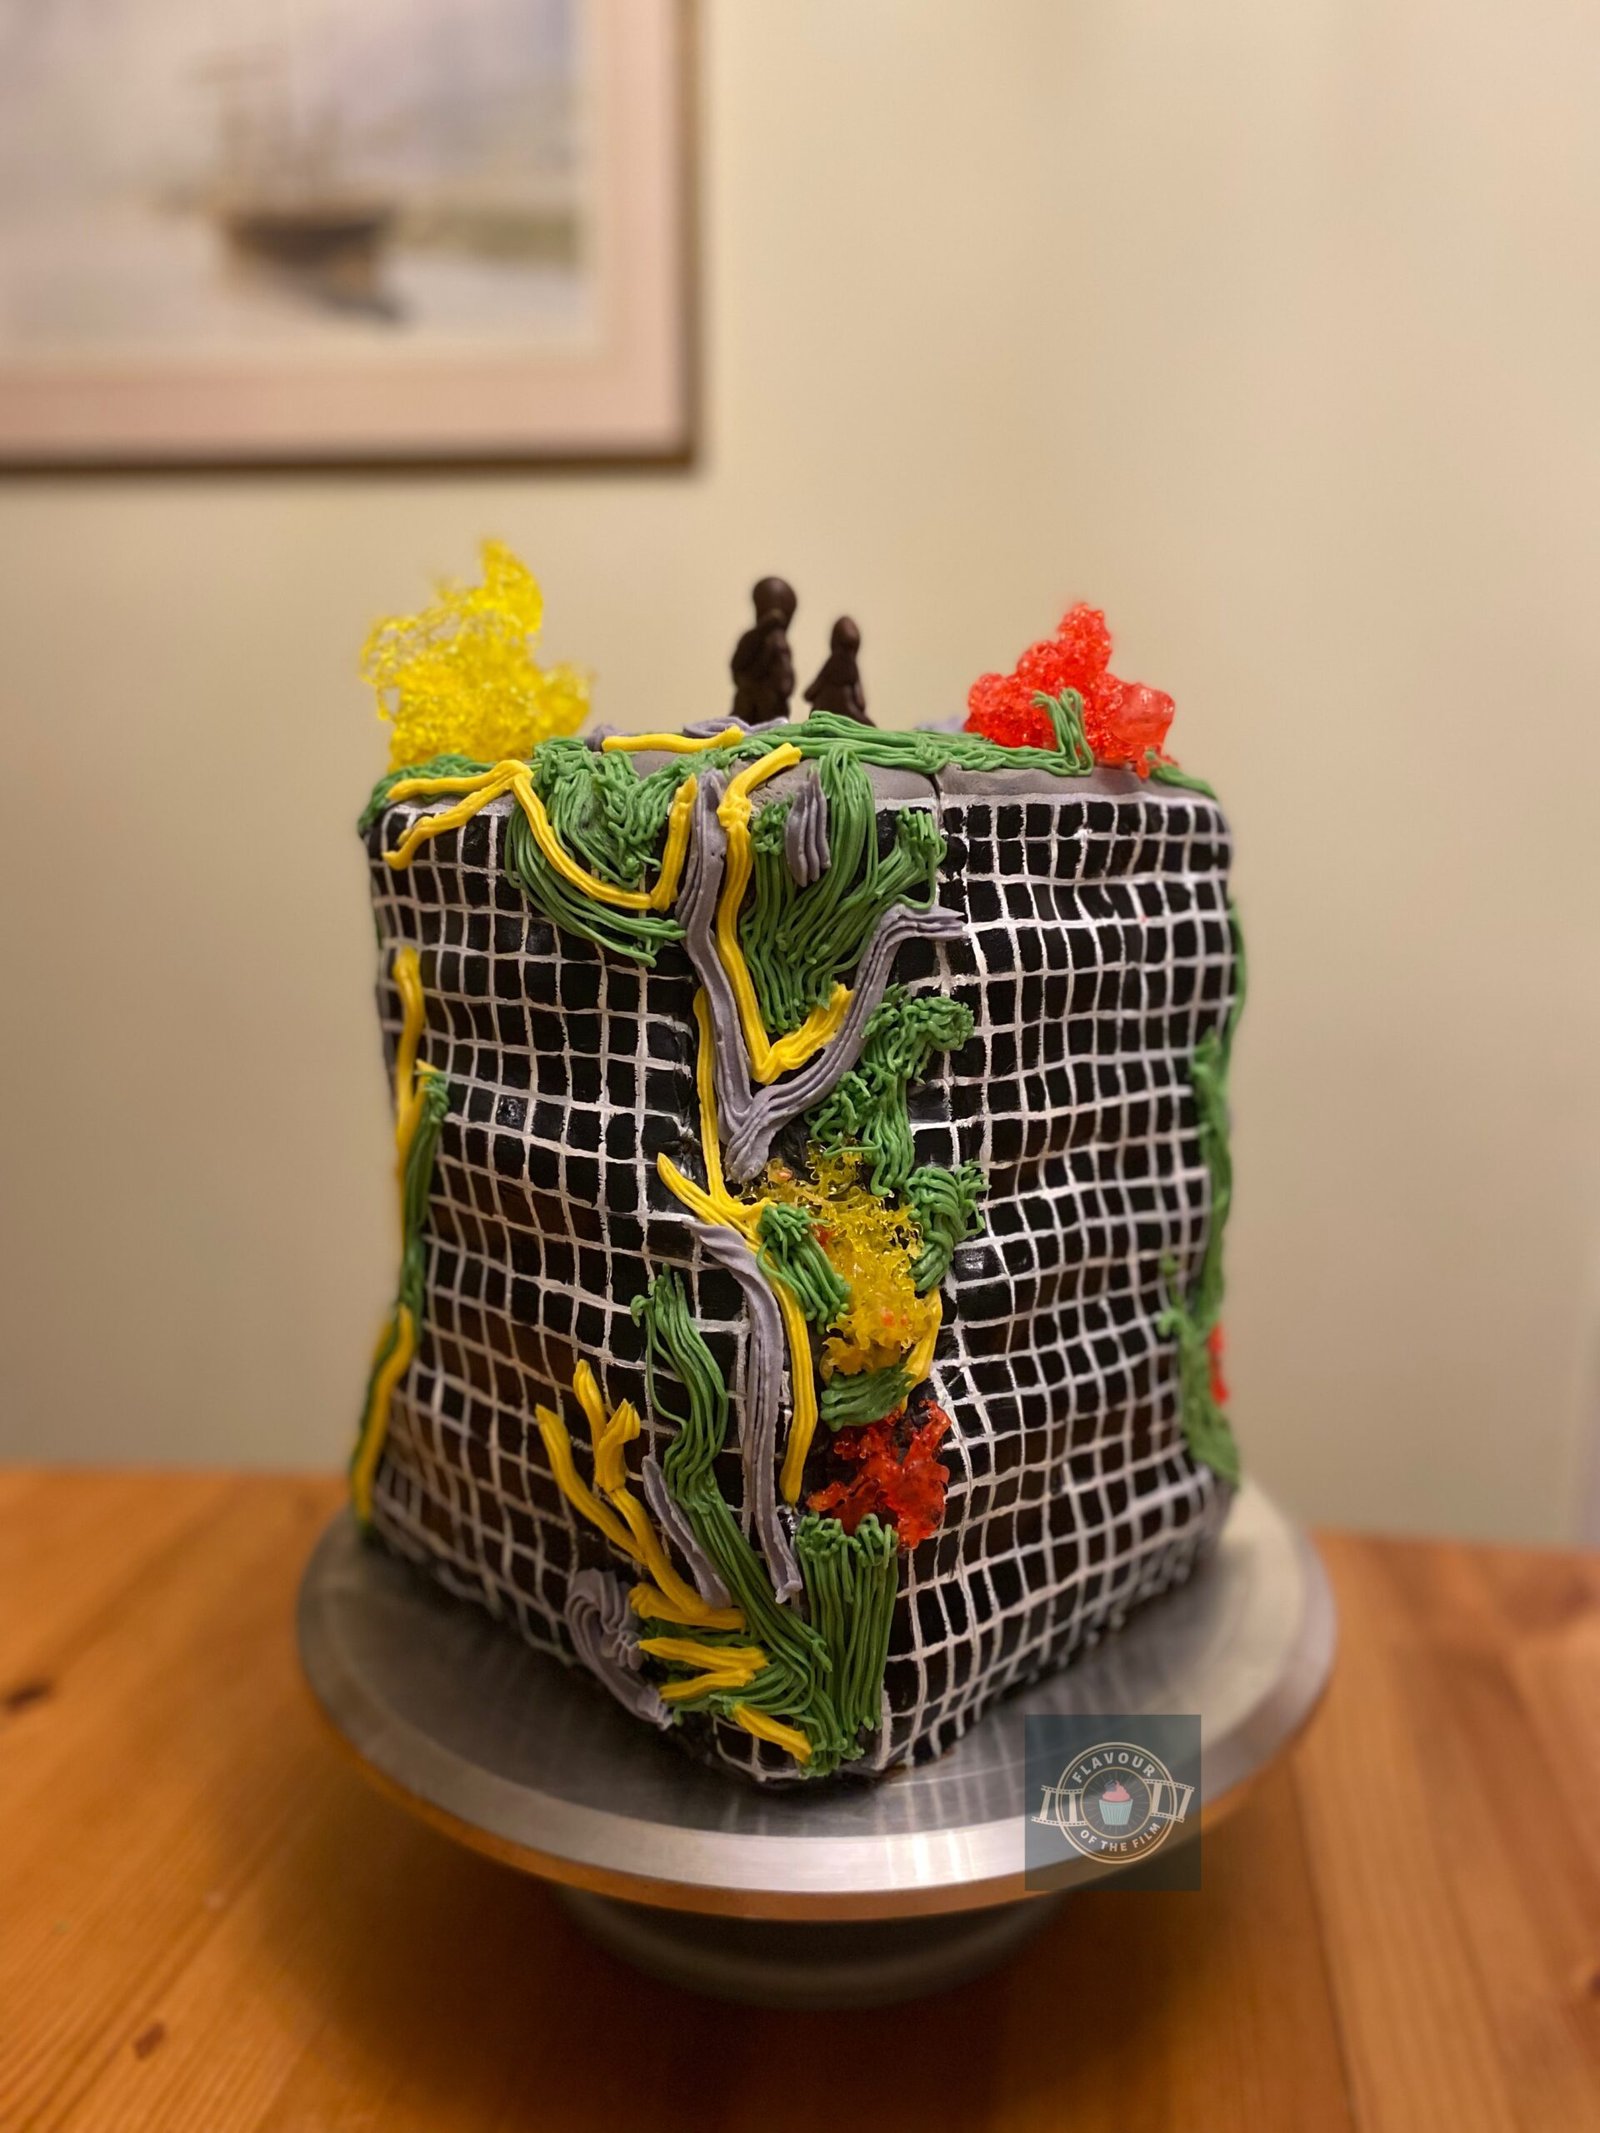
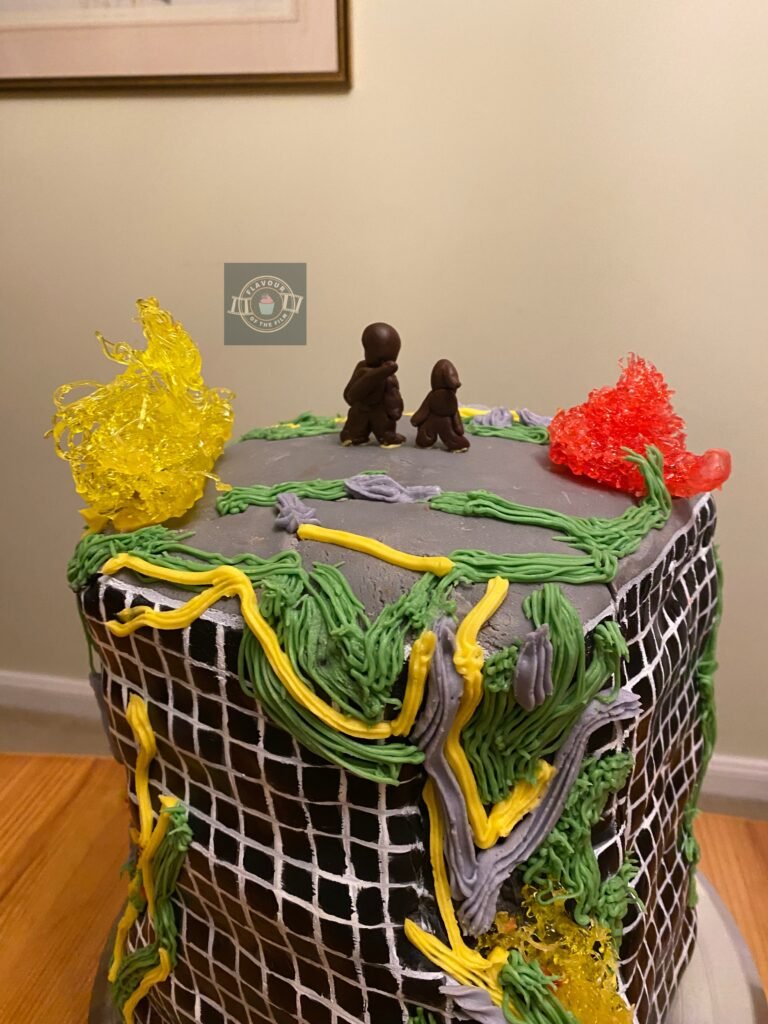
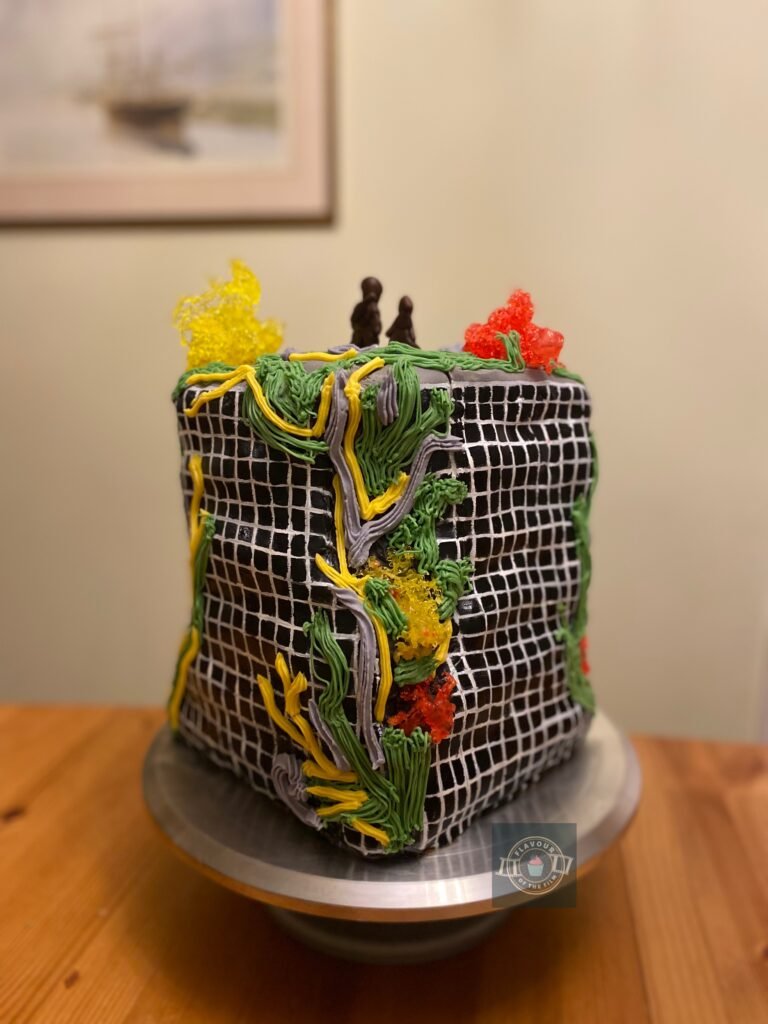
I had one vision and one vision only for this particular bake: a derelict skyscraper made entirely of cake with silhouettes of Joel and Ellie standing on the roof of it. My The Last of Us cake, friends.
A massive cake for a massive hit.
The key to a really delicious texture in a cake is measuring all of the other ingredients to the exact weight of the eggs. With eggs, it’s difficult to get an exact measurement (i.e. 1200g as is needed for this giant The Last of Us birthday cake) so it’s much more effective to weight the eggs out in their shells, in a bowl, until you can get a weight as close to the required weight as possible.
Then, measure out the rest of the ingredients to the exact weight of the eggs. As I did my batter in two halves, I weighed out my eggs and got 607g. I then weighed everything else out as 607g. Trust me when I say this makes all the difference.

When it came to flavours, I wanted them to feel relevant to the vibe of the show.
So, I started coming up with ideas of flavour combinations and decided on something I’d never tried before. I was all in with this one.
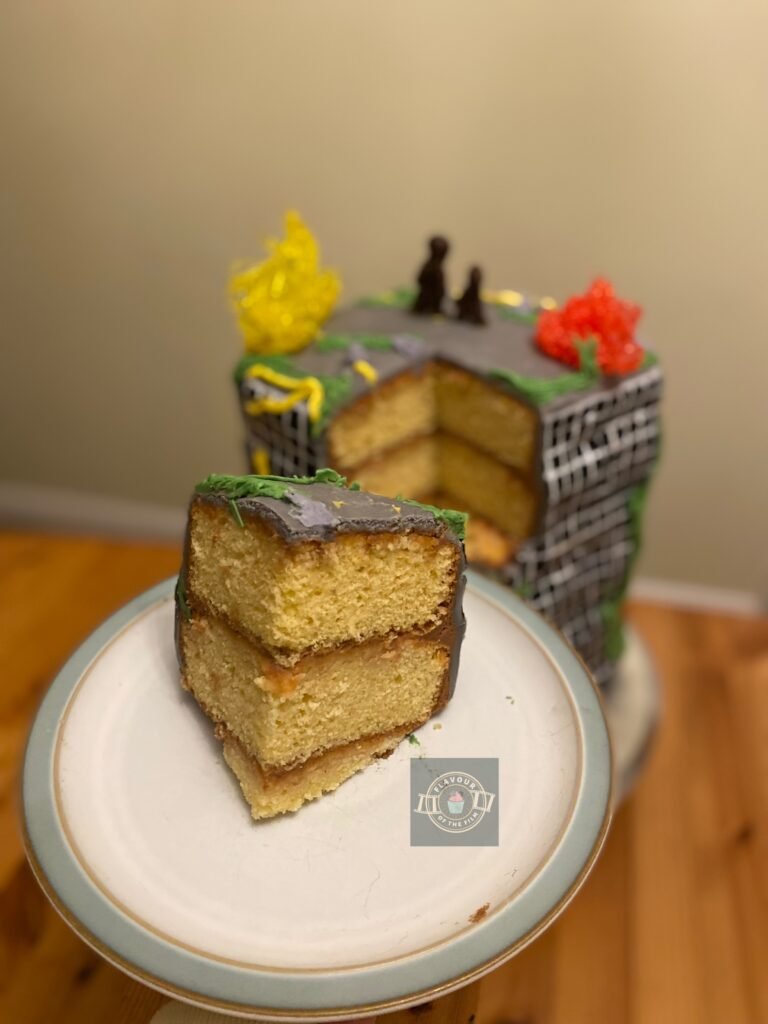
I soaked the sponges of my The Last of Us cake in a blood orange juice and dark spiced rum syrup that I made. The dark spiced rum was actually a dark fruits one by Kopparberg because that’s all I had in the house. I also liked the idea of the berries coming through to blend with the sweetness of the blood orange.
With the rum, it’s entirely up to you which type you use as the alcohol element is cooked out in the syrup making process anyway. We’re all about flavour here, after all.
I added melted dark chocolate (85%) into the buttercream because I wanted a dark and rich flavour, but I also wanted to counteract some of the sweetness that comes through from both the syrup and the fondant around the cake.

I’m so pleased with this flavour combination; it’s up there as one of my favourite creations.
For the decoration, I wanted to do this in a way that was more accessible for any home baker. I don’t have an airbrush or posh tools/equipment for my baking so it’s important to me to create recipes that don’t necessarily require extra investment. I had to buy new cake tins for this recipe but I know I’ll use them again so it made sense.
My The Last of Us cake recipe is six layers but I only had three tins so I had to do two cake batches and build when all six layers had cooled. It prolongs the process but what home baker has an oven big enough to fit six 20cm by 20cm by 20 cm square cake tins in it all together?
If you do then by all means, bake all six sponges at once! I’ll still be writing this recipe for those baking three sponges at a time.
I ended up using 1.5kg fondant to cover the entire cake. Personally, I’m not a huge fan of decorating with fondant icing, nor am I overly keen on eating it, but it can be great to use for certain designs (like this one).
Because the aesthetic of my The Last of Us cake is a derelict skyscraper, the fondant definitely does NOT need to look flawless.
The worse you can make it look, the more derelict your post-apocalyptic skyscraper will look! Those stretched parts and cracks are what give it the character it needs.
As part of this, I carved out parts of the edges of the cake before covering it in the fondant icing. This is completely optional but it does give a really cool illusion in the end result. I aimed to make it look like the ‘fungus’ had grown through the structure and thus, broken sections of the building away. It also ended up looking like it was on a tilt which added to the derelict effect.
I hand painted all of the windows and frames on my The Last of Us themed cake using food dye and a small paint brush – it took a couple of hours but it was so worth it. It’s so dramatic.
I then piped ‘fungus’ using buttercream and three different nozzles for each of the colours (the grass effect in the green is my favourite). The red and yellow ‘fungus’ sculptures are made from red and yellow tempered isomalt that I melted down and poured into cold water to form the patterns!

Magic? Science? You decide.
To (quite literally) top it off, I moulded little silhouette sculptures of Joel and Ellie. They’re made from some leftover brown fondant I had. As they’re silhouettes, the detail could be minimal, but I made sure to include backpacks, Joel’s gun and Ellie’s ponytail.
My The Last of Us inspired cake is the biggest cake I have ever made and has no structural help in it. No dowels or other supports. The entire thing is cake on cake. So long as you weigh out the ingredients as instructed earlier in the post, your sponges won’t compact and suffer from the weight of each other.
Top Tips
- Weigh out your eggs in their shells as close to the weight required for the rest of the cake base ingredients. Allow for 20g either way. Then, weigh out the rest of your base cake ingredients to the exact weight of your eggs. This creates the best cake texture!
- Avoid over mixing the cake batter as much as possible to retain a great texture once baked.
- If you feel like you need dowels or supports, then by all means insert them in but this cake really doesn’t need the extra help.
- Carve away minimal amounts of sponge at a time to prevent de-stabilising the cake. Eat it as you go along if that’s the vibe.
- If the fondant rips, let it! Either leave bare as it’s in-keeping with the theme or cover with piped/isomalt fungus.
- Handle the isomalt with care. It can still be very hot even after sitting in cold water. NEVER touch it straight away, especially without the right gloves.
- When cutting the cake to serve, cut in squares from the top down and stop either just before midway or right in the middle. That way you get slices that are 2 – 3 layers.
- Make sure you have plenty of cake lovers to feed. Seriously.
This The Last of Us cake was a labour of love and I thoroughly enjoyed the creating and baking process. Just as much as I love The Last of Us, as it happens. I honestly can’t explain just how MASSIVE this cake is so make sure you have plenty of people to share it with so none of it goes to waste! I really hope you have fun with this bake – there’s not as much to it as it looks so don’t let the recipe intimidate you! Enjoy.
If you haven’t seen the show yet… well, I hope you get round to it before you see any spoilers.
Happy baking, happy eating!
The Recipe
Ingredients
The Last of Us cake sponges:
- 1200g [42.25 oz] unsalted butter
- 1200g [5¾ cups + 3 tbsp] caster sugar
- 1200g [7¼ cups + 3 tbsp] self-raising flour
- 1200g or around 16 large eggs (as close as you can get to this weight)
- Zest of 2 blood oranges
Syrup:
- 160ml [5.6 oz] spiced dark rum
- Juice of 2 blood oranges
- 160g [¾ cup +1 tbsp] caster sugar
Buttercream:
- 350g [12.25 oz] unsalted butter
- 800g [5½ cups] icing [confectioners] sugar
- 100g [½ cup + 1 tbsp] dark chocolate (85% or higher)
Finishing decorations:
- 1.5kg [3.3 lbs] grey fondant icing
- White food colouring or edible paint
- Black food colouring or edible paint
- 125g [around ½ cup] red ready-tempered isomalt
- 125g [around ½ cup] yellow ready-tempered isomalt
- 100g [3.5 oz] unsalted butter
- 250g [1½ cup + 3 tbsp] icing sugar
- Purple food colouring
- Yellow food colouring
- Green food colouring
- A palmful of brown/black fondant icing/sugar paste or modelling chocolate
Serves: 20+
Preparation time: 20 minutes
Baking time: 35 – 40 minutes (twice)
Decorating time: 2+ hours
Method
The Last of Us cake sponges:
- Preheat your oven to 180°C [325°F] or 160°C fan and grease and line three 20 x 20 x 20 deep square cake tins with greaseproof paper/baking parchment.
- Weigh out half of the eggs – the nearest you can get to 600g.
- Beat together half of the sugar and half of the butter for your cake batter. Do this until pale, light and fluffy.
- Add the eggs in one at a time and beat until smooth.
- Add the flour and zest and mix in just until combined. Be careful not to overmix.
- Split the batter evenly among the three tins and bake for 35 – 40 minutes. Your cakes will be golden and risen, a cocktail stick will come out clean from the centre of each cake and they will not be making any crackling or bubbling sounds when you listen to them.
- Leave the cakes in the tins while you make the syrup.
Syrup:
- Pour half of the sugar, half of the rum and half of the blood orange juice into a small pot and bring it to a simmer. Stir regularly so that the sugar dissolves and the alcohol cooks out. The syrup will be ready when it has thickened a little but is still runny enough to pour.
- Prick your sponges with a cocktail stick or fork and spoon the syrup in even amounts over the sponges.
- Leave to sink in for a few minutes before transferring the sponges out of the tins and onto a cooling rack to cool completely.
- While your first three sponges are cooling, make the second batch of batter.
- Grease and line your tins again.
- Repeat steps 2 to 10 for the second three sponges.
Buttercream:
- While your second batch of sponges are cooling, make the chocolate buttercream.
- Beat together the butter and sugar until light, pale and fluffy.
- Melt down the dark chocolate in a microwave safe bowl in 20 second bursts, stirring in between to prevent the chocolate from burning.
- Add the chocolate and beat until nice and smooth. If the buttercream seems a little stiff, add some water or milk 1 tbsp at a time until it is slightly looser. You don’t want to risk ripping the cake while you build it – the sponges are very soft!
- When all of your sponges are cool, begin building your skyscraper.
- Spread a little buttercream on your cake stand/board/plate and place the first sponge over it.
- Spread a layer of buttercream over the sponge. Place the next one over and repeat.
- Repeat this process until all six sponges are stacked in a tower. Choose the flattest one for the top layer.
- Cover the entire tower of sponges in the rest of your buttercream and smooth it as much as possible.
Decoration:
- If carving pieces of the cake, do so now, and spread buttercream in the gaps. Do not carve any cake from too low down in the cake otherwise you put the stability of the cake at risk.
- Roll out your grey fondant in pieces and cover the cake with it. Don’t worry too much about getting it straight or measuring for precision: you want the cake to look derelict!
- Using the white food colouring/edible paint, paint the frames of the skyscraper windows. I did all of the vertical lines first and then the horizontal ones, leaving the corners completely grey. If you need a ruler, use one! Otherwise, paint it by eye as I did.
- Paint some black shading in the carved out areas if applicable.
- Leave to dry while you make the ‘fungus’.
- Beat together the butter and icing [confectioners] sugar. Split into three bowls and add each food colouring. Mix in.
- Choose your different piping tips or simply snip off the ends of three different piping bags in different sizes.
- Add each coloured buttercream to its own piping bag.
- Pipe the different colours on your cake in a way that makes it look like it’s growing out and through the cake building, i.e. piping from the bottom up.
- Once finished with the piping, prepare the isomalt.
Isomalt:
- Pour the isomalt in a microwave safe bowl (one colour per bowl) and melt in the microwave until completely melted. Do not stir as a utensil will likely get stuck in the isomalt. This will be VERY hot so do NOT touch the isomalt or the bowl without oven gloves.
- Fill a large glass jug with really cold water.
- Wait until the isomalt has stopped bubbling and pour straight into the cold water, allowing the isomalt to pile on top of itself and crystalise. Watch the magic happen!
- Allow to cool for a moment. Remove the isomalt from the water with your hand and place on a plate.
- Repeat until you have used all of your isomalt. Don’t worry if any of it breaks, you can still use it in interesting ways!
- Place your isomalt sculptures on and around your cake – I stuck some of mine in the carved out areas and the bigger sculptures on the top of the cake.
- For the final element, sculpt your Joel and Ellie silhouettes and place them on the roof of your cake. Use any leftover buttercream to glue the feet down if needed.
- Marvel at your masterpiece.
This gorgeously tasty The Last of Us cake will last for around 4 days in an airtight container or covered in tin foil. The sponges can be wrapped and frozen after baked and cooled for up to 3 months. Enjoy!
The TV Show
This SHOW. Oof.
It’s a straight up work of art. I’m gonna start by saying that usually, I can’t watch anything that involves zombies or zombie-like figures because it’s a genuine irrational fear of mine (think crying-and-laughing-because-I’m-crying kind of vibe) but I saw the trailer and just knew that I had to watch The Last of Us.
Turns out, whilst the infected were creepy as heck, I could stomach them being on screen (just about). It was worth pushing through because I LOVE this show. It’s epic and I’m already hankering for season two.

Based on the incredibly popular 2013 Playstation game created by Naughty Dog, HBO’s The Last of Us (2023) is a story set in a post-apocalyptic-style world.
After a fungus-based epidemic sweeps across the globe, those left alive and free from infection find themselves working hard to survive in a scary, uncertain world. Infected still rampage in certain areas; raiders loot and kill to survive, and there’s a military-enforced way of living.
The story revolves around lead characters Joel, a hardened survivor, and Ellie, a teenager that Joel is hired to smuggle across the country.
Ellie, played by the incredibly talented Bella Ramsey, is considered to be humanity’s last hope for a cure to the fungal disease. Joel, played by the man of the hour himself, Pedro Pascal, is hired by rebels to smuggle her out of the quarantine zone and across the country to their allies, where she will be met by doctors looking to create the cure.
This masterpiece is the creation of Neil Druckmann and Craig Mazin and features a whole cast of excellent performers, including the likes of Anna Torv; Lamar Johnson, Melanie Lynskey, Merle Dandridge, Nico Parker, Keivonn Woodard, Gabriel Luna, Jeffrey Pierce and Storm Reid, Ashley Johnson and Nick Offerman among others.
I have to say it: episode three titled “Long, Long Time” is hands down one of the most BEAUTIFUL episodes of television I have ever seen.
I was sobbing by the end and it has stayed with me since. The relationship between Nick Offerman as Bill and Murray Bartlett as Frank in this episode is proof of how something so wonderful can thrive even in such a dark and desperate world.
The Last of Us is truly a tale of raw, heart-wrenching emotion. I can’t recommend it enough. It’s a hit for a reason, I’ll say that.
“When you’re lost in the darkness, look for the light.“
Recipe Card

The Last of Us Cake
Ingredients
The Last of Us cake:
- 1200 g [42.25] unsalted butter
- 1200 g [5¾ cups + 3 tbsp] caster sugar
- 1200 g [7¼ cups + 3 tbsp] self-raising flour
- 1200 g or around 16 large eggs as close as you can get to this weight
- Zest of 2 blood oranges
Syrup:
- 160 ml [5.6 oz] spiced dark rum
- Juice of 2 blood oranges
- 160 g [¾ cup +1 tbsp] caster sugar
Buttercream:
- 350 g [12.25 oz] unsalted butter
- 800 g [5½ cups] icing [confectioners] sugar
- 100 g [½ cup + 1 tbsp] dark chocolate 85% or higher
Finishing decorations:
- 1.5 kg [3.3 lbs] grey fondant icing
- White food colouring or edible paint
- Black food colouring or edible paint
- 125 g [around ½ cup] red ready-tempered isomalt
- 125 g [around ½ cup] yellow ready-tempered isomalt
- 100 g [3.5 oz] unsalted butter
- 250 g [1½ cup + 3 tbsp] icing sugar
- Purple food colouring
- Yellow food colouring
- Green food colouring
- A palmful of brown/black fondant icing/sugar paste or modelling chocolate
Instructions
- Preheat your oven to 180°C [325°F] or 160°C fan and grease and line three 20 x 20 x 20 deep square cake tins with greaseproof paper/baking parchment.
- Weigh out half of the eggs – the nearest you can get to 600g.
- Beat together half of the sugar and half of the butter for your cake batter. Do this until pale, light and fluffy.
- Add the eggs in one at a time and beat until smooth.
- Add the flour and zest and mix in just until combined. Be careful not to overmix.
- Split the batter evenly among the three tins and bake for 35 – 40 minutes. Your cakes will be golden and risen, a cocktail stick will come out clean from the centre of each cake and they will not be making any crackling or bubbling sounds when you listen to them.
- Leave the cakes in the tins while you make the syrup.
- Pour half of the sugar, half of the rum and half of the blood orange juice into a small pot and bring it to a simmer. Stir regularly so that the sugar dissolves and the alcohol cooks out. The syrup will be ready when it has thickened a little but is still runny enough to pour.
- Prick your sponges with a cocktail stick or fork and spoon the syrup in even amounts over the sponges.
- Leave to sink in for a few minutes before transferring the sponges out of the tins and onto a cooling rack to cool completely.
- While your first three sponges are cooling, make the second batch of batter.
- Grease and line your tins again.
- Repeat steps 2 to 10 for the second three sponges.
- While your second batch of sponges are cooling, make the chocolate buttercream.
- Beat together the butter and sugar until light, pale and fluffy.
- Melt down the dark chocolate in a microwave safe bowl in 20 second bursts, stirring in between to prevent the chocolate from burning.
- Add the chocolate and beat until nice and smooth. If the buttercream seems a little stiff, add some water or milk 1 tbsp at a time until it is slightly looser. You don’t want to risk ripping the cake while you build it – the sponges are very soft!
- When all of your sponges are cool, begin building your skyscraper.
- Spread a little buttercream on your cake stand/board/plate and place the first sponge over it.
- Spread a layer of buttercream over the sponge. Place the next one over and repeat.
- Repeat this process until all six sponges are stacked in a tower. Choose the flattest one for the top layer.
- Cover the entire tower of sponges in the rest of your buttercream and smooth it as much as possible.
- If carving pieces of the cake, do so now, and spread buttercream in the gaps. Do not carve any cake from too low down in the cake otherwise you put the stability of the cake at risk.
- Roll out your grey fondant in pieces and cover the cake with it. Don’t worry too much about getting it straight or measuring for precision: you want the cake to look derelict!
- Using the white food colouring/edible paint, paint the frames of the skyscraper windows. I did all of the vertical lines first and then the horizontal ones, leaving the corners completely grey. If you need a ruler, use one! Otherwise, paint it by eye as I did.
- Paint some black shading in the carved out areas if applicable.
- Leave to dry while you make the ‘fungus’.
- Beat together the butter and icing [confectioners] sugar. Split into three bowls and add each food colouring. Mix in.
- Choose your different piping tips or simply snip off the ends of three different piping bags in different sizes.
- Add each coloured buttercream to its own piping bag.
- Pipe the different colours on your cake in a way that makes it look like it’s growing out and through the cake building, i.e. piping from the bottom up.
- Once finished with the piping, prepare the isomalt.
- Pour the isomalt in a microwave safe bowl (one colour per bowl) and melt in the microwave until completely melted. Do not stir as a utensil will likely get stuck in the isomalt. This will be VERY hot so do NOT touch the isomalt or the bowl without oven gloves.
- Fill a large glass jug with really cold water.
- Wait until the isomalt has stopped bubbling and pour straight into the cold water, allowing the isomalt to pile on top of itself and crystalise. Watch the magic happen!
- Allow to cool for a moment. Remove the isomalt from the water with your hand and place on a plate.
- Repeat until you have used all of your isomalt. Don’t worry if any of it breaks, you can still use it in interesting ways!
- Place your isomalt sculptures on and around your cake – I stuck some of mine in the carved out areas and the bigger sculptures on the top of the cake.
- For the final element, sculpt your Joel and Ellie silhouettes and place them on the roof of your cake. Use any leftover buttercream to glue the feet down if needed.
- Marvel at your masterpiece.
Notes
© Flavour of the Film. All content and imagery is copyright protected. Please do not use any of my images or written content without prior permission. If you would like to share any of the recipes or images on Flavour of the Film, please link back to the recipe in question and rewrite it in your own words, crediting Flavour of the Film as the original source.


2 Comments
Comments are closed.