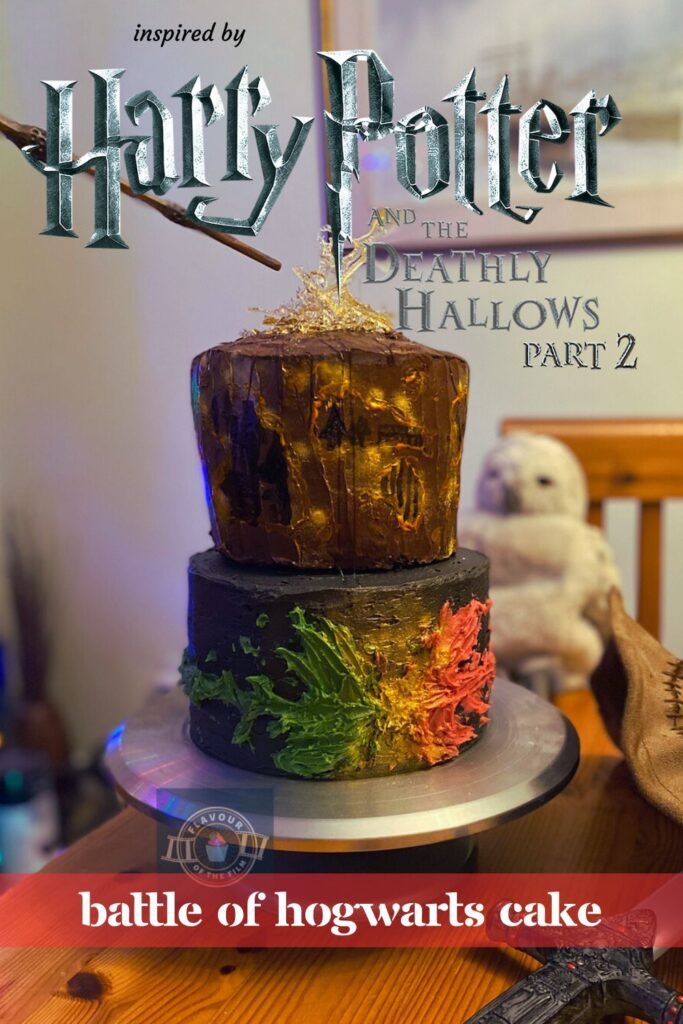
It’s the final addition to my Harry Potter series of bakes! My Harry Potter themed cake is a proper celebration cake fit for the finale of the Harry Potter film series. A treacle tart inspired base cake with a chocolate fudge top tier and spun sugar decoration to finish. Wands at the ready. Let’s do this.
Contents
The Bake
Ah, yes. It’s not one cake, but two! A two tiered cake, as it happens.
The top tier on this cake is a chocolate fudge cake covered in a rich chocolate ganache. I chose this type of cake because I wanted to bring this series of bakes to a full circle. My Harry Potter and the Philosopher’s Stone cake is a chocolate fudge cake, so the top tier of this Harry Potter themed cake pays homage to the beginnings of the story in this way.


The key with a good chocolate fudge cake is the use of a high percentage dark chocolate.
I used 85% as I usually do, but you can use anything that is 70% or above.
As mentioned in previous posts like my Grogu cake, the coffee is completely optional. It serves to bring out and lift the chocolate flavour even more without giving away any coffee taste in the cake.
I highly recommend sticking with it, but if coffee is an issue allergy wise, feel free to leave it out. Add in the water either way so that you don’t affect the structural integrity and quality of the bake of your sponges!
I first learned how to create this kind of ganache through Marc’s Chocolate Brownie Drip Cake recipe in the GBBO: Love To Bake book. The technique he displays in this recipe is making a wonderfully glossy ganache and then whipping it into a mousse-like texture.
This ganache frosting is next level.
I used half milk chocolate and half dark chocolate in my ganache to achieve a glorious balance for my Harry Potter themed cake. If preferred, you can use all milk or all dark. Either way, you don’t have to adjust the amount of cream so long as you stick to the recipe.
A ganache using either milk or dark (or both!) requires equal parts chocolate and cream.
For the design on the top tier of my Harry Potter themed cake, I opted to recreate one of the most visually stunning scenes in Harry Potter and the Deathly Hallows: Part 2.
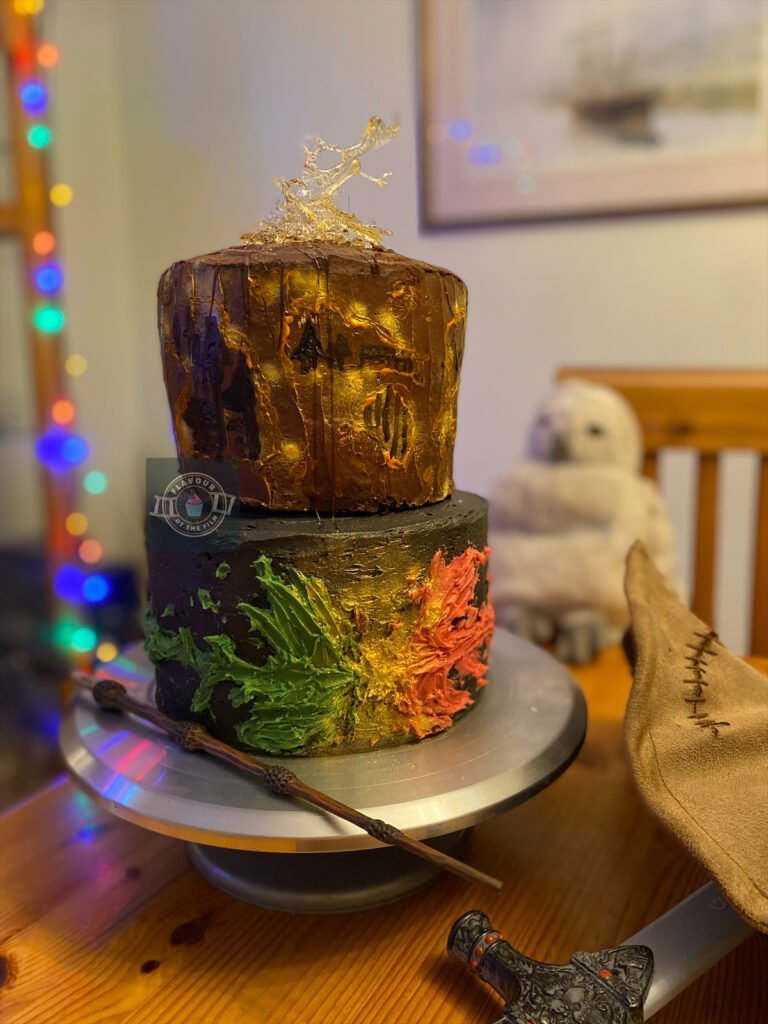
The moment the charm shield around Hogwarts took a devastating blow and began to disintegrate.
This sequence is so powerful. In order to recreate it, I painted the detailing of Hogwarts through the torn gaps of the shield in food colouring. I then sprayed edible gold glitter to reflect the magic burning the shield away.
Cool, right?
Thankfully, this cake isn’t heavy enough to compress the base cake. So, both of the cakes remain light and fluffy in texture! For added stability, I used three dowels to secure the top tier to the base.
The base of my Harry Potter inspired cake is inspired by Harry Potter’s favourite dessert, as mentioned in the books.


That’s right, friends. Treacle Tart.
Traditionally, treacle tart is made with golden syrup, not black treacle. But, to achieve the flavour within the base cake, I opted for adding a couple of tablespoons of black treacle into the buttercream. It’s a more subtle added sweetness rather than an intense flavour.
Black treacle was all I could get my hands on but if you prefer golden syrup, feel free to use that. I will say that the black treacle helped with the colour change of the buttercream!
There is also ginger in treacle tart, so there is ginger in the sponges! This is optional, though.
The design of the decoration is inspired by the peak of the Battle of Hogwarts:

Harry and Voldemort’s spells clashing in their final duel.
Green tinted magic on Voldemort’s side, and red tinted magic coming from Harry’s side. They meet in the middle and a gold hue erupts from the point of contact. I achieved this by painting the different coloured buttercream over the top of the base buttercream once it had dried out a little. It gives it a really artsy look which I love.
To top the entirety of my Harry Potter themed birthday cake, I made caramel and allowed it to harden in peculiar shards. Once stacked on top of the cake, they looked pretty magical. If preferred, you can spin the sugar instead and create a nest of it to go on the top. I planned to do this but ended up really liking the caramel hardened into shards instead.
This is the absolute last step as the hardened caramel/spun sugar won’t last much longer than a few hours! Keep this in mind when making this cake for an event or specific time.
I learned how to create spun sugar through this written tutorial by A Beautiful Plate – the steps are so simple and she has some great tips! I also referred to the Croquembouche recipe in the same Great British Bake Off: Love To Bake book I referenced earlier.
Top Tips
- The coffee in the chocolate fudge cake is completely optional. You can’t taste it, it’s included to really help boost the chocolate flavour. If wanting to leave it out, make sure to still add the boiling water so that the structure doesn’t change.
- As always, use as high a percentage as you’re willing to go with the dark chocolate in the fudge sponge. 70% or higher is where the magic exists, friends.
- If you can’t find buttermilk, simply add the same amount in cow’s milk that you have soured with the juice of 1/2 lemon. Whisk it together and leave it to stand for ten minutes before using.
- The treacle you use is up to you, but black treacle will help deepen the colour of the buttercream for the treacle tart inspired cake.
- Have fun with the decorating! Really get artsy with the buttercream and hand painted elements of both tiers.
- If the ganache is struggling to whip up, place the bowl in the fridge for a few minutes to cool the ganache further. Then, try whipping again. You should find that it whips up to a soft but stiff peak swiftly after.
- When working with the sugar, be extra careful as it will be VERY hot and can easily burn.
There you have it, friends. My Harry Potter themed cake: a two tiered celebration cake fit for the finale of this wonderful franchise. Harry Potter and the Deathly Hallows: Part 2 hits hard even over a decade later. I hope you have great fun with this recipe. It’s a magical cake!
Happy baking, happy eating!
The Recipe
Ingredients
Harry Potter themed cake treacle base:
- 400g [14 oz] unsalted butter room temperature
- 400g [2 cups] light brown sugar
- 400g eggs (around 7-8 medium)
- 400g [2½ cups] self-raising flour
- 2-3 tsp ground ginger optional
Treacle base decoration:
- 800g [5½ cups] icing [confectioners] sugar
- 400g [14 oz] unsalted butter softened
- 2-3 tbsp black treacle
- Black food colouring oil based
- Green food colouring oil based
- Red food colouring oil based
- Gold edible glitter
Chocolate fudge cake:
- 205g [1 cup + 2 tbsp] dark chocolate at least 70%
- 205g [7.25 oz] unsalted butter room temperature
- 10g instant coffee
- 95ml [3.25 oz] boiling water
- 190g eggs (about 3 medium)
- 75ml [3 oz] buttermilk
- 150g [¾ cup] caster sugar
- 230g [1 cup + 2 tbsp] light brown sugar
- 190g [1 cup + 3 tbsp] plain [all-purpose] flour
- 30g [¼ cup] high quality cocoa powder
- ½ tsp baking powder
- ¼ tsp bicarbonate of soda [baking soda]
Chocolate ganache:
- 175g [¾ cup + 3 tbsp] milk chocolate
- 175g [¾ cup + 3 tbsp] dark chocolate
- 350ml [13 oz] double [heavy] cream
- Orange food colouring oil based
- Black food colouring oil based
- Gold edible glitter
Sugar shards / spun sugar:
- 100g [¼ cup + 3 tbsp] granulated sugar
- 2 tbsp water
Serves: 12 +
Preparation time: 45 minutes total
Baking time: 1 hour 10 minutes total
Decorating time: Up to 2 hours
Method
Harry Potter themed cake treacle base cake:
- Preheat your oven to 180°C [350°F] or 160°C fan. Grease and line three 20 cm (8 inch) round cake tins with greaseproof paper/baking parchment. Set aside.
- In a large mixing bowl, cream together the butter and sugar until light and fluffy.
- Add the eggs on at a time, beating in between until fully incorporated.
- Sieve in the flour and add the ginger if using. Mix in just until you can no longer see any flour.
- Split the cake mix evenly into the 3 tins.
- Bake your sponges for 25 – 30 minutes or until golden and risen.
- Your sponges will be ready when a cocktail stick/skewer comes out clean when tested; the sponges bounce back when gently pressed on, and you hear little to no bubbling/crackling when you listen to them.
- Once baked, allow your sponges to cool in the tins for around 10 minutes before transferring to a wire rack to cool completely.
Chocolate fudge cake:
- While your base sponges are cooling, make your top tier cake sponges.
- Turn the oven down to 160°C [320°F] or 140°C fan. Grease and line three deep 6 inch cake tins with greaseproof paper/baking parchment. Set aside.
- Either over a bain marie [bowl set over a pan of simmering hot water] or in the microwave in a microwavable safe bowl in 30 second bursts, melt the dark chocolate and butter together.
- Once melted, leave the chocolate and butter mix to cool for now.
- Mix together the coffee (if using) and the boiling water from a freshly boiled kettle in a mug. Set aside to cool.
- In a large mixing bowl, sieve in the flour. Add the cocoa powder, both sugars, baking powder and bicarbonate of soda. Mix together with a spoon until evenly distributed.
- Pour the coffee water into the chocolate and butter mix. Fold in until completely incorporated.
- In another bowl, whisk together the eggs and buttermilk until pale and frothy using an electric whisk.
- Combine the flour mix with the chocolate mix until well combined. It will seem very stiff and odd at first.
- Pour in the whisked eggs and buttermilk and fold in gently until completely incorporated. This will take some time so be gentle and be patient!
- Once smooth, distribute the cake mix evenly into the deep 6 inch tins.
- Bake for 35 – 40 minutes. This will depend on how hot your oven runs. Mine took nearer 45 minutes to bake.
- Your chocolate fudge sponges will be ready when a cocktail stick/skewer comes out clean when tested; the sponges bounce back when gently pressed on, and you hear little to no bubbling/crackling when you listen to them.
- Once baked, leave your chocolate fudge cakes to cool in the tins for around 10 minutes before transferring to a wire rack to cool completely.
Base cake decoration:
- While your chocolate fudge sponges are cooling, start building and decorating your base cake!
- Beat the butter for your buttercream in a large mixing bowl to loosen it slightly.
- Add in half the icing sugar and beat in until fluffy.
- Add the other half of your icing sugar and beat in until light and fluffy.
- Spoon in the treacle and beat in.
- Take around 2 tbsp of buttercream from the large bowl and spoon it into a small bowl. Do this twice so that you have two small bowls of buttercream.
- Mix some green food colouring into one of the small bowls.
- Mix some red food colouring into the other small bowl of buttercream.
- Drop some black food colouring into the large bowl of buttercream and beat in until an even colour is achieved. Adjust here if necessary, adding more if needed.
- Beat in a splash of milk to loosen the large amount of buttercream to make it more spreadable if required.
- Spread a smudge of black buttercream onto a cake stand (rotating one is ideal)/cake board/plate and lay your first treacle sponge on top.
- Dollop a generous amount of black buttercream onto the cake layer. Lay the next cake layer over the top and repeat this until all 3 layers are stacked.
- Cover the treacle cake in the remaining black food colouring and smooth round with a palette knife. This doesn’t need to be perfect!
- Allow to dry for a few minutes.
- Using a small palette knife or paintbrush, paint on the spells so that each one is curving around the cake. Bring the two ends together in the centre of the front of your cake.
- Spray the gold edible glitter in and around the centre of the colliding magic.
Chocolate fudge cake decoration:
- In a microwavable safe bowl, melt together the chocolate and cream in 20 second bursts, stirring in between until a shiny and smooth ganache is achieved.
- Leave to cool for around 15 minutes.
- Once cooled, whip the ganache using an electric whisk until it can just about hold its shape.
- On another plate or board (I used a chopping board) place the first layer of your chocolate fudge cake on it.
- Spread a generous amount of ganache over the top and lay the next sponge on the top.
- Repeat until all 3 layers are stacked.
- Spread the remaining ganache over the entire cake using a palette knife. Create a pattern using your palette knife if desired.
- Leave to set for a few minutes.
- Once the ganache has hardened a little, paint on the Hogwarts and shield detailing using the orange and black food colourings and a small paintbrush.
- Spray on some gold edible glitter as desired.
- Leave to dry.
Construction:
- Push 3 dowels into the centre of the base cake, leaving about 2 inches of each dowel poking out of the top.
- Carefully lift the chocolate fudge cake from its board and sit it over the base cake. Make sure that the cake slides onto the dowels as evenly as possible.
- Lastly, make your caramel shards or spun sugar to top the cake off. If doing spun sugar, use the recipe by A Beautiful Plate as noted above.
- Pour the sugar and water into a heavy based saucepan and bring up to a medium heat. Stir regularly until the sugar has dissolved.
- Once the sugar has dissolved, turn the heat up high and leave to bubble away.
- Do not stir and do not take your eyes off it. It can go from ready to burnt very quickly!
- Once the mixture has turned a wonderful amber colour, take it off the heat immediately and submerge the base of the pan into cold water to stop the cooking process.
- Pour the caramel onto a sheet of greaseproof paper/baking parchment either in blobs or as one large one that you can break into shards. Leave to cool and harden. This will take moments.
- Once cool and solid, arrange the blobs on the top of the cake or shatter the single piece of caramel with a rolling pin and arrange the pieces on the top of the cake.
- Serve immediately.
This magical Harry Potter themed cake will last around 4 days if covered or kept in a cake box. The caramel shards will soften within a few hours. The cake sponges can be made ahead and frozen for up to 3 months. Enjoy!
The Film
What a finale this was. Seriously. It’s a truly magnificent film.
There is so much emotion and so much heart in Deathly Hallows: Part 2. It’s like the cast and crew channelled all of that finale energy and put absolutely everything into it.
This energy translates completely on screen. Even now, over a decade after the release. The sense of coming together to tell the last chapter of this epic tale is still palpable. I feel it every single time I watch it.
A film that makes you feel that way is a film that will stay with you for a lifetime.
I’m here for it.
If I’m being honest, I don’t think there are many words that can do this last instalment of the Harry Potter series justice.
It has the highest IMDb rating of all the Harry Potter films. Usually, I don’t allow such ratings to sway my perspective or opinion of a film. But, it does give you an idea of just how impactful the filmmakers were able to make Deathly Hallows: Part 2.
As I discussed in my Harry Potter and the Deathly Hallows: Part 1 recipe post, it’s a rare event to find a book to screen adaptation that is one hundred percent faithful and true to the original content.
Most of the Harry Potter books – particularly the later instalments – are mammoth sized novels.
There just isn’t the scope for a completely accurate translation of an entire novel of such size into a motion picture that is still less than three hours in length.
However, I genuinely think the filmmakers did a brilliant job in this case. Yes, there were elements that were left out. Some of which I would have loved to have seen on screen.


Hermione’s project to fight for the rights of house elves springs to mind.
Nonetheless, Harry Potter and the Deathly Hallows: Part 2 is a cracker of an adaptation. The premiere alone was one of the most highly anticipated.
In 2011, Harry Potter and the Deathly Hallows: Part 2 was finally released. It was such a juxtaposition in terms of emotions felt at this time. The excitement and anticipation was rich in the air.
As was the lingering sadness felt by all who were invested. This was the final film of an eight piece series. One of the most loved franchises in cinematic history. Millions of Potterheads worldwide were both in tears whilst also watching this final film with completely open hearts.
Besides the magic, it’s the characters that made this story what it is.
True, unadulterated love. That’s what these characters displayed. Family, friendship and strength of self is what they stood for.
It’s no wonder so many people around the globe were completely wrapped up in this tale of magic, wonder and of the boy who lived. From the cupboard under the stairs to the halls and classrooms of Hogwarts.
We got to experience Harry’s journey along with him. That’s a beautiful thing – being able to follow the life of a fictional character with such compassion and care.
I hope that people soon see that this same level of compassion and care can be felt for all we dwell on this earth with. As well as ourselves.

Love and only love. That’s all that matters.
This last chapter wrapped everything up. The Battle of Hogwarts is where most of the film plays out – emotionally tormenting the entire fandom in the process.
Courtyard Apocalypse is the score that is used over the tracking shots taking us through the battle as it rages. Alexander Desplat scored the film and this particular track happens to be my favourite score of all time. It literally makes me hold my breath.
For this finale, Steve Kloves finished his run as the screenwriter and David Yates polished off the saga at the director’s helm.
There were oodles of returning characters, as well as a couple of new cast members. Ciarán Hinds stepped in as Aberforth Dumbledore, alongside Hebe Beardsall as Ariana Dumbledore.
Can we just take a moment here to appreciate Warwick Davis? What a triumph of not just one performance, but two. A master of his craft.
Hogwarts forever, friends.
Recipe Card

Harry Potter Themed Cake | Harry Potter and the Deathly Hallows: Part 2
Ingredients
Harry Potter themed cake treacle base:
- 400 g [14 oz] unsalted butter room temperature
- 400 g [2 cups] light brown sugar
- 400 g eggs around 7-8 medium
- 400 g [2½ cups] self-raising flour
- 2-3 tsp ground ginger optional
Treacle base decoration:
- 800 g [5½ cups] icing [confectioners] sugar
- 400 g [14 oz] unsalted butter softened
- 2-3 tbsp black treacle
- Black food colouring oil based
- Green food colouring oil based
- Red food colouring oil based
- Gold edible glitter
Chocolate fudge cake:
- 205 g [1 cup + 2 tbsp] dark chocolate at least 70%
- 205 g [7.25 oz] unsalted butter room temperature
- 10 g instant coffee
- 95 ml [3.25 oz] boiling water
- 190 g eggs about 3 medium
- 75 ml [3 oz] buttermilk
- 150 g [¾ cup] caster sugar
- 230 g [1 cup + 2 tbsp] light brown sugar
- 190 g [1 cup + 3 tbsp] plain [all-purpose] flour
- 30 g [¼ cup] high quality cocoa powder
- ½ tsp baking powder
- ¼ tsp bicarbonate of soda [baking soda]
Chocolate ganache:
- 175 g [¾ cup + 3 tbsp] milk chocolate
- 175 g [¾ cup + 3 tbsp] dark chocolate
- 350 ml [13 oz] double [heavy] cream
- Orange food colouring oil based
- Black food colouring oil based
- Gold edible glitter
Sugar shards / spun sugar:
- 100 g [¼ cup + 3 tbsp] granulated sugar
- 2 tbsp water
Instructions
Harry Potter themed cake treacle base cake:
- Preheat your oven to 180°C [350°F] or 160°C fan. Grease and line three 20 cm (8 inch) round cake tins with greaseproof paper/baking parchment. Set aside.
- In a large mixing bowl, cream together the butter and sugar until light and fluffy.
- Add the eggs on at a time, beating in between until fully incorporated.
- Sieve in the flour and add the ginger if using. Mix in just until you can no longer see any flour.
- Split the cake mix evenly into the 3 tins.
- Bake your sponges for 25 – 30 minutes or until golden and risen.
- Your sponges will be ready when a cocktail stick/skewer comes out clean when tested; the sponges bounce back when gently pressed on, and you hear little to no bubbling/crackling when you listen to them.
- Once baked, allow your sponges to cool in the tins for around 10 minutes before transferring to a wire rack to cool completely.
Chocolate fudge cake:
- While your base sponges are cooling, make your top tier cake sponges.
- Turn the oven down to 160°C [320°F] or 140°C fan. Grease and line three deep 6 inch cake tins with greaseproof paper/baking parchment. Set aside.
- Either over a bain marie [bowl set over a pan of simmering hot water] or in the microwave in a microwavable safe bowl in 30 second bursts, melt the dark chocolate and butter together.
- Once melted, leave the chocolate and butter mix to cool for now.
- Mix together the coffee (if using) and the boiling water from a freshly boiled kettle in a mug. Set aside to cool.
- In a large mixing bowl, sieve in the flour. Add the cocoa powder, both sugars, baking powder and bicarbonate of soda. Mix together with a spoon until evenly distributed.
- Pour the coffee water into the chocolate and butter mix. Fold in until completely incorporated.
- In another bowl, whisk together the eggs and buttermilk until pale and frothy using an electric whisk.
- Combine the flour mix with the chocolate mix until well combined. It will seem very stiff and odd at first.
- Pour in the whisked eggs and buttermilk and fold in gently until completely incorporated. This will take some time so be gentle and be patient!
- Once smooth, distribute the cake mix evenly into the deep 6 inch tins.
- Bake for 35 – 40 minutes. This will depend on how hot your oven runs. Mine took nearer 45 minutes to bake.
- Your chocolate fudge sponges will be ready when a cocktail stick/skewer comes out clean when tested; the sponges bounce back when gently pressed on, and you hear little to no bubbling/crackling when you listen to them.
- Once baked, leave your chocolate fudge cakes to cool in the tins for around 10 minutes before transferring to a wire rack to cool completely.
Base cake decoration:
- While your chocolate fudge sponges are cooling, start building and decorating your base cake!
- Beat the butter for your buttercream in a large mixing bowl to loosen it slightly.
- Add in half the icing sugar and beat in until fluffy.
- Add the other half of your icing sugar and beat in until light and fluffy.
- Spoon in the treacle and beat in.
- Take around 2 tbsp of buttercream from the large bowl and spoon it into a small bowl. Do this twice so that you have two small bowls of buttercream.
- Mix some green food colouring into one of the small bowls.
- Mix some red food colouring into the other small bowl of buttercream.
- Drop some black food colouring into the large bowl of buttercream and beat in until an even colour is achieved. Adjust here if necessary, adding more if needed.
- Beat in a splash of milk to loosen the large amount of buttercream to make it more spreadable if required.
- Spread a smudge of black buttercream onto a cake stand (rotating one is ideal)/cake board/plate and lay your first treacle sponge on top.
- Dollop a generous amount of black buttercream onto the cake layer. Lay the next cake layer over the top and repeat this until all 3 layers are stacked.
- Cover the treacle cake in the remaining black food colouring and smooth round with a palette knife. This doesn’t need to be perfect!
- Allow to dry for a few minutes.
- Using a small palette knife or paintbrush, paint on the spells so that each one is curving around the cake. Bring the two ends together in the centre of the front of your cake.
- Spray the gold edible glitter in and around the centre of the colliding magic.
Chocolate fudge cake decoration:
- In a microwavable safe bowl, melt together the chocolate and cream in 20 second bursts, stirring in between until a shiny and smooth ganache is achieved.
- Leave to cool for around 15 minutes.
- Once cooled, whip the ganache using an electric whisk until it can just about hold its shape.
- On another plate or board (I used a chopping board) place the first layer of your chocolate fudge cake on it.
- Spread a generous amount of ganache over the top and lay the next sponge on the top.
- Repeat until all 3 layers are stacked.
- Spread the remaining ganache over the entire cake using a palette knife. Create a pattern using your palette knife if desired.
- Leave to set for a few minutes.
- Once the ganache has hardened a little, paint on the Hogwarts and shield detailing using the orange and black food colourings and a small paintbrush.
- Spray on some gold edible glitter as desired.
- Leave to dry.
Construction:
- Push 3 dowels into the centre of the base cake, leaving about 2 inches of each dowel poking out of the top.
- Carefully lift the chocolate fudge cake from its board and sit it over the base cake. Make sure that the cake slides onto the dowels as evenly as possible.
- Lastly, make your caramel shards or spun sugar to top the cake off. If doing spun sugar, use the recipe by A Beautiful Plate as noted above.
- Pour the sugar and water into a heavy based saucepan and bring up to a medium heat. Stir regularly until the sugar has dissolved.
- Once the sugar has dissolved, turn the heat up high and leave to bubble away.
- Do not stir and do not take your eyes off it. It can go from ready to burnt very quickly!
- Once the mixture has turned a wonderful amber colour, take it off the heat immediately and submerge the base of the pan into cold water to stop the cooking process.
- Pour the caramel onto a sheet of greaseproof paper/baking parchment either in blobs or as one large one that you can break into shards. Leave to cool and harden. This will take moments.
- Once cool and solid, arrange the blobs on the top of the cake or shatter the single piece of caramel with a rolling pin and arrange the pieces on the top of the cake.
- Serve immediately.
Notes
© Flavour of the Film. All content and imagery is copyright protected. Please do not use any of my images or written content without prior permission. If you would like to share any of the recipes or images on Flavour of the Film, please link back to the recipe in question and rewrite it in your own words, crediting Flavour of the Film as the original source.