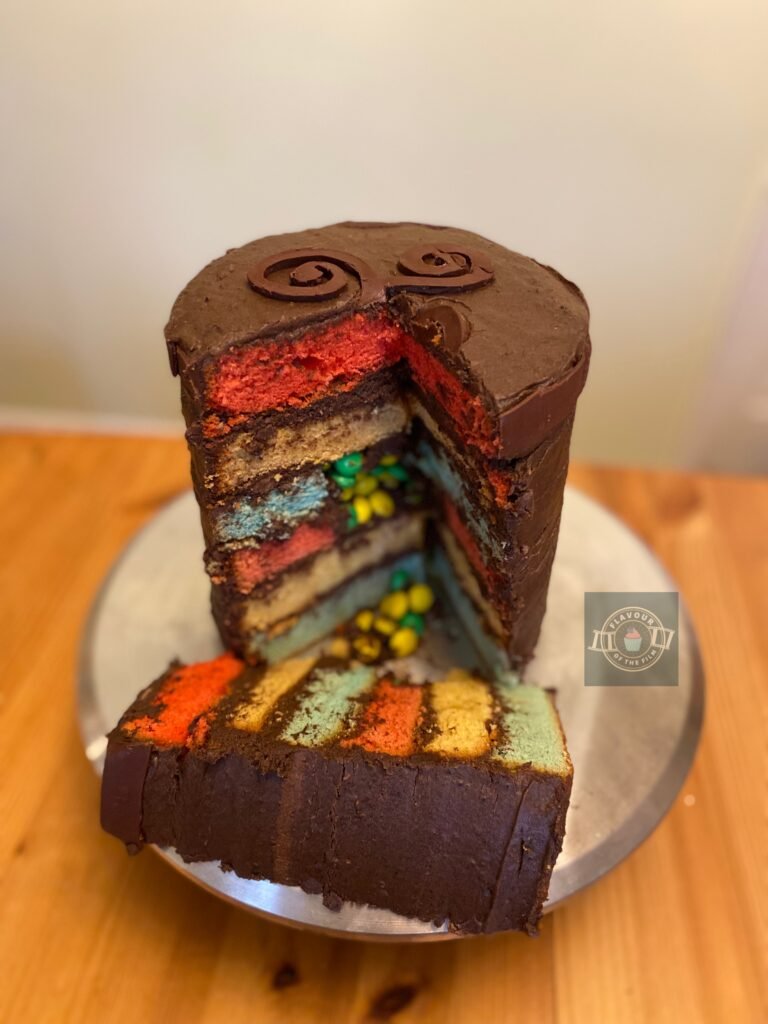
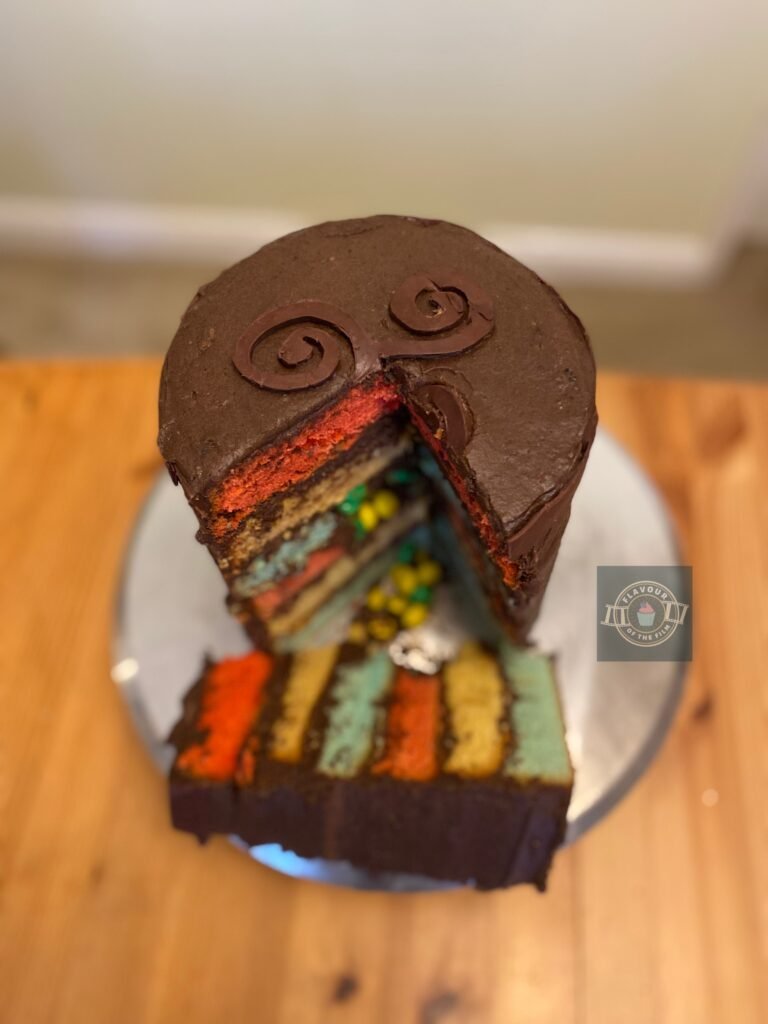
Yes, friends. This is the softest, fluffiest six-layer vanilla sponge cake you will ever make. My Teen Wolf chocolate cookies and cream cake is smothered in cookies and cream buttercream and filled with a surprise chocolate centre. Fancy a bite?
Contents
The Bake
When it came to this bake, I wanted to celebrate both my love for the third season of the TV show in particular, as well as celebrating the release of Teen Wolf: The Movie. I chose to make a cake based on the Triskelion urn that contained the Nogitsune.
It’s a six-layer chocolate cookies and cream Teen Wolf cake. Each layer is tinted with the appropriate colour to represent each type of werewolf: Alpha, Beta and Omega. Red for Alpha, yellow for Beta and blue for Omega AKA the eye colours for the corresponding werewolves in Teen Wolf.
When deciding on flavours, I knew I wanted to make a vanilla cake. Having tasted vanilla cake in Japan and remembering how delicious it was, I gravitated towards making a vanilla cake using Japanese methods.
Of course, this ties in with the theme, as the Nogitsune is from Japanese mythology, and there are references to this throughout both the third season and the movie.
With a Japanese method, a vanilla cake is made as light and fluffy as can be.
To do this, it’s important to whisk the eggs and sugar together until super pale and until the quantity has practically tripled before adding anything else. It’s also important to add the milk and butter whilst they are both hot. You get all the soft, airiness of a Japanese cake that way.
I adapted this recipe from an incredible vanilla cake on recipetineats which is also an adapted recipe using Japanese methods. For this cake, I changed the amounts of each ingredient as I wanted to make a big enough cake that could pass as an urn. The baking temperatures and timings are different too.
I found, through experimenting, that the recipe you find here is the one that worked best for what I wanted to achieve. Slow and steady wins the race in this one.

I opted for a flavour that makes me think of the U.S. immediately: cookies and cream.
To achieve my Teen Wolf inspired cake flavours, I simply used crushed Oreos and then added cocoa powder, milk and melted dark chocolate for the colour. It tastes like ice cream – unreal.
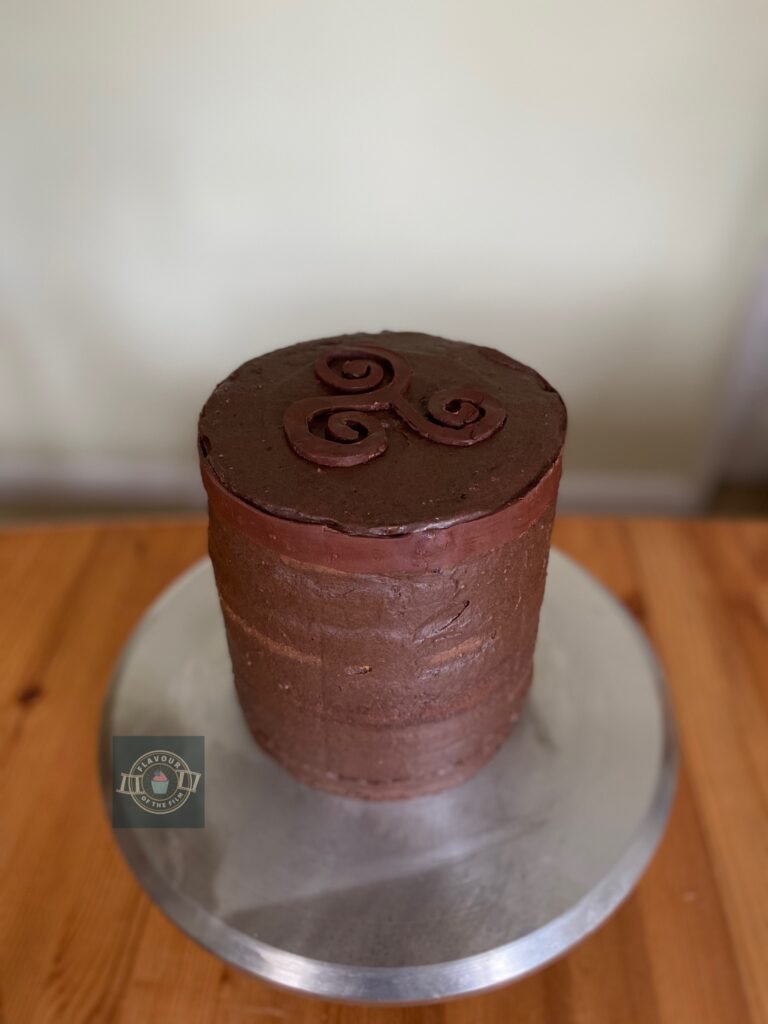
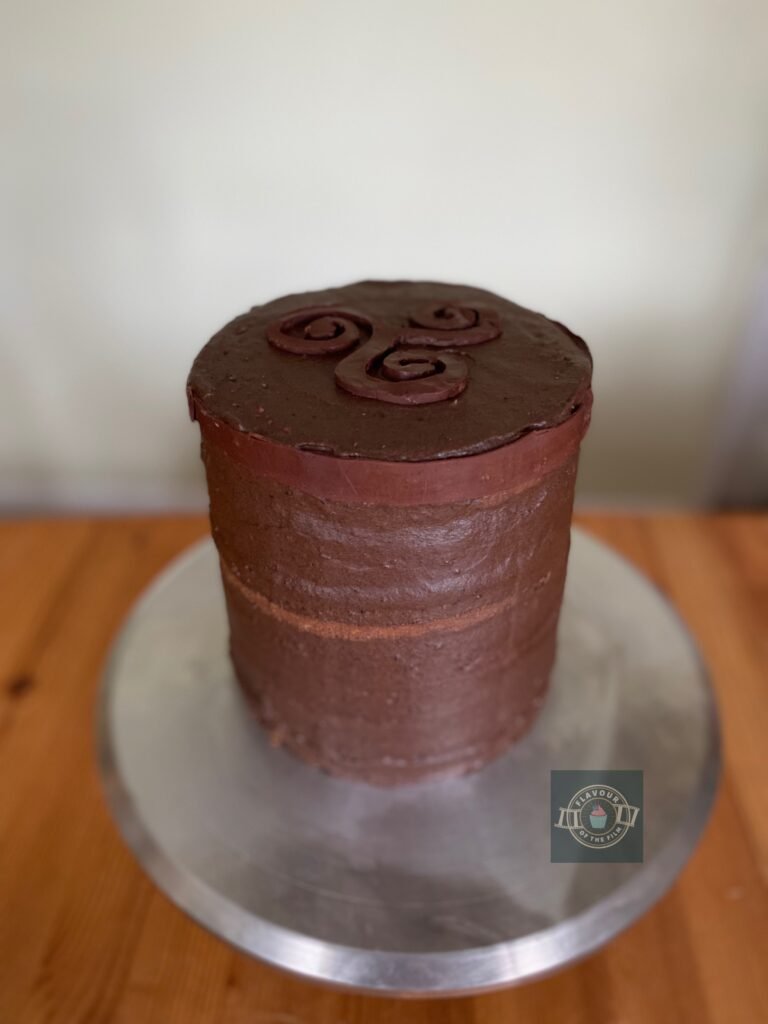
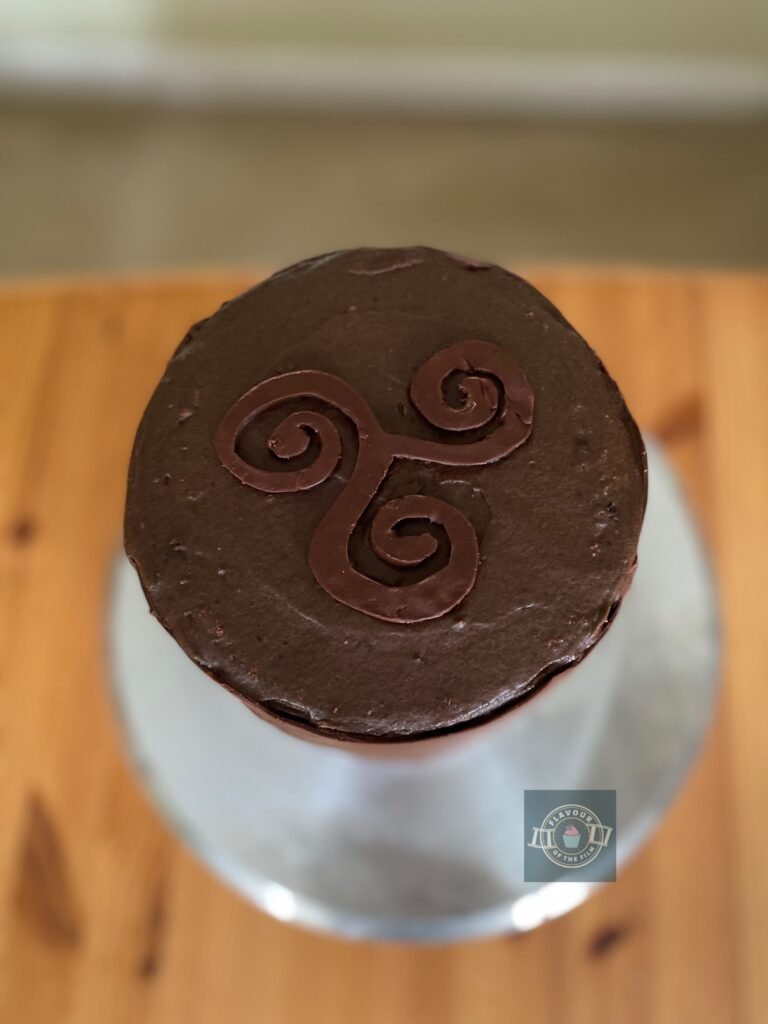
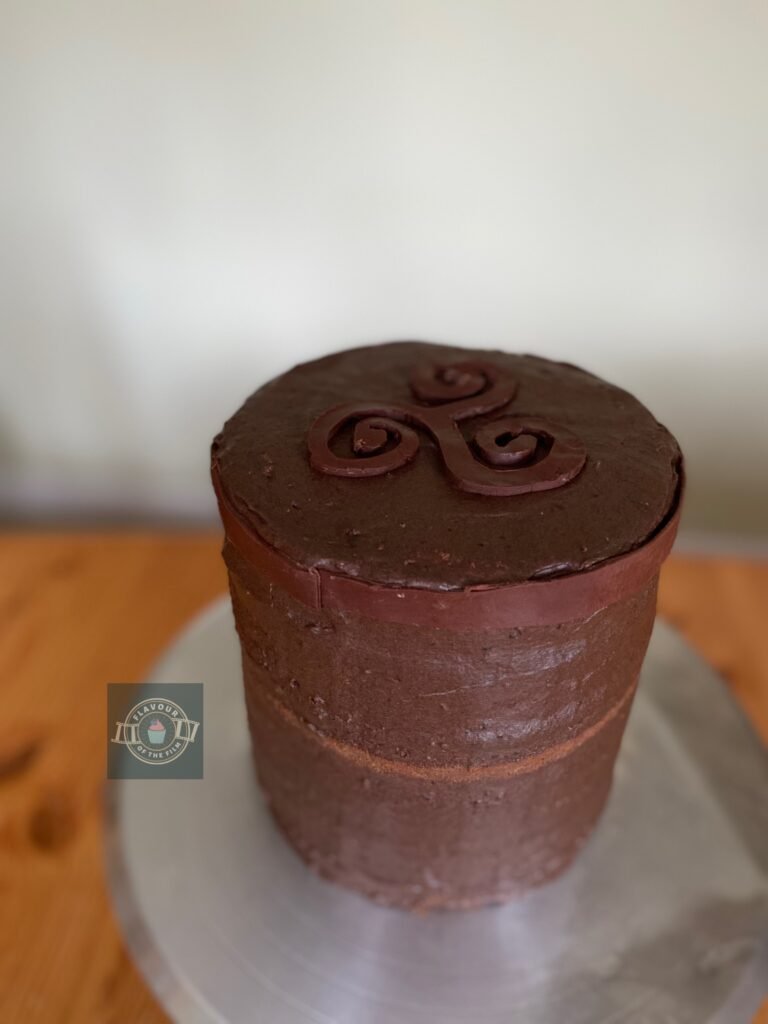
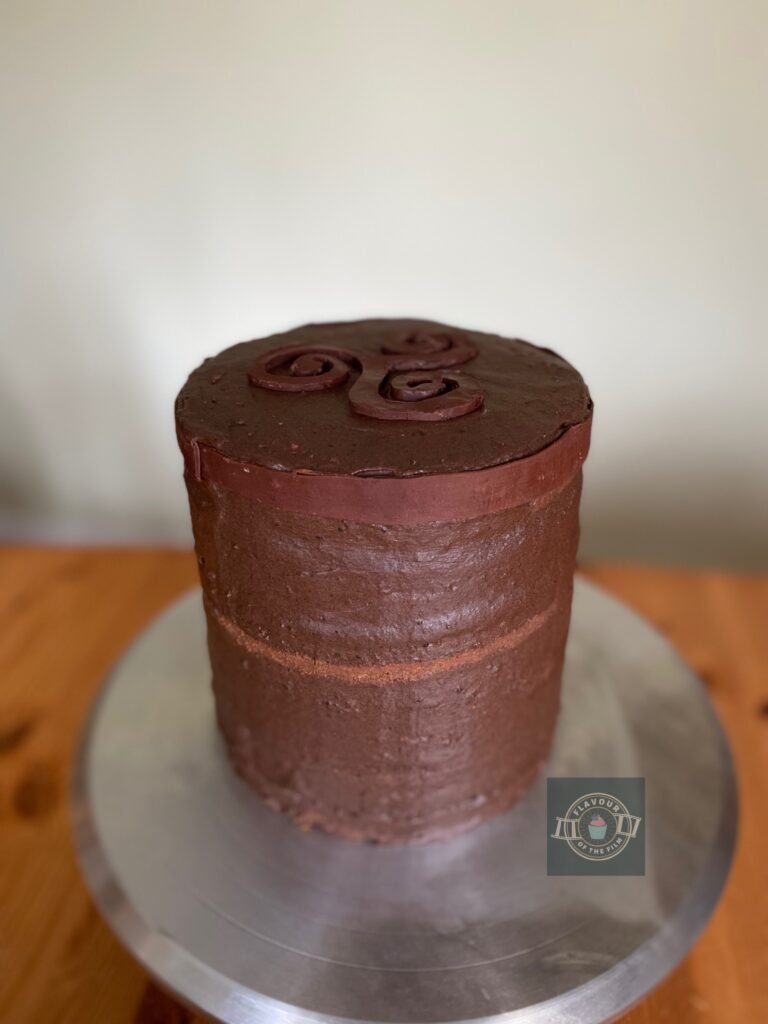
For the decoration, I moulded and cut out a Triskelion for the top and a rim for the “lid” of the urn using modelling chocolate. I found that when smoothing the buttercream on the cake, I liked the look of it being slightly rough because it looks more like wood that way.
It also looks like aged wood, which works even better as the Triskelion in Teen Wolf has been in the Hale family for generations. Plus, the crumbs of the Oreos gives my chocolate cookies and cream cake that gritty look, which adds to the overall effect.
The last element to this Teen Wolf cake were the “fireflies”.
The Nogitsune spirit is represented in firefly form until it possesses certain characters in Teen Wolf, so I used yellow and green M’n’Ms as my fireflies and put them in the centre of the urn cake, rather than all the way through the middle.
Top Tips
- Be patient when whisking your eggs and sugar together. It’s worth the wait and is the main reason for the fluffy and light texture of the cake once baked.
- Do NOT let your milk boil when warming it through. This could have a less than desirable impact on the taste of your cake.
- The making of the sponges is a lengthier process than most Western cakes but stick with it. The end result is more than worth the extra time and effort.
- Be accurate when stacking the sponges during the decorating section. The last thing you want is a wonky (and ultimately unstable) cake!
- Be generous with the flavours in the buttercream. The sponges are a delicate vanilla flavour so you want the buttercream to provide the richness from the chocolate and Oreo cookies.
I hope you enjoy making this cake! It’s massive in size and incredibly delicious. I’m super proud of how I managed to bring so many elements of Teen Wolf into this cake and had a lot of fun making it. It makes a great birthday cake for any Teen Wolf fan. Enjoy, friends.
Happy baking, happy eating!
The Recipe
Ingredients
Teen Wolf cake sponges:
- 400g [2½ cups] plain [all-purpose] flour
- ½ tsp salt
- 3 tsp baking powder
- 400g [2 cups] caster sugar
- 5 large eggs
- 310ml [10.9 oz] whole milk
- 145g [5 oz] unsalted butter
- 3 tsp vanilla extract
- 4 tsp vegetable oil
- 1 – 2 tsp liquid red food colouring oil based
- 1 – 2 tsp liquid yellow food colouring oil based
- 1 – 2 tsp liquid baby blue food colouring oil based
Decoration:
- 250g [8.75 oz] unsalted butter
- 500g [3¼ cups + 3 tbsp] icing [confectioners] sugar
- 150g or about 1½ packets Oreo cookies
- 2 tbsp cocoa powder
- 50g [¼ cup] 70% or more dark chocolate
- 4+ tbsp whole milk
- Modelling chocolate (dark)
- The yellow and green M’n’Ms or similar candied chocolate from a single packet
Serves: 10+
Preparation time: 30 minutes
Baking time: 1 hour to 1 hour 30 minutes
Decorating time: 30 minutes
Method
Teen Wolf cake sponges:
- Preheat your oven to either 170°C [340°F] or 150°C fan or 160°C [320°F] or 140°C fan. This is up to you and is based on how hot your oven runs. I baked at 140°C fan.
- Grease and line three deep 6 inch cake tins and set aside.
- Sieve the flour into a bowl. Add the salt and baking powder, mix evenly and then set aside.
- In a large room temperature bowl, whisk the eggs until the yolks and whites have mixed.
- Add the sugar gradually to the eggs while whisking (I used a large spoon and added every few seconds). If using a standing mixer with the whisk attachment, proceed to the next step whilst the eggs and sugar are doing their thing until very pale and tripled in volume. If using an electric hand whisk (as I did), stay with your eggs and sugar and whisk until very pale and the amount has tripled in volume. It’ll take a bit of time but it’s worth the wait.
- In a microwave safe bowl or jug, melt the butter in with the milk and heat the mixture. Do this in bursts of 1 minute until the mixture is hot to touch. Do not let it boil (a bit of frothing is fine).
- Sprinkle the flour mix, ⅓ at a time over your whisked sugar and eggs and whisk. When you can no longer see any flour, stop whisking.
- Add the vanilla and oil to the hot milk and butter mix and whisk.
- With your milk and butter mix still hot, add two rough ladles of your combined flour and egg mix into the milk and butter. Whisk until smooth.
- Pour the milk and butter mix over the rest of the flour and egg mix ⅓ at a time and whisk in between. Whisk completely until the batter is pourable.
- Ladle into the cake tins – I do two ladles per tin and continue this until the batter is used up. This provides even amounts.
- Add the red food colouring into the first tin, the yellow food colouring into the second tin and the blue food colouring into the last tin. Whisk each one gently just until the colour is combined (this way you keep the air in the batter!). Make sure to rinse your whisk in between each tin so you don’t mix colours.
- Tap each tin 3 times on the counter to knock out the large bubbles.
- Bake the cakes on the middle shelf for 1 hour to start if your oven is at 170°C [340°F] or 150°C fan. Keep an eye on them from 1 hour onwards. If your oven is at 160°C [320°F] or 140°C fan, start with 1 hour and 15 minutes. The tins are deep and the cakes will be thick enough to cut in half so they take longer to bake through.
- Your cakes will be done when they are not “singing to you” (making a bubbling/crackling sound) and a cocktail stick comes out clean.
- Once baked, leave to cool in the tins for 15 minutes, then turn out upside down onto a cooling rack to cool completely.
Buttercream:
- Whilst the cakes are cooling, make the buttercream.
- Beat the butter until softened and add the sugar bit by bit, beating in between.
- Blitz your Oreos in a food processor until they become a fine crumb. Alternatively, crush them in a bag with a rolling pin.
- Add the Oreos and the cocoa powder to the buttercream. Add milk 1 tbsp at a time to loosen the buttercream. It needs to be soft enough to not break the sponges (which will be very soft!).
- Melt the dark chocolate in the microwave in bursts of 20 seconds. Add to the buttercream and beat until smooth.
Decoration:
- Break off some modelling chocolate and knead it until pliable. Roll out into a large circle. Using a stencil or by eye, cut out a Triskelion. Take your time and have fun with this!
- Break off another piece of modelling chocolate and roll it out with your hand into a long and thin sausage – long enough to go around the diameter of your cake. Use a rolling pin to flatten it out so that it looks like a belt. Use a knife to slice off the edges and ends to make them sharper.
- Once the cakes are completely cool, cut them in half so that you have 6 halves: 2 of each colour.
- Scrape some buttercream onto your cake stand/board/plate and place the first blue layer. Smooth buttercream over the top and layer the first yellow one on top of it. Add more buttercream. Using a round cookie cutter, cut out a hole of the centre of the first red layer and then add it to the cake. Add more buttercream.
- Cut a hole from the centre of the second blue layer and add to the cake. Separate the yellow and green M’n’Ms from the rest and pour them into the hole. Continue adding buttercream and the last layers until you have layered all of your cakes.
- Smooth buttercream over the entire cake in a thin layer to create a crumb coat.
- Chill in the fridge for a few minutes.
- Add more buttercream over your crumb coat and smooth with a palette knife. Make it as smooth or rough as you like, but rough will look more like aged wood.
- Place your modelling chocolate Triskelion and lid collar on your cake, using the buttercream as a glue.
- Chill again until set.
This delectable chocolate cookies and cream Teen Wolf inspired cake is best enjoyed on the day. but will last for 4+ days in an airtight container. Enjoy!
The TV Show
Yes, I know I have just done a recipe based on a “Teen” title but I had to write this one up seeing as Teen Wolf: The Movie has officially been released. I adored the TV show when it was airing – it got me through my media course when I was 17/18 years old.
I really liked the original Teen Wolf starring Michael J. Fox that was released in 1985 so to see it being re-imagined in the way that Jeff Davis did drew me to it immediately. To be honest, anything with werewolves mixed with other mythical creatures is my vibe.
Howling at the moon? Roaring to signal your pack? Sarcastic best friends? Count me in.
Created by Jeff Davis, MTV’s Teen Wolf gained momentum from 2011 and a huge fanbase developed with the release of every season; all of whom were along for this supernatural ride with nothing but passion for the show. The final season of the TV show aired in 2017.
Alongside Jeff Davis, a myriad of writers and directors were responsible for making Teen Wolf what it is, not to mention the on-screen talent. The characters are the heart of Teen Wolf and are what make it so lovable.
The story follows Scott McCall: a teenager living a relatively unexciting life as a high school student.
Struggling with grades, lack of popularity and an inability to be picked to play in an actual game of lacrosse. That is until one fateful night, when Scott is bitten by an alpha werewolf and from there, the story unfolds as Scott’s life goes from unimaginative to supernaturally charged.
Lead character, Scott McCall, was brought to life by Tyler Posey. Joined by Dylan O’Brien as fan-favourite Stiles Stilinski, with the likes of Crystal Reed; Holland Roden, Tyler Hoechlin, Colton Haynes, Arden Cho, Shelley Hennig, Ryan Kelley and more all having joined forces to make Teen Wolf so special.
In my opinion, it’s better to have cool teen characters AND some kickass adults to shake things up.
Melissa Ponzio, Linden Ashby, JR Bourne, Ian Bohen, Seth Gilliam and Orny Adams brought the parent/responsible adult vibes but with a way more fun twist.
Though, Coach, played brilliantly by Orny Adams, lacked any real sense of “responsible adult”. His comedic relief hit the mark every time.
Naturally, Teen Wolf is about werewolves. But what takes it those few steps further are the other mythical creatures that are thrown into the mix. Banshees, coyotes, hellhounds and even druids are brought into the story, with new creatures introduced every season.
Teen Wolf brings in mythology from varying cultures around the world, including some La Loba vibes inspired by Mexican mythology and fox spirits AKA the Kitsune and Nogitsune from Japanese mythology.
Season three, where the Japanese mythology was introduced, is arguably the most popular season and certainly my personal favourite, so when it was revealed that it would be the Nogitsune that would be revisited for the movie, I was thrilled.
The TV show still holds a special sentimentality for me and I often rewatch it to feel invested in it again. Because of this, I was really glad to see how a sense of sentimentality was approached for the movie. Teen Wolf: The Movie was made for the fans.
Recipe Card

Chocolate Cookies and Cream Cake | Teen Wolf
Ingredients
For the cake:
- 400 g [2½ cups] plain [all-purpose] flour
- ½ tsp salt
- 3 tsp baking powder
- 400 g [2 cups] caster sugar
- 5 large eggs
- 310 ml [10.9 oz] whole milk
- 145 g [5 oz] unsalted butter
- 3 tsp vanilla extract
- 4 tsp vegetable oil
- 1 – 2 tsp liquid red food colouring oil based
- 1 – 2 tsp liquid yellow food colouring oil based
- 1 – 2 tsp liquid baby blue food colouring oil based
For the decoration:
- 250 g [8.75 oz] unsalted butter
- 500 g [3¼ cups + 3 tbsp] icing [confectioners] sugar
- 150 g or about 1 ½ packets Oreos
- 2 tbsp cocoa powder
- 50 g [¼ cup] 70% or more dark chocolate
- 4 + tbsp whole milk
- Modelling chocolate dark
- The yellow and green M’n’Ms or similar candied chocolate from a single packet
Instructions
- Preheat your oven to either 170°C [340°F] or 150°C fan or 160°C [320°F] or 140°C fan. This is up to you and is based on how hot your oven runs. I baked at 140 fan.
- Grease and line three deep 6 inch cake tins and set aside.
- Sieve the flour into a bowl. Add the salt and baking powder, mix evenly and then set aside.
- In a large room temperature bowl, whisk the eggs until the yolks and whites have mixed.
- Add the sugar gradually to the eggs while whisking (I used a large spoon and added every few seconds). If using a standing mixer with the whisk attachment, proceed to the next step whilst the eggs and sugar are doing their thing until very pale and tripled in volume. If using an electric hand whisk (as I did), stay with your eggs and sugar and whisk until very pale and the amount has tripled in volume. It’ll take a bit of time but it’s worth the wait.
- In a microwave safe bowl or jug, melt the butter in with the milk and heat the mixture. Do this in bursts of 1 minute until the mixture is hot to touch. Do not let it boil (a bit of frothing is fine).
- Sprinkle the flour mix, ⅓ at a time over your whisked sugar and eggs and whisk. When you can no longer see any flour, stop whisking.
- Add the vanilla and oil to the hot milk and butter mix and whisk.
- With your milk and butter mix still hot, add two rough ladles of your combined flour and egg mix into the milk and butter. Whisk until smooth.
- Pour the milk and butter mix over the rest of the flour and egg mix ⅓ at a time and whisk in between. Whisk completely until the batter is pourable.
- Ladle into the cake tins – I do two ladles per tin and continue this until the batter is used up. This provides even amounts.
- Add the red food colouring into the first tin, the yellow food colouring into the second tin and the blue food colouring into the last tin. Whisk each one gently just until the colour is combined (this way you keep the air in the batter!). Make sure to rinse your whisk in between each tin so you don’t mix colours.
- Tap each tin 3 times on the counter to knock out the large bubbles.
- Bake the cakes on the middle shelf for 1 hour to start if your oven is at 170°C [340°F] or 150°C fan. Keep an eye on them from 1 hour onwards. If your oven is at 160°C [320°F] or 140°C fan, start with 1 hour and 15 minutes. The tins are deep and the cakes will be thick enough to cut in half so they take longer to bake through. Your cakes will be done when they are not “singing to you” (making a bubbling/crackling sound) and a cocktail stick comes out clean.
- Once baked, leave to cool in the tins for 15 minutes, then turn out upside down onto a cooling rack to cool completely.
- Whilst the cakes are cooling, make the buttercream.
- Beat the butter until softened and add the sugar bit by bit, beating in between.
- Blitz your Oreos in a food processor until they become a fine crumb. Alternatively, crush them in a bag with a rolling pin.
- Add the Oreos and the cocoa powder to the buttercream. Add milk 1 tbsp at a time to loosen the buttercream. It needs to be soft enough to not break the sponges (which will be very soft!).
- Melt the dark chocolate in the microwave in bursts of 20 seconds. Add to the buttercream and beat until smooth.
- Break off some modelling chocolate and knead it until pliable. Roll out into a large circle. Using a stencil or by eye, cut out a Triskelion. Take your time and have fun with this!
- Break off another piece of modelling chocolate and roll it out with your hand into a long and thin sausage – long enough to go around the diameter of your cake. Use a rolling pin to flatten it out so that it looks like a belt. Use a knife to slice off the edges and ends to make them sharper.
- Once the cakes are completely cool, cut them in half so that you have 6 halves: 2 of each colour.
- Scrape some buttercream onto your cake stand/board/plate and place the first blue layer. Smooth buttercream over the top and layer the first yellow one on top of it. Add more buttercream. Using a round cookie cutter, cut out a hole of the centre of the first red layer and then add it to the cake. Add more buttercream.
- Cut a hole from the centre of the second blue layer and add to the cake. Separate the yellow and green M’n’Ms from the rest and pour them into the hole. Continue adding buttercream and the last layers until you have layered all of your cakes.
- Smooth buttercream over the entire cake in a thin layer to create a crumb coat.
- Chill in the fridge for a few minutes.
- Add more buttercream over your crumb coat and smooth with a palette knife. Make it as smooth or rough as you like, but rough will look more like aged wood.
- Place your modelling chocolate Triskelion and lid collar on your cake, using the buttercream as a glue.
- Chill again until set.
Notes
© Flavour of the Film. All content and imagery is copyright protected. Please do not use any of my images or written content without prior permission. If you would like to share any of the recipes or images on Flavour of the Film, please link back to the recipe in question and rewrite it in your own words, crediting Flavour of the Film as the original source.


One Comment
Comments are closed.