Well, looky here! We have ourselves the first throwback recipe on Flavour of the Film! I went back to my childhood for this one. Anyone else a Cartoon Network kid? What an era that was. For my second bread-based recipe, I chose to celebrate one of my favourite cartoons growing up: Teen Titans, in the form of a seaweed bread with miso.
Contents
The Bake
Because Teen Titans has a Japanese feel to it, I wanted to use a few of my favourite Japanese ingredients. Thus, my seaweed bread with miso was created.
I played around with combinations and spent a while trying to decide how to structure it. I knew I wanted it to be a milk bread – Japan makes the best milk bread A.K.A. shokupan 食パン. So, the actual bread itself is a deliciously soft and fluffy texture.
This base of this recipe is inspired by Jane’s Patisserie’s garlic bread, though I adapted it and added elements to fit my vision. If you’ve looked around for recipes for milk bread, you’ll notice that most, if not all, contain butter as well as milk. You’ll also see that there are different methods, like using milk powder instead of fresh milk or using a Tangzhong paste or a Yudane mix.
I personally like to use fresh milk and make Tangzhong paste (another method I learned from Kim-joy!) to add to the dough.
There are certainly lots of authentic recipes specifically for shokupan out there so by all means, refer to one of those if that’s what you’re after! This is just based on what’s easily available in the U.K. in terms of ingredients.
The other flavours I went for were miso, which is in the dough itself, and nori seaweed, which I re-hydrated and mixed with garlic and butter for the filling. Both flavours are relatively subtle in this bread but give the sense of Japan that I was going for.
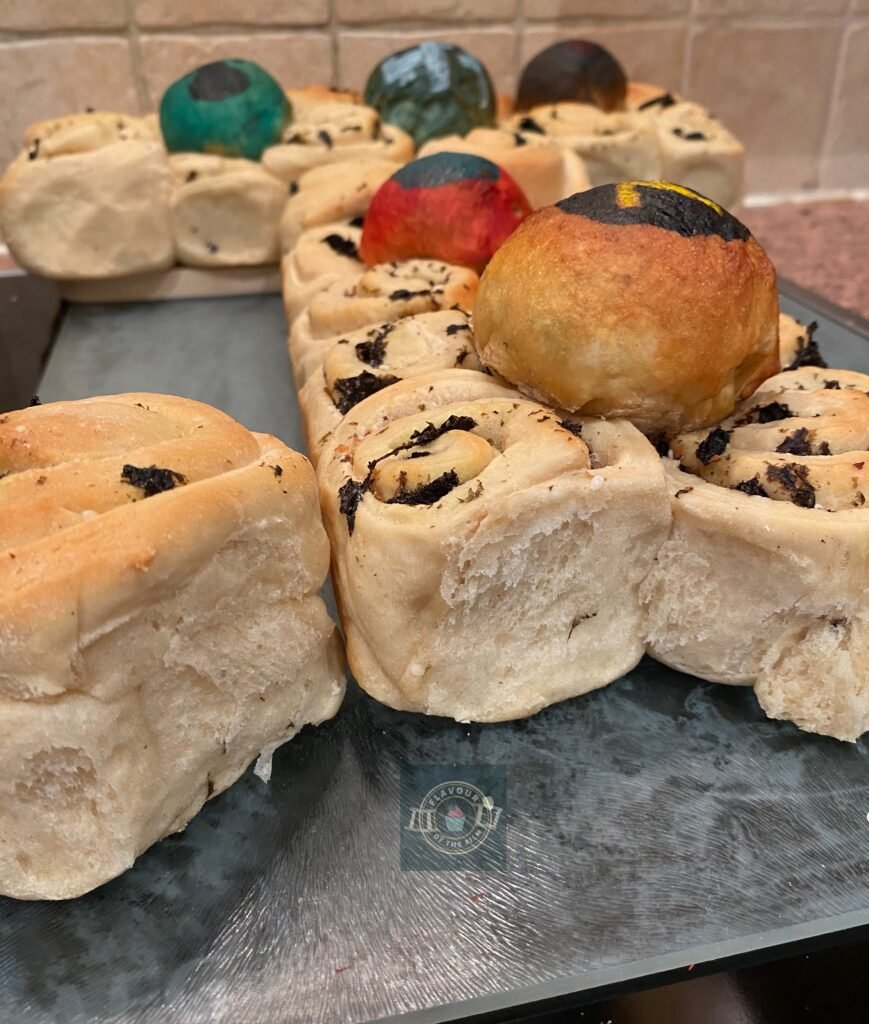
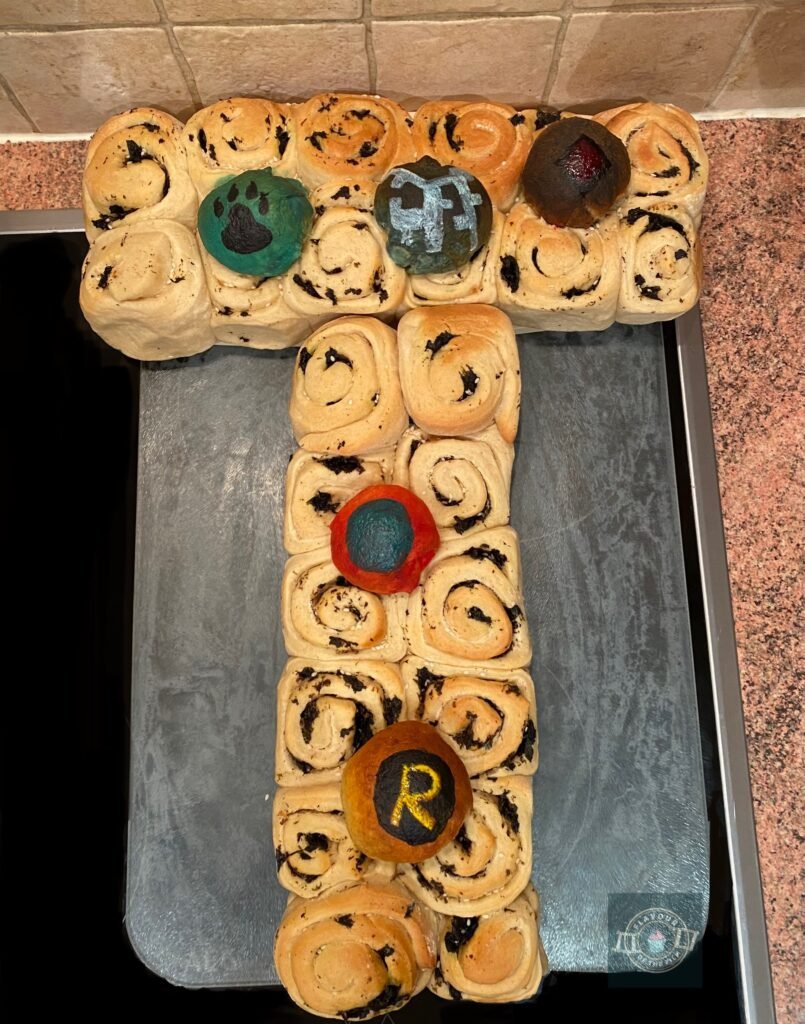
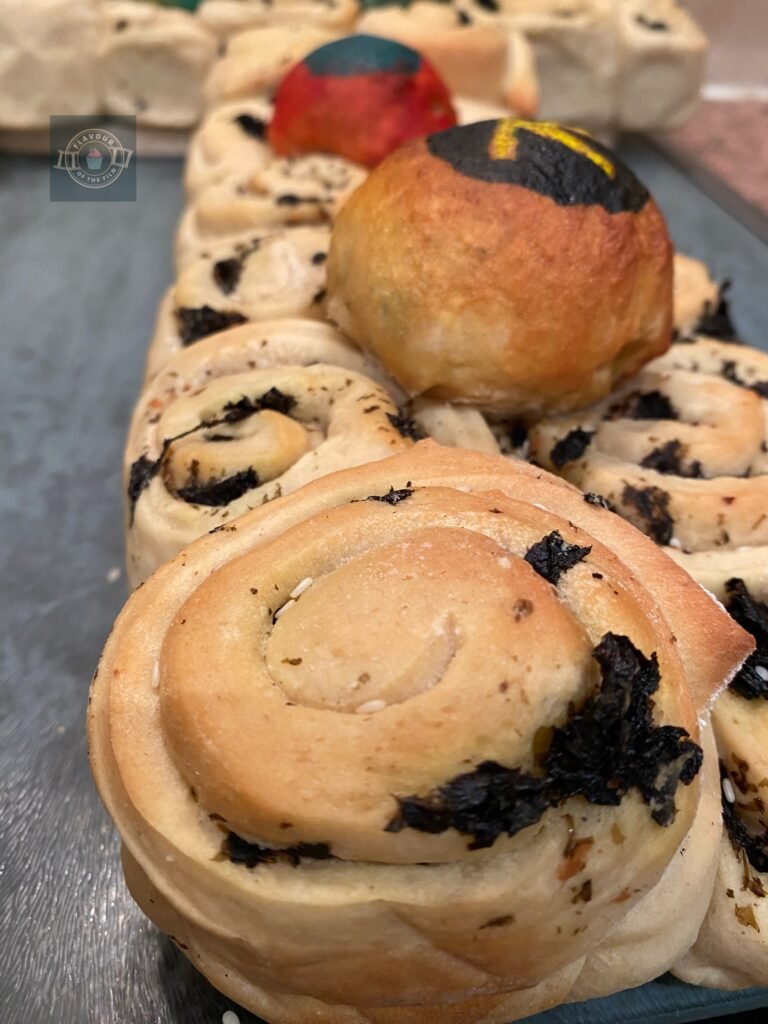
For my seaweed bread with miso, I went for sharing rolls in swirl form for the structure.
I did this because the pattern reminded me of the drawings that appear near cartoon characters’ heads to represent exaggerated emotions and reactions. Teen Titans is full of them.
For the character buns, I glazed them with a honey and soy sauce mix to add some sweetness to the overall bake. Plus, soy sauce is a core flavour used in Japanese cooking so I wanted to get it in there somewhere!


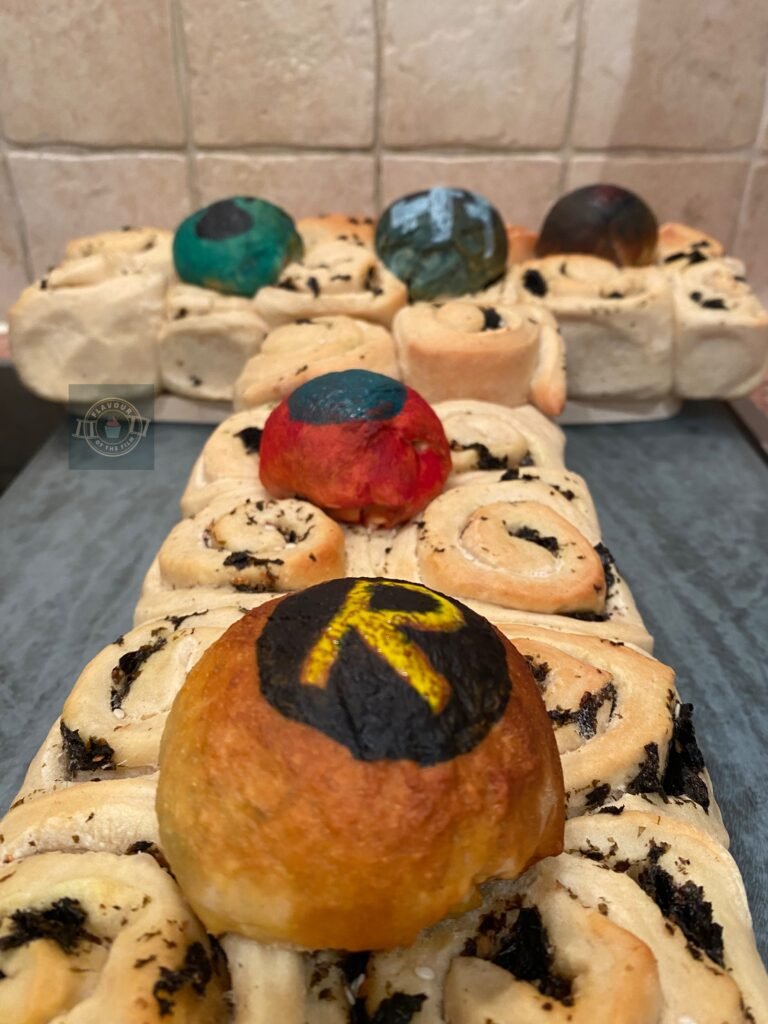
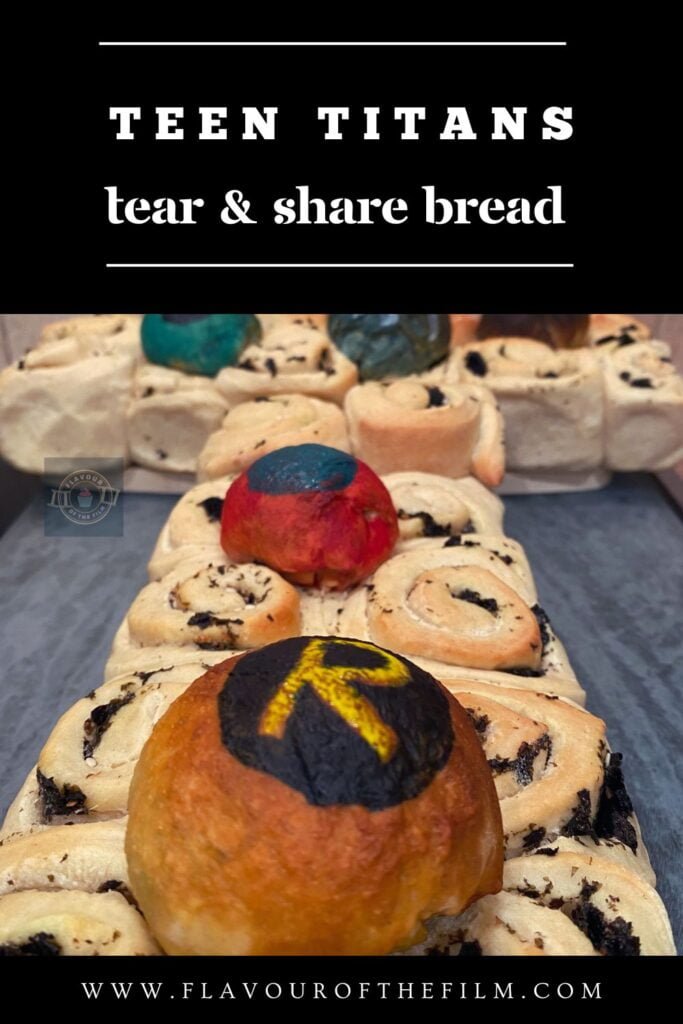
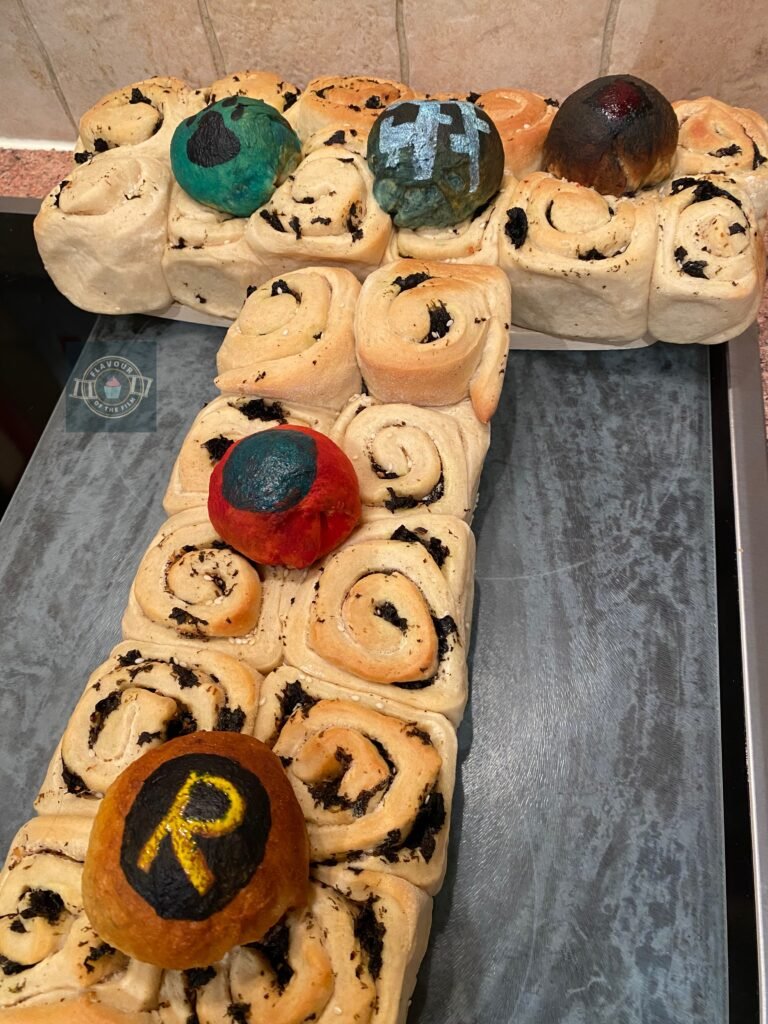
The shape of my seaweed and miso bread represents the T Tower: the massive lone building that the Titans live in.
It represents them both as a team and as an apparent separate entity from the city that they serve and protect, arguably because of their powers and thus, their responsibilities.
I then added small buns across the surface of the tower to represent each of the titans with their colours and identifiable/symbolic imagery.
This show means a lot to me for various reasons but at the core of it, it’s genuinely funny, entertaining and emotional. These characters are so well written that they felt like my friends when I was a young’n.
Top Tips
- Be generous with the fillings. You need more than you realise to really achieve the flavours!
- Don’t be put of by the use of vodka in the decoration. A minute amount is needed and any alcohol is cooked out in the oven.
- Keep count of how many times you cut the dough into rolls. It’s easy to lose track and you could end up with an uneven amount or uneven sized rolls.
- Follow the first steps for the Tangzhong paste. It’s a little extra effort but it gives you a really soft bread, so it’s worth it!
When I make bread, I really make it. As demonstrated in my Narnia tear and share bread recipe, there is plenty to go around. I had a lot of fun making this throwback seaweed bread with miso and I hope you do too. Enjoy!
Happy baking, happy eating!
The Recipe
Ingredients
The dough (split into halves to make two doughs):
- 1200g [7¼ cups + 3 tbsp] strong white bread flour
- 14g [1 tbsp] (2 sachets) fast action dried yeast
- 4 tbsp caster or granulated sugar
- 180g [6.25 oz] unsalted butter
- 2 medium eggs
- 550ml [20 oz] milk
- 42g [3-5 tbsp] white miso paste
Tangzhong paste:
- 75g [9 tbsp] strong white bread flour
- 300ml [10.5 oz] water
Seaweed and miso filling:
- 2 tbsp melted unsalted butter
- Chopped garlic to taste (2 – 4 fresh cloves or 2 – 3 tsp pre-chopped)
- 20g [¼ to ½ cup] dried nori seaweed
- 2 – 3 tbsp water
Glaze and decoration:
- Runny honey to taste
- Soy sauce to taste
- Food colours based on your Teen Titans designs
- Splash of vodka (for the food colouring)
- Sesame seeds to sprinkle (optional)
Serves: 12+
Preparation time: 30 minutes
Proving time: 2 hours
Baking time: 20 – 25 minutes
Method
The dough:
- Whisk together the flour and water in a pan until smooth. Put the pan over a medium heat and stir constantly until you get a thick, paste-like consistency. Place in a bowl and chill in the fridge.
- Sieve out half of the flour into one bowl and the other half into another bowl. It is easier to make 2 doughs so follow this principle for the entire recipe: half of the ingredients in each dough.
- Add the yeast on one side of the bowl, then the sugar and salt on the other side of the bowl. Do not let the yeast and salt touch yet otherwise they could cancel each other out.
- Soften your butter and add your Tangzhong paste, making sure it is cool first before mixing with your butter, then split evenly between your two bowls.
- Warm through the milk in a pan over a medium heat. Whisk in the miso paste briefly. Let the milk warm until you can see steam rising from it but it’s still warm enough to touch. Do not let it get hot enough to simmer or boil.
- Make a well in each of your bowls and split the milk in half, pouring each half into each bowl.
- Whisk an egg for each bowl and pour in: one egg per bowl.
- Combine the ingredients together with a spoon in each bowl until you have two rough looking doughs.
Kneading:
- One at a time, pour the dough onto a clean and lightly floured surface and knead by hand for around 10 minutes. If using a dough hook on a hand or standing mixer, knead for around 5 minutes. The dough will be smooth and shiny when done.
- Repeat for the second dough, keeping the two separate.
- Place in lightly oiled bowls and cover with cling film/beeswax paper/a damp tea towel.
- Set aside in a warm room/airing cupboard to rise for around 1 hour or until each dough has doubled in size.
Seaweed & miso filling:
- Tear up your dried nori seaweed sheets into a bowl and re-hydrate them with the water. Mix together until the seaweed has regained moisture. If too wet, squeeze and drain.
- Mix the chopped garlic in with the seaweed.
- Melt the butter in a separate bowl.
- Line a deep, rectangular tray (i.e. roasting tray) with baking parchment. Add another half-sheet over the top of half the lined tray so that you will be able to keep the rows of rolls separate.
- When your dough is ready, start with one dough by knocking the air out briefly and rolling out into a rectangle about a half inch thick.
- Brush half of the melted butter onto your rectangular dough.
- Sprinkle over the seaweed and garlic mix. It is likely you will need to pull apart some of the seaweed as the water will have stuck it together a bit.
- Roll the dough from length side to length side to create a long cylinder shape.
- Cut into 10 – 12 pieces (depending on the size you want your T tower to be).
Shaping:
- Place the pieces length-ways on one (length, not end) side of the tray: 5 or 6 rolls to make 2 rows on the top sheet of baking parchment, making sure that a side of the sheet is able to separate the two rows of rolls to prevent them from touching.
- Repeat this process with the second dough, first cutting off a small piece of the dough for the 5 small character buns.
- Place the second lot of seaweed buns in rows of two beside your first rows, keeping some baking parchment in the middle to keep them on 2 separate sides.
- You should have 4 long rows of 5 to 6 rolls down (looking at the tray with one end facing you and the two longer sides on either side of you), 4 across in total (2 either side of the baking parchment). 2 rows will make the base of the T, the other 2 will be the top.
- Split the ¼ into 5 and roll into balls, tucking them underneath to keep a round surface. Place these buns in a dish, cover and allow to rise.
- Cover the seaweed buns and allow to rise for another hour.
Baking:
- When the rolls are touching and have grown in size, preheat your oven to 180°C [350°F] or 160°C fan.
- Mix together the honey and soy sauce to taste and brush this glaze on the small buns.
- If doing background colours for the character buns, mix the food colouring with a splash of vodka and brush on.
- Place the character buns on the two rows of seaweed rolls in whatever pattern takes your fancy.
- Bake for 20 – 25 minutes until golden brown.
- Allow to cool.
- Once cool enough, finish painting your designs on the character buns with the different food colourings and a splash of vodka with each, mixed together.
- Carefully lift the rolls from your tray and arrange in a T shape: 2 rows as the base and 2 on the top.
- Finish by sprinkling with sesame seeds if doing so.
This deliciously soft and fluffy seaweed bread with miso is best eaten when freshly baked, but will last for 2 days after. It’s also delicious with tuna or egg. Enjoy!
The TV Show
The original cartoon adaptation of Teen Titans ran from 2003 to 2006 and even had its own movie set in Japan: Teen Titans: Trouble In Tokyo (2006). I LOVED this show and I still do. I spent more money than I had – at the time – on the DVD box set during my Uni days because, at that point, it was one of those shows I wanted to rewatch but wasn’t available anywhere on streaming sites.
Worth it.

The story follows five DC superheroes who team up to fight crime.
Robin, having detached himself from Batman’s side, leads a team of teen supers: Starfire (a kickass alien), Raven (a manipulator of shadows who can transcend levels of existence), Cyborg (a cyborg and tech master) and Beast Boy (a shapeshifter).
A whole plethora of DC’s superheroes and supervillains further drive the story, with most episodes having new encounters for the Titans – my favourites include Aqualad and Bumblebee.
The story really begins to develop when the ultimate antagonist shows up and causes chaos to the team: Slade.
Whilst it’s a throwback piece, I will still keep plot details out of the post. Spoilers are still spoilers to those who don’t know the story or the events that unfold.
The creators of Teen Titans included Bob Haney; David Slack and Bruno Premiani. There was a huge team of talented writers, directors and artists that worked on this show, too many to list in a post like this, but their work is one of the jewels of my childhood.

If anyone can name another throwback cartoon that voice actor Scott Menville (Robin) worked on, you get bonus brownie points and nerdy bragging rights.
Though it’s an American creation, it’s clearly inspired by Japanese Anime. Stylistically and aesthetically, you can see the similarities and I think it’s pretty epic. I’m a big admirer of Japanese Anime and grew up watching it. After I graduated from University, I moved to Japan and was there until the pandemic hit (yes, I miss it with all my heart). It was the most special time in my life.
Recipe Card

Seaweed Bread with Miso | Teen Titans
Ingredients
The dough (split into halves to make two doughs):
- 1200 g [7 ¼ cups + 3 tbsp] strong white bread flour
- 14 g [1 tbsp] 2 sachets fast action dried yeast
- 4 tbsp caster or granulated sugar
- 180 g [6.25 oz] unsalted butter
- 2 medium eggs
- 550 ml [20 oz] milk
- 42 g [3-5 tbsp] white miso paste
The Tangzhong paste:
- 75 g [9 tbsp] strong white bread flour
- 300 ml [10.5 oz] water
The filling:
- 2 tbsp melted unsalted butter
- Chopped garlic to taste 2 – 4 fresh cloves or 2 – 3 tsp pre-chopped
- 20 g [¼ to ½ cup] dried nori seaweed
- 2 – 3 tbsp water
The glaze and decoration:
- Runny honey to taste
- Soy sauce to taste
- Food colours based on your Teen Titans designs
- Splash of vodka for the food colouring
- Sesame seeds to sprinkle optional
Instructions
- Make the Tangzhong paste. Whisk together the flour and water in a pan until smooth. Put the pan over a medium heat and stir constantly until you get a thick, paste-like consistency. Place in a bowl and chill in the fridge.
- Sieve out half of the flour into one bowl and the other half into another bowl. It is easier to make 2 doughs so follow this principle for the entire recipe: half of the ingredients in each dough.
- Add the yeast on one side of the bowl, then the sugar and salt on the other side of the bowl. Do not let the yeast and salt touch yet otherwise they could cancel each other out.
- Soften your butter and add your Tangzhong paste, making sure it is cool first before mixing with your butter, then split evenly between your two bowls.
- Warm through the milk in a pan over a medium heat. Whisk in the miso paste briefly. Let the milk warm until you can see steam rising from it but it’s still warm enough to touch. Do not let it get hot enough to simmer or boil.
- Make a well in each of your bowls and split the milk in half, pouring each half into each bowl.
- Whisk an egg for each bowl and pour in: one egg per bowl.
- Combine the ingredients together with a spoon in each bowl until you have two rough looking doughs.
- One at a time, pour the dough onto a clean and lightly floured surface and knead by hand for around 10 minutes. If using a dough hook on a hand or standing mixer, knead for around 5 minutes. The dough will be smooth and shiny when done.
- Repeat for the second dough, keeping the two separate.
- Place in lightly oiled bowls and cover with cling film/beeswax paper/a damp tea towel.
- Set aside in a warm room/airing cupboard to rise for around 1 hour or until each dough has doubled in size.
- Prepare your filling.
- Tear up your dried nori seaweed sheets into a bowl and re-hydrate them with the water. Mix together until the seaweed has regained moisture. If too wet, squeeze and drain.
- Mix the chopped garlic in with the seaweed.
- Melt the butter in a separate bowl.
- Line a deep, rectangular tray (i.e. roasting tray) with baking parchment. Add another half-sheet over the top of half the lined tray so that you will be able to keep the rows of rolls separate.
- When your dough is ready, start with one dough by knocking the air out briefly and rolling out into a rectangle about a half inch thick.
- Brush half of the melted butter onto your rectangular dough.
- Sprinkle over the seaweed and garlic mix. It is likely you will need to pull apart some of the seaweed as the water will have stuck it together a bit.
- Roll the dough from length side to length side to create a long cylinder shape.
- Cut into 10 – 12 pieces (depending on the size you want your T tower to be).
- Place the pieces length-ways on one (length, not end) side of the tray: 5 or 6 rolls to make 2 rows on the top sheet of baking parchment, making sure that a side of the sheet is able to separate the two rows of rolls to prevent them from touching.
- Repeat this process with the second dough, first cutting off a small piece of the dough for the 5 small character buns.
- Place the second lot of seaweed buns in rows of two beside your first rows, keeping some baking parchment in the middle to keep them on 2 separate sides.
- You should have 4 long rows of 5 to 6 rolls down (looking at the tray with one end facing you and the two longer sides on either side of you), 4 across in total (2 either side of the baking parchment). 2 rows will make the base of the T, the other 2 will be the top.
- Split the ¼ into 5 and roll into balls, tucking them underneath to keep a round surface. Place these buns in a dish, cover and allow to rise.
- Cover the seaweed buns and allow to rise for another hour.
- When the rolls are touching and have grown in size, preheat your oven to 180°C [325°F] or 160°C fan.
- Mix together the honey and soy sauce to taste and brush this glaze on the small buns.
- If doing background colours for the character buns, mix the food colouring with a splash of vodka and brush on.
- Place the character buns on the two rows of seaweed rolls in whatever pattern takes your fancy.
- Bake for 20 – 25 minutes until golden brown.
- Allow to cool.
- Once cool enough, finish painting your designs on the character buns with the different food colourings and a splash of vodka with each, mixed together.
- Carefully lift the rolls from your tray and arrange in a T shape: 2 rows as the base and 2 on the top.
- Finish by sprinkling with sesame seeds if doing so.
Notes
© Flavour of the Film. All content and imagery is copyright protected. Please do not use any of my images or written content without prior permission. If you would like to share any of the recipes or images on Flavour of the Film, please link back to the recipe in question and rewrite it in your own words, crediting Flavour of the Film as the original source.


