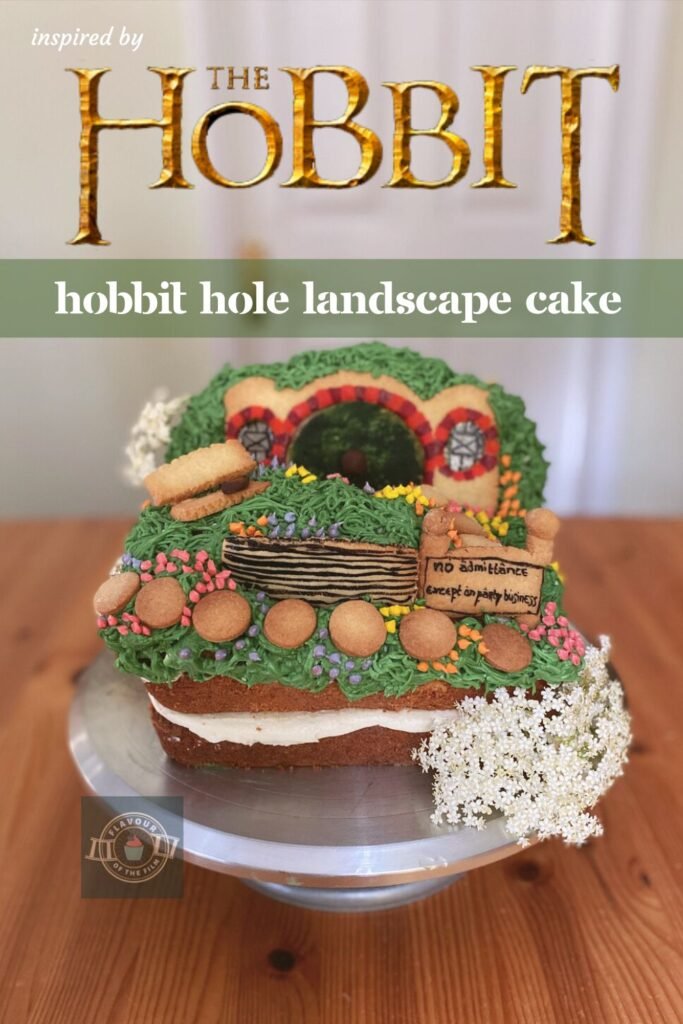
I’m a big fan of epic fantasy movies, especially such films as The Lord of the Rings and The Hobbit in particular. They’re right up my street and I get SO invested. The more detailed a fantasy world, the better. My The Hobbit inspired hobbit hole cake encapsulates delicious natural flavours, as well as the homeliness of Bag End. Let’s go on an adventure!
Contents
The Bake
I’m planning on making a bake to celebrate each film from The Lord of the Rings because they feel more different from one another, whereas the films that make up the The Hobbit trilogy feel closer together. With that in mind, I decided to dedicate just one bake to The Hobbit.
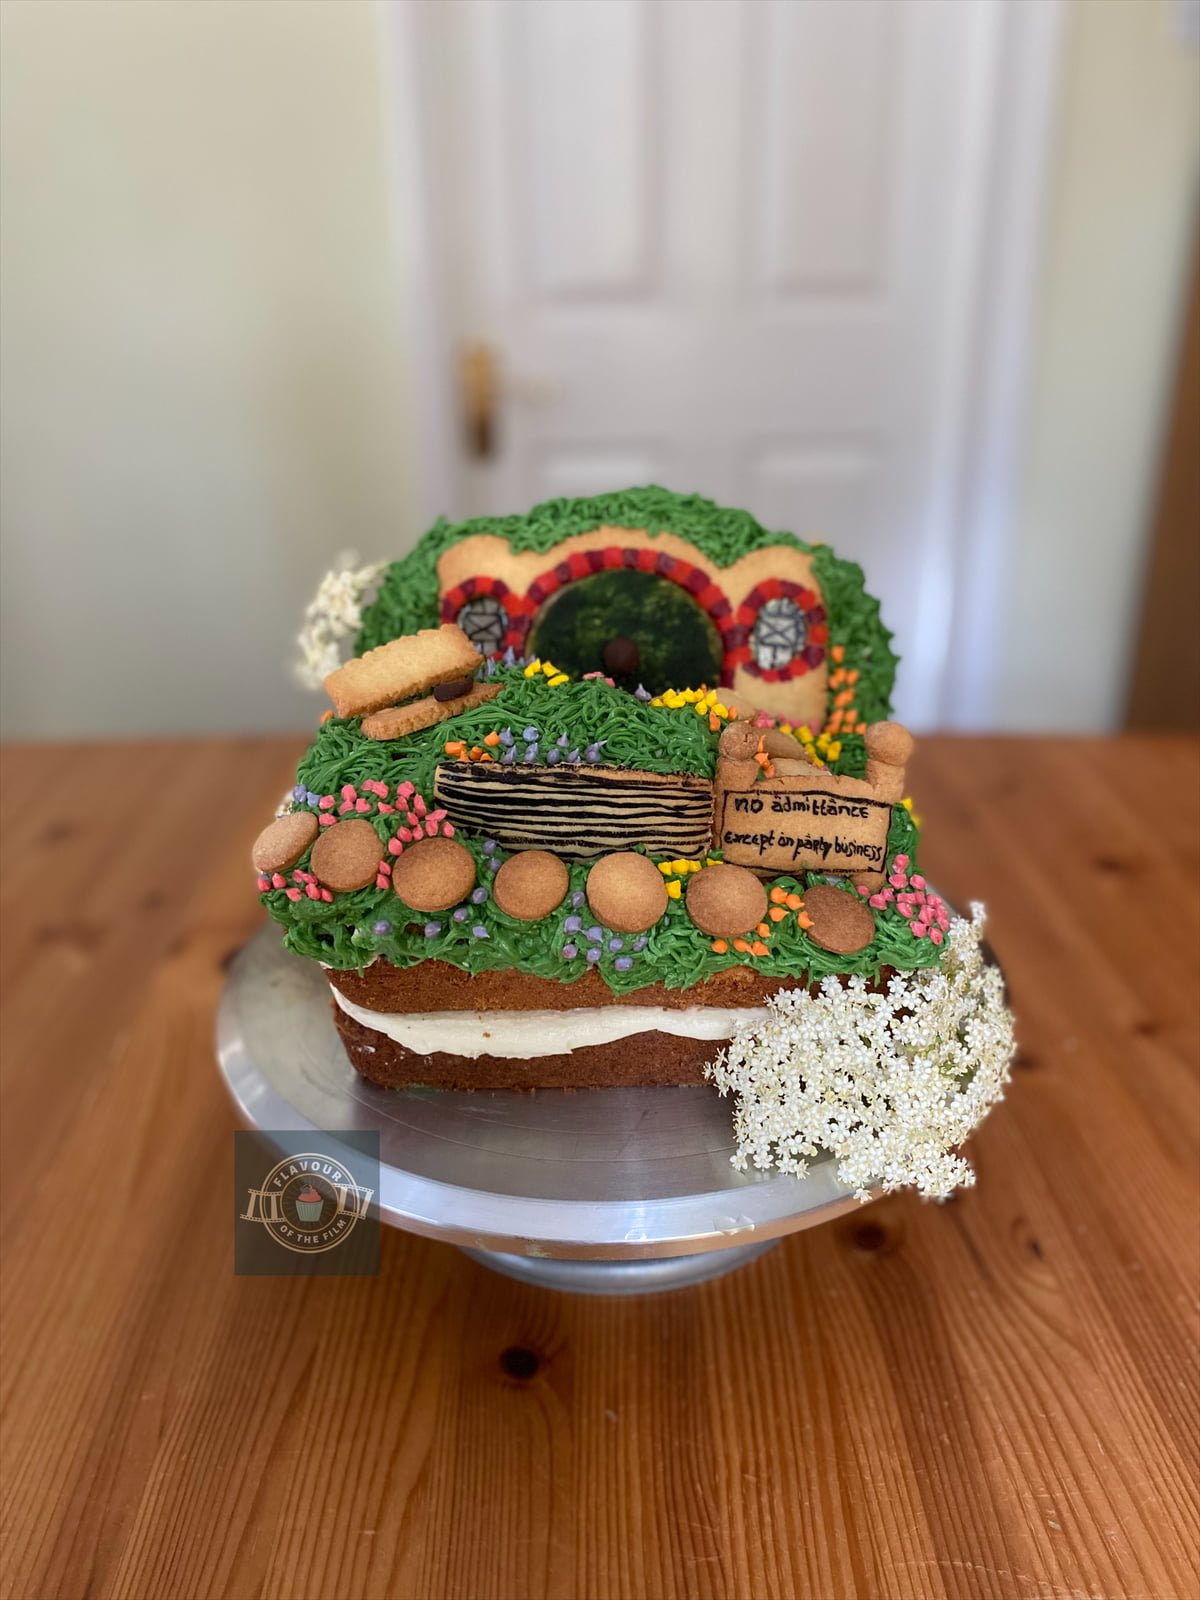
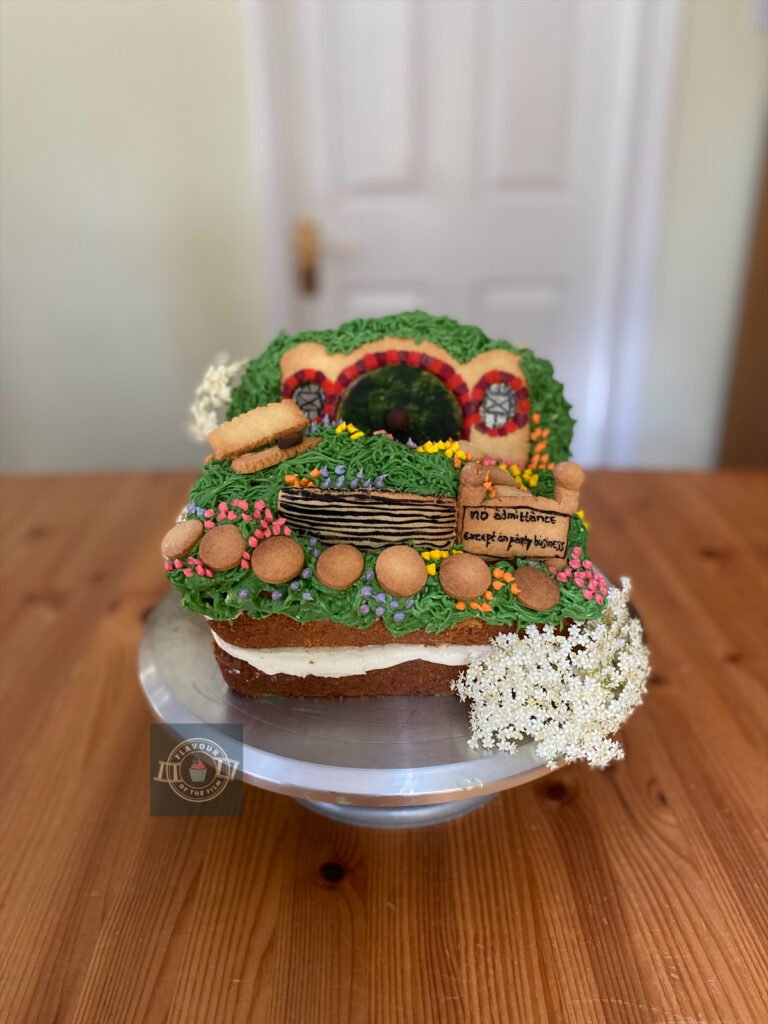
This is the second of my landscape cake series; the first one being my Outlander landscape cake. Both are grassy scenes but this won’t be a trending theme for the landscape cake recipes. My inspiration for this hobbit hole cake is where it all started… Bag End. The hobbit hole in The Shire where both Bilbo and Frodo Baggins reside.


I want to say first and foremost: this type of cake is so much easier to make than it may look.
I opted for a slightly overgrown look for the grass to represent the year-long adventure that Bilbo goes on with Thorin and company. But, you can choose whatever length of grass you want when piping the buttercream. I talked about the piping nozzle needed in my Outlander landscape cake recipe but it’s essentially a nozzle with multiple holes.
It gives the effect of grass or fur which is ideal for this hobbit hole cake. You can definitely just spread the buttercream on for a slightly less detailed look – it’s completely up to you. It’s arguably more important to achieve the right colour than the actual formation of the buttercream in this bake.
The sponges are lemon and elderflower flavour, with lemon zest in the sponges and lemon juice and elderflower cordial in the buttercream.
SO delicious and SO summery! I placed elderflower from my family’s garden around the hobbit hole cake as decoration. If you are also planning on doing this, be sure to wash the picked flowers beforehand and do not eat them raw as the flowers are mildly toxic until cooked… plus, they don’t taste all that nice. The flavour comes from the cordial!
As with all of my landscape cakes, they are built on two layers of square sponge. This one needed more to make the actual hobbit hole, so I baked the same type of cake in a 6 inch DEEP cake tin to use for the sculpting parts. This tin needs to be deep because the amount of cake needed is a lot.
It is also better to bake the sculpting cake in a round cake tin because you can utilise the shape of it for the hobbit hole, wasting far less cake overall.


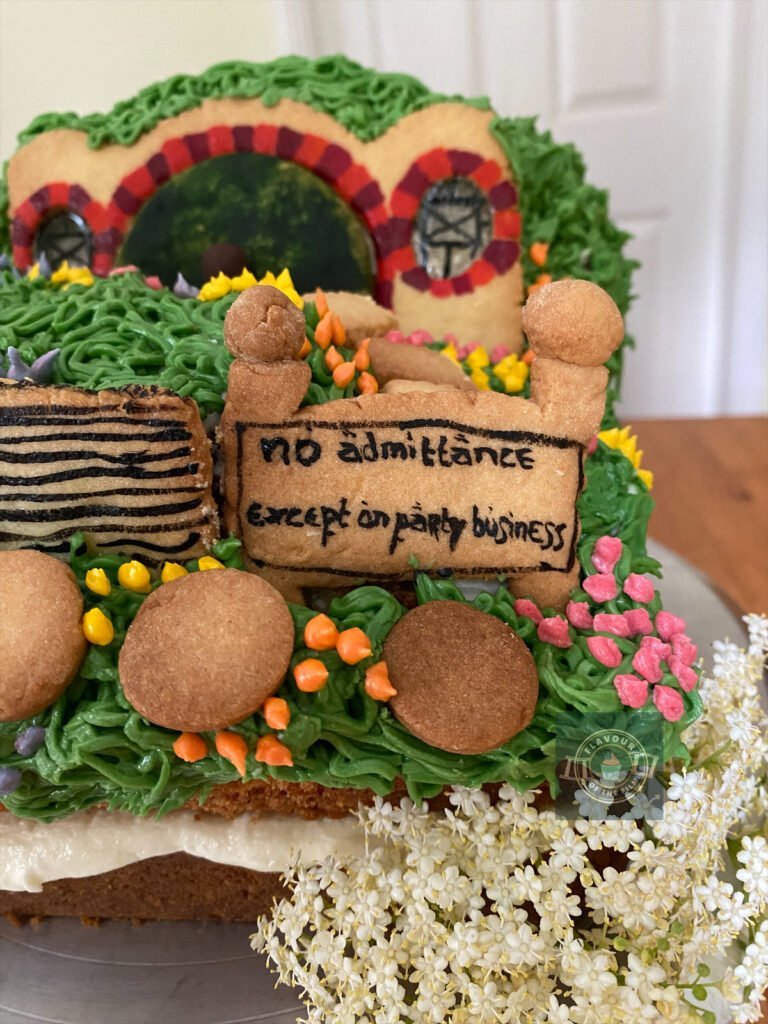
The decorations that make up the detail of this hobbit hole cake are a simple but delicious vanilla biscuit.
I used the biscuit to cut out the detailing, like the front of the hobbit hole and the steps etc. I did this freehand but feel free to draw out templates on paper and use those to help cut out the biscuit decorations.
The recipe provided below gives you a lot of biscuit to play with which is ideal as you can make multiple of the same thing just in case one breaks! I painted the detailing with food colouring and melted clear boiled sweets for the windows.
I also used modelling chocolate that I had on hand to shape the doorknob and the smoking pipe that sits on the biscuit bench. This can be done with fondant or can just be painted on. This cake is a prime example of using what you have.

It’s still delicious and it still looks great. You don’t need a big budget to make great looking bakes!
I’m still impressed that I managed to hand paint the sign on the gate into Bag End. I used a very thin paint brush and black food colouring. That’s it. It’s not at all necessary to paint on the sign as it’s actually a feature in The Lord of the Rings. I painted it because I wanted to tie the stories together in a gentle way to show that Bag End is a core setting in both stories.
Top Tips
- Try to avoid over mixing the cake as this can change the texture. You want the light and fluffy feel!
- Weigh out your eggs in the shells first and get as close to the required weight as possible, allowing for 20g either way. Then, weigh out the rest of your base ingredients to the exact weigh of your eggs. This helps to achieve the best cake texture!
- Go easy on the elderflower cordial – you don’t need a lot to achieve the delicious taste. Plus, too much cordial can be an unpleasant experience.
- Be careful not to over work the biscuit dough. You don’t want tough biscuits!
- Enjoy carving your biscuits and cake. Making this cake is a proper building experience – one that could be great to do with young ones.
As I said earlier, this hobbit hole cake is far easier to make than it looks. Which is the whole idea! It’s utterly delicious and my family devoured it within a couple of days. It’s also excellent with an elderflower cordial lemonade on the side. I hope you enjoy building your Bag End masterpiece and enjoy eating it while watching The Hobbit trilogy or hosting a themed party!
Happy baking, happy eating!
The Recipe
Ingredients
Biscuit:
- 100g [3.5 oz] unsalted butter
- 100g [½ cup] golden caster sugar
- 1 medium egg (the smallest you have)
- 250g [1½ cups + 1 tbsp] plain [all-purpose] flour
- 1 tsp vanilla extract
Hobbit hole cake base cake:
- 400g [14 oz] unsalted butter
- 400g [2 cups] caster sugar
- 400g eggs (about 6 medium eggs)
- 400g [2½ cups] self-raising flour
- Zest of 2 – 3 lemons
Sculpting cake (6 inch deep round tin):
- 150g [5.25 oz] unsalted butter
- 150g [¾ cup] caster sugar
- 150g eggs (around 2 medium)
- 150g [¾ cup + 3 tbsp] self-raising flour
- Zest of 1 lemon
Hobbit hole cake decoration:
- 150g [5.25 oz] unsalted butter
- 550g [3¾ cups] icing [confectioners] sugar
- 3 – 4 tbsp elderflower cordial
- Juice of half a lemon
- 1 clear boiled sweet [hard candy] cut in half
- Modelling chocolate or brown fondant optional
- Forest green food colouring
- Preferred food colourings for flowers i.e. yellow, pink, orange etc.
- Black food colouring
- Red and orange food colouring
- Edible glue optional
Serves: 12+
Preparation time: 1 hour
Chilling time: 1 hour 30 minutes + chilling between stages
Baking time: 40 minutes
Decorating time: 1 hour
Method
Biscuit:
- Prepare the biscuit dough first as it needs to chill. Cream together the butter and sugar until pale and fluffy. Add the egg and vanilla and beat in until smooth. Sieve in the flour and mix until a dough is formed.
- Wrap the dough in cling film or beeswax paper and chill for 30 minutes in the fridge.
- Prepare two baking trays by lining with baking parchment/greaseproof paper and set aside.
- Once chilled, tip the dough out onto a clean and floured surface. Flour your hands and the dough and fold in on itself a few times. Roll out with a rolling pin until about an inch in thickness.
- Cut out your decoration shapes: the outside of the hobbit hole, the steps, the gate, the bench and so on. Make sure to cut out gaps for the two windows. I used the base of a piping nozzle to do this, as I did for the pebbled path stones. You may have to keep bringing the dough together and rolling it out again: do so as needed.
- Carefully place the biscuits on the baking trays, making sure to arrange the bigger/thicker biscuits on one tray and smaller ones on the other.
- Chill in the fridge for 1 hour.
- Whilst your biscuits are chilling, make your cakes.
Hobbit hole cake:
- Preheat the oven to 180°C [350°F] or 160°C fan. Grease and line two 8 x 8 x 2 inch square cake tins, plus a deep 6 inch round tin and set aside.
- Weigh out your eggs in their shells and get as close to 400g as possible. Weigh out the rest of your ingredients to the specific weight you get i.e. 411g.
- Make the base cake mix first. Cream together the sugar and butter until light and fluffy. Add the eggs one at a time and beat in until combined.
- Add the lemon zest and flour and mix just until combined.
- Divide between the two square tins evenly.
- Repeat steps 10 to 13 to make the sculpting cake mix and spoon into the 6 inch deep cake tin.
- Bake the cakes on the middle shelves for around 40 minutes until golden. The square cakes will be ready first so check after 40 minutes. The round cake may take a little longer. Your cakes will be ready when a cocktail stick or skewer comes out clean, the surface bounces back when pressed on and you don’t hear a crackling/bubbling sound when you listen to your cakes.
- Leave to cool in the tins for around 10 minutes and then transfer upside down onto a wire rack to cool completely.
- If the biscuits have been chilled for 1 hour, take them from the fridge and bake for around 15 minutes until golden and crisp. Carefully add the halves of the boiled sweet to your window gaps after around 10 minutes of your biscuits baking. If particularly thin or small, then check after 10 minutes.
- Leave to cool on the trays.
- While everything is cooling, make your buttercream.
Buttercream:
- Beat together the sugar and butter. It will be dry but will loosen when you add the rest of the ingredients.
- Add the elderflower cordial and lemon juice and beat in. Take a few tbsp of buttercream and split into smaller bowls for your different coloured flowers: one bowl per colour.
- Place the first cooled square cake on a cake stand/plate/cake board and lay over a generous amount of buttercream from the large bowl.
- Place the second layer over and do the same with slightly less buttercream in order to create a crumb coat.
Construction:
- Cut the round cake in half and use one half to begin building the hobbit hole. Cut a chunk off the other half and cut into columns. Smother with buttercream and curve over the ends of the hobbit hole so make it wider. Add a back if necessary.
- Use the rest of the cake to build a slight hill on the left side of the cake, in front of the hobbit hole. You can do this in layers, using the buttercream as glue. Make sure to leave the right side of the cake uncovered.
- Chill in the fridge while you colour the rest of your buttercream. Add the green to the large bowl of remaining buttercream and mix well.
- Add your chosen flower colours to each small bowl and mix well.
- Add the green buttercream to a piping bag with the grass nozzle if using.
- Do the same for the other colours, with the very ends of the piping bags snipped off.
- If it’s particularly warm out, keep your buttercream/piping bags in the fridge until you are ready to use.
Decoration:
- Retrieve your cake from the fridge and begin adding the biscuit decorations ever so gently. Use the buttercream as glue. Use a small knife to make indents into the sponge in order to press the gate and hobbit hole front into the cake for stability: the biscuits may break if you try to force them in without an indent.
- The front of the hobbit hole will likely not press flush against the cake. If this is the case, do not worry as you will be able to disguise this with the grass buttercream.
- Pipe or spread the green buttercream across the entire top of the exposed sponge and sculpted cake to create the grass. Use the buttercream to join the hobbit hole cake and biscuit, filling in any gaps.
- Place in the fridge to chill.
- Mould any of the smaller details you are adding like the doorknob and smoking pipe.
- After the cake has chilled for a few minutes in the fridge, retrieve it and paint the decorations you are planning on painting: the door, brickwork, sign if doing so etc.
- Using edible glue, add the doorknob or paint it on with food colouring. Also use edible glue to build the bench and allow it to set.
- Add the steps and any other biscuit features over the grass. Pipe the flowers on top of the grass: simple dots give a great effect!
- Chill the cake again.
- To finish, paint any further decorations with food colouring, like the window frames using black food colouring.
- Make sure to chill even when finished.
- Marvel at your fantastical masterpiece!
This magically epic hobbit hole cake will last for around 4 to 5 days in a cake box or airtight container. The biscuit elements will soften slightly on the cake but they will remain tasty. I doubt this cake will last that long though! It’s incredibly moreish and makes a great addition to any The Lord of the Rings or The Hobbit themed party. Enjoy!
The Films
“It began long ago…”
Middle Earth is one of the best fantasy worlds ever created. J.R.R. Tolkien was a pure artistic genius.
As was Peter Jackson: the man who brought Tolkien’s handwritten masterpiece to the big screen. Having read The Lord of the Rings, I can honestly say that I think Peter Jackson did a truly wonderful job, especially considering just how intricate and detailed the original material is.
Naturally, I want to celebrate these films with a bake, so I decided to start with the prequel films that were released later: The Hobbit: An Unexpected Journey (2012), The Hobbit: Desolation Of Smaug (2013), and The Hobbit: The Battle Of Five Armies (2014).
This trilogy was based on the stand alone book: The Hobbit, that Tolkien wrote with a younger demographic in mind. I’ve also read this book and I can understand how it differs from The Lord of the Rings. Nevertheless, it provides excellent context, particularly regarding the character of Bilbo Baggins. After all, Bilbo is the hobbit that The Hobbit is centred around.
If you’ve read and/or seen The Lord of the Rings, you will understand why The Hobbit is integral in giving further insight into the time before the known return of the One Ring and how both stories fit together so fluidly. Knowing Bilbo’s backstory also helps round out the story of The Lord of the Rings.

I love when stories relate and connect in such a way. Makes me giddy.
Released in 2012, The Hobbit: An Unexpected Journey takes us back to the time before Bilbo Baggins was in possession of the One Ring. Back way before Frodo’s journey: when Bilbo was much younger, living contentedly in Bag End; his home in The Shire.
In the start, Gandalf the Grey finds Bilbo sitting on the bench outside Bag End, smoking his pipe.
They have a vague yet intriguing conversation, one that leaves Bilbo rather puzzled. It is later that evening that Bilbo is abruptly introduced to a travelling group of dwarves. One by one (or by pair, as is the case with Fili and Kili), dwarves knock on Bilbo’s door, expecting to be hosted in Bag End for a meeting.
Gandalf had made a magical mark on Bilbo’s door, guiding the dwarves to Bag End.
We discover that they are a company of dwarves, led by Thorin Oakenshield. Their desire and intention is to reclaim their home, The Misty Mountain of Erebor, back from under the claws of Smaug the dragon. In order to do this, they are in need of a burglar. This is where Bilbo comes in.
Despite his best efforts to turn down the job and convince himself that he is much better off remaining in Bag End, Bilbo can’t help but feel drawn into the adventure. From there, the trilogy of films follows Bilbo with Thorin and company on their journey to reclaiming Erebor.
As I mentioned earlier, Jackson did a fantastic job with The Lord of the Rings and while you can’t compare the two series, I also really like The Hobbit trilogy as well. The Hobbit has a different vibe to The Lord of the Rings for sure.
The colour palette is different, the style is different despite the director being the same. Plus, the frame rate is higher in The Hobbit than it was in The Lord of the Rings.

What is consistent with both series is how wonderful the casts are.
The great Sir Ian McKellan returned as Gandalf; joining him was Martin Freeman as Bilbo Baggins and Richard Armitage as Thorin Oakenshield. The company was brought together by Ken Stott; Graham McTavish, Aiden Turner, Dean O’Gorman, William Kircher, James Nesbitt, Stephen Hunter, John Callen, Peter Hambleton, Jed Brophy, Mark Hadlow, and Adam Brown.
Appearing later were Evangeline Lily as Tauriel: a character created for the film, plus Lee Pace and one of my favourite entertainers: Billy Connolly.
Returning cast members from The Lord of the Rings include Ian Holm as older Bilbo, Elijah Wood as Frodo, Hugo Weaving as Elrond, Cate Blanchett as Galadriel and Christopher Lee as Saruman. Orlando Bloom also returned as Legolas in the next instalments of The Hobbit, which was an interesting decision considering Legolas doesn’t appear in the original text.
Plus, the exquisite Andy Serkis as Gollum. The cast for this trilogy is extensive so I won’t list everyone here, but it really is a multitude of talent.
Alongside Peter Jackson, Fran Walsh and Phillipa Boyens also co-wrote all three films in The Hobbit trilogy.
Fantasy as a genre isn’t to everyone’s taste, but if it is yours and you haven’t seen The Hobbit trilogy, I definitely recommend giving them a watch. Then you can follow up with The Lord of the Rings and enjoy even more of the depths and curves of the hills of Middle Earth. They really are beautiful films to look at (despite the orcs and goblins).
Fun fact: Richard Armitage’s cousin was the headteacher at my primary school. That’s my claim to fame (haha!).
Recipe Card

Hobbit Hole Cake | The Hobbit Bag End Landscape Cake
Ingredients
Biscuit:
- 100 g [3.5 oz] unsalted butter
- 100 g [½ cup] golden caster sugar
- 1 medium egg the smallest you have
- 250 g [1½ cups + 1 tbsp] plain [all-purpose] flour
- 1 tsp vanilla extract
Hobbit hole cake base cake:
- 400 g [14 oz] unsalted butter
- 400 g [2 cups] caster sugar
- 400 g eggs about 6 medium eggs
- 400 g [2½ cups] self-raising flour
- Zest of 2 – 3 lemons
Sculpting cake (6 inch deep round tin):
- 150 g [5.25 oz] unsalted butter
- 150 g [¾ cup] caster sugar
- 150 g eggs around 2 medium
- 150 g [¾ cup + 3 tbsp] self-raising flour
- Zest of 1 lemon
Decoration:
- 150 g [5.25 oz] unsalted butter
- 550 g [3¾ cups] icing [confectioners] sugar
- 4 tbsp elderflower cordial
- Juice of half a lemon
- 1 clear boiled sweet [hard candy] cut in half
- Modelling chocolate or brown fondant optional
- Forest green food colouring
- Preferred food colourings for flowers i.e. yellow pink, orange etc.
- Black food colouring
- Red and orange food colouring
- Edible glue optional
Instructions
- Prepare the biscuit dough first as it needs to chill. Cream together the butter and sugar until pale and fluffy. Add the egg and vanilla and beat in until smooth. Sieve in the flour and mix until a dough is formed.
- Wrap the dough in cling film or beeswax paper and chill for 30 minutes in the fridge.
- Prepare two baking trays by lining with baking parchment/greaseproof paper and set aside.
- Once chilled, tip the dough out onto a clean and floured surface. Flour your hands and the dough and fold in on itself a few times. Roll out with a rolling pin until about an inch in thickness.
- Cut out your decoration shapes: the outside of the hobbit hole, the steps, the gate, the bench and so on. Make sure to cut out gaps for the two windows. I used the base of a piping nozzle to do this, as I did for the pebbled path stones. You may have to keep bringing the dough together and rolling it out again: do so as needed.
- Carefully place the biscuits on the baking trays, making sure to arrange the bigger/thicker biscuits on one tray and smaller ones on the other.
- Chill in the fridge for 1 hour.
- Whilst your biscuits are chilling, make your cakes.
- Preheat the oven to 180°C [350°F] or 160°C fan. Grease and line two 8 x 8 x 2 inch square cake tins, plus a deep 6 inch round tin and set aside.
- Weigh out your eggs in their shells and get as close to 400g as possible. Weigh out the rest of your ingredients to the specific weight you get i.e. 411g.
- Make the base cake mix first. Cream together the sugar and butter until light and fluffy. Add the eggs one at a time and beat in until combined.
- Add the lemon zest and flour and mix just until combined.
- Divide between the two square tins evenly.
- Repeat steps 10 to 13 to make the sculpting cake mix and spoon into the 6 inch deep cake tin.
- Bake the cakes on the middle shelves for around 40 minutes until golden. The square cakes will be ready first so check after 40 minutes. The round cake may take a little longer. Your cakes will be ready when a cocktail stick or skewer comes out clean, the surface bounces back when pressed on and you don’t hear a crackling/bubbling sound when you listen to your cakes.
- Leave to cool in the tins for around 10 minutes and then transfer upside down onto a wire rack to cool completely.
- If the biscuits have been chilled for 1 hour, take them from the fridge and bake for around 15 minutes until golden and crisp. Carefully add the halves of the boiled sweet to your window gaps after around 10 minutes of your biscuits baking. If particularly thin or small, then check after 10 minutes.
- Leave to cool on the trays.
- While everything is cooling, make your buttercream.
- Beat together the sugar and butter. It will be dry but will loosen when you add the rest of the ingredients.
- Add the elderflower cordial and lemon juice and beat in. Take a few tbsp of buttercream and split into smaller bowls for your different coloured flowers: one bowl per colour.
- Place the first cooled square cake on a cake stand/plate/cake board and lay over a generous amount of buttercream from the large bowl.
- Place the second layer over and do the same with slightly less buttercream in order to create a crumb coat.
- Cut the round cake in half and use one half to begin building the hobbit hole. Cut a chunk off the other half and cut into columns. Smother with buttercream and curve over the ends of the hobbit hole so make it wider. Add a back if necessary.
- Use the rest of the cake to build a slight hill on the left side of the cake, in front of the hobbit hole. You can do this in layers, using the buttercream as glue. Make sure to leave the right side of the cake uncovered.
- Chill in the fridge while you colour the rest of your buttercream. Add the green to the large bowl of remaining buttercream and mix well.
- Add your chosen flower colours to each small bowl and mix well.
- Add the green buttercream to a piping bag with the grass nozzle if using.
- Do the same for the other colours, with the very ends of the piping bags snipped off.
- If it’s particularly warm out, keep your buttercream/piping bags in the fridge until you are ready to use.
- Retrieve your cake from the fridge and begin adding the biscuit decorations ever so gently. Use the buttercream as glue. Use a small knife to make indents into the sponge in order to press the gate and hobbit hole front into the cake for stability: the biscuits may break if you try to force them in without an indent.
- The front of the hobbit hole will likely not press flush against the cake. If this is the case, do not worry as you will be able to disguise this with the grass buttercream.
- Pipe or spread the green buttercream across the entire top of the exposed sponge and sculpted cake to create the grass. Use the buttercream to join the hobbit hole cake and biscuit, filling in any gaps.
- Place in the fridge to chill.
- Mould any of the smaller details you are adding like the doorknob and smoking pipe.
- After the cake has chilled for a few minutes in the fridge, retrieve it and paint the decorations you are planning on painting: the door, brickwork, sign if doing so etc.
- Using edible glue, add the doorknob or paint it on with food colouring. Also use edible glue to build the bench and allow it to set.
- Add the steps and any other biscuit features over the grass. Pipe the flowers on top of the grass: simple dots give a great effect!
- Chill the cake again.
- To finish, paint any further decorations with food colouring, like the window frames using black food colouring.
- Make sure to chill even when finished.
- Marvel at your fantastical masterpiece!
Notes
© Flavour of the Film. All content and imagery is copyright protected. Please do not use any of my images or written content without prior permission. If you would like to share any of the recipes or images on Flavour of the Film, please link back to the recipe in question and rewrite it in your own words, crediting Flavour of the Film as the original source.


2 Comments
Comments are closed.