Japanese Strawberry Roll Cake | Demon Slayer
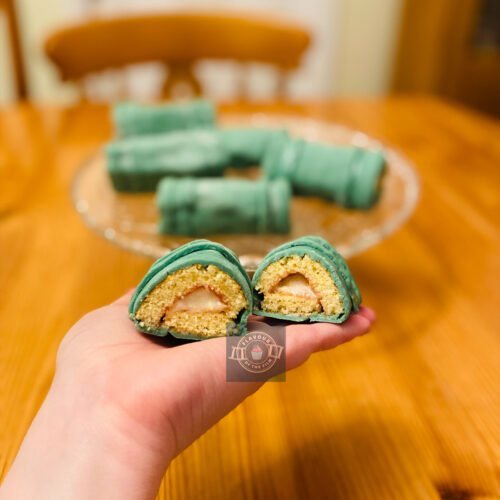
Light and fluffy mini versions of a Japanese roll cake with buttercream and strawberry jam, decorated to look like Nezuko's bamboo mouthpiece, celebrating Demon Slayer.
Ingredients
Japanese strawberry cake roll sponge:
- 60 g [¼ cup + 2 tbsp] plain [cake] flour
- 50 g [¼ cup] caster sugar
- 2 medium eggs
- 30 g [1 oz] unsalted butter
- 1 tsp vanilla extract make sure it is extract, not essence
Decoration:
- 200 g [7 oz] green fondant icing
- 25 g [2 tbsp] unsalted butter
- 50 g [¼ cup + 1 tbsp] icing [confectioners] sugar
- 4 - 5 tbsp strawberry jam
Instructions
- Preheat your oven to 180°C [350°F] or 160°C fan.
- Line a baking tray with plenty of oil directly on the tray, and a sheet of baking paper/greaseproof parchment on the top. Set aside.
- Melt the butter in a microwave-safe bowl in the microwave until completely melted. Set aside to cool.
- Make sure that your mixing bowls are dry and grease-free. Egg white needs a clean bowl!
- Separate your eggs: yolks in one bowl and whites into another.
- Add ¾ of the sugar to the yolks and whisk with an electric hand whisk until light and mousse-like. You’ll know it’s ready when you lift the whisk out and the egg mix leaves a ribbon or trail from the whisk for a few seconds.
- Clean your whisk attachment and dry it completely before reattaching.
- Whisk your egg whites until doubled in size and fluffy.
- Add the rest of the sugar to the egg whites, in small batches at a time, whilst still whisking. Whisk until the egg whites hold themselves and are glossy white: a meringue with stiff peaks.
- Add the flour to your egg yolk mix and fold in until completely incorporated. Be gentle and patient here - you don’t want to overmix this!
- Spoon ⅓ of the meringue into the flour paste and fold in gently.
- Add the rest of the meringue to your flour mix ⅓ at a time and fold in gently. Be gentle still as you don’t want to knock all of the air out of your meringue. This is what makes your sponge rise!
- Add the vanilla and melted butter and fold in a few times. Don’t worry if the butter doesn’t completely incorporate - it’ll still bake well.
- Pour the cake mix slowly onto the lined baking tray. Tip the tray both lengthways to help the sponge spread into a rough rectangle. A thin sponge is the desired result here.
- Bake for 8 - 10 minutes or until golden brown and until a cocktail stick comes out clean. If the stick comes out a little wet, bake for another minute or two and test again.
- Slide the sponge on the paper onto a cooling rack to cool completely. This will only take around 30 minutes as it’s so thin.
- Once completely cool, begin to decorate.
- Prepare another sheet of baking parchment/greaseproof paper. Lay it on your worktop and lightly dust with icing sugar.
- Flip the sponge upside down onto the new sheet of paper and peel the old sheet of paper off the bottom of the sponge.
- Thinly trim the edges of the sponge to achieve a sharp rectangle.
- Cut the sponge in half lengthways so that you have 2 long halves.
- Cut the 2 halves into 3 squares so that you have 6 even squares in total.
- In a mixing bowl, beat together the butter and icing sugar. Add a very small splash of milk to loosen if needed.
- Spoon a thin layer of jam onto each square. Be careful not to put too much on!
- Spread a small amount of buttercream on top of the jam covered squares. Use all of it up.
- Roll one sponge at a time. Don’t try to roll tight swirls! Meet edge to edge and tuck one under the other. Use the buttercream to help them hold their shape.
- Dust a clean surface with icing sugar and roll out the fondant. Cut into squares that are slightly larger than your sponge squares were. This doesn’t need to be exact - you can trim them!
- Roll each cake in fondant and tuck the edges in. The ends do not need to be covered: the inside of bamboo is pale!
- Trim any excess fondant that isn’t wanted.
- Use any remaining fondant to add the detail. Slice into thin strips and attach 2 strips to the ends of each bamboo bite, slightly apart. Add a touch of water to each one to secure them well.
- Dab your finger in water and wipe away any excess icing sugar on the fondant if desired. Otherwise, enjoy your bamboo bites in their natural form!
Notes
These mouth watering mini versions of a Japanese strawberry roll cake will last around 4 days in an airtight container. That’s if they last that long. Enjoy!