The Nightmare Before Christmas Cake
Devilishly rich chocolate and coffee cake decorated to look like a bust of Jack Skellington, with American buttercream, fondant icing and tempered chocolate, celebrating Disney's The Nightmare Before Christmas.
Ingredients
Jack’s head (the cake):
- 400 g [2½ cups] self-raising flour
- 100 g [¾ cup + 2 tbsp] good quality cocoa powder
- 500 g [17.75 oz] unsalted butter
- 350 g [1¾ cups] caster sugar
- 150 g [¾ cup] light brown sugar
- 6 large eggs
- 3-5 tbsp strong black coffee instant
- 1 tbsp boiling water
Jack’s head decoration:
- 250 g [8.75 oz] unsalted butter
- 550 g [3¾ cups] icing sugar [confectioners sugar]
- 3-4 tsp strong black coffee instant
- 1 tsp boiling water
- 2-3 tbsp good quality cocoa powder
- 500 g to 1kg [roughly 18 oz to 35 oz] white fondant icing/sugar paste
- Black food colouring
Jack’s collar:
- 200 g [1 cup] to 300g [1½ cups] high quality dark chocolate 70% or higher (chopped)
- 50 g [¼ cup] white chocolate chopped
- A palm-sized amount black fondant/sugar paste
Base/Jack’s clavicle:
- Leftover cake after carving
- Leftover buttercream
- 250 g [roughly 9 oz] black fondant/sugar paste
- White food colouring
- A splash of vodka optional
Instructions
- Preheat your oven to 180°C [325°F] or 160°C fan. Grease and line 3 deep 20cm/8 inch cake tins and set aside.
- Add the coffee and boiling water to a mug or bowl and mix well until the coffee has dissolved. Set aside to cool slightly.
- Beat the butter to loosen it, then add the sugars and beat until light and fluffy.
- Add the eggs one at a time, beating in between until all the eggs are fully incorporated into the butter and sugars.
- Beat in the cooled coffee.
- Sieve the flour and cocoa powder over your batter and mix in until fully incorporated. Take your time and be careful not to overmix!
- Divide the batter evenly between the three tins. I like to use a large spoon but you can weigh the batter in the individual tins if you prefer.
- Bake the cakes for around 35 – 40 minutes to begin with. The cakes will be done when a cocktail stick comes out clean and the cakes spring back when you press a finger lightly on their surface. If you listen to them and they are making a crackling/bubbling sound, bake for longer until the sound stops (check every 2 or so minutes). It can depend on how hot your oven runs.
- When baked, allow your cakes to cool for 15 minutes in the tins and then transfer to a wire rack to cool completely. Turn upside down for a flatter top surface.
- While your cakes are cooling, make the buttercream.
- Mix the coffee and boiling water to a mug (the same as before) and mix until the coffee has dissolved. Set aside to cool.
- Beat the butter to loosen it, then add the icing [confectioners] sugar a bit at a time until light and fluffy.
- Add the cooled coffee and the cocoa powder to the buttercream to flavour. If the buttercream seems a little stiff, add another splash of water or milk and beat until it’s slightly looser.
- When your cakes are completely cool, either leave them in 3 layers or cut each layer in half with a serrated knife, rotating the cake around while holding the knife parallel to your worktop as you gently saw through the sponges, so that you end up with 6 layers in total. It’s your choice!
- Smudge some buttercream onto your cake stand/chopping board/clean surface and lay the first sponge layer over it.
- Spread a reasonably thin layer of buttercream over the sponge and layer the next sponge over the top.
- Repeat this process until all of the sponges are stacked.
- Use some of the remaining buttercream to create a thin crumb coat (this is your ‘glue’ during carving) over your cake and place the cake in the fridge to chill.
- While the cake is chilling, make Jack’s collar.
- Grease and line two baking trays with baking parchment/greaseproof paper.
- If preferred, draw a rough outline of three shards with a curved bottom edge – it should look a little like a cartoon crown. Use whatever you are using as Jack’s neck to trace the bottom edge as that is the part of the collar that will curve around his neck.
- Do this twice so that you have two halves – one on each tray. These will fit together to create the whole collar.
- To temper the chocolate, melt ⅔ of the dark chocolate in a bowl over a bain marie (bowl set over a pot of boiling water). Using a food grade thermometer, continuously stir the chocolate until melted and until the temperature reaches about 46°C [115°F] but no higher than 49°C [120°F].
- Take the melted chocolate off the heat – do NOT let any water touch the chocolate as it can seize – and gradually ‘seed’ in your remaining solid chocolate to bring the temperature down. Continuously stir until the remaining chocolate has melted and the temperature has dropped to around 29°C [84°F]. It may take some time so patience is key.
- Place the bowl of melted chocolate back over the bain marie to inject some heat back into it. Leave it for about 10 seconds, stirring constantly, then remove it and keep stirring. Place it back over the heat for another 10 seconds, still stirring, then remove it again. Repeat this process until the temperature has reached around 32°C [89°F] but don’t let it get any higher than about 33°C [91°F].
- Your chocolate is now at working temperature!
- Pour the chocolate into a piping bag and trace the outline of the collar halves – one on each tray. Fill in the centre and use a cocktail stick to help spread the chocolate into any gaps before it begins to set.
- Place your collar halves in the fridge while you finish the cake elements.
- Take the cake out of the fridge and, using a serrated knife, begin to carve your cake into a round shape. Mine looked a little like a soccer ball by the end. Rule of thumb: take a little off at a time, rather than large chunks. Also, hold the knife at an angle rather than the sharp edge directly against the cake.
- Make sure to catch the cake you cut off and place it in a bowl for later.
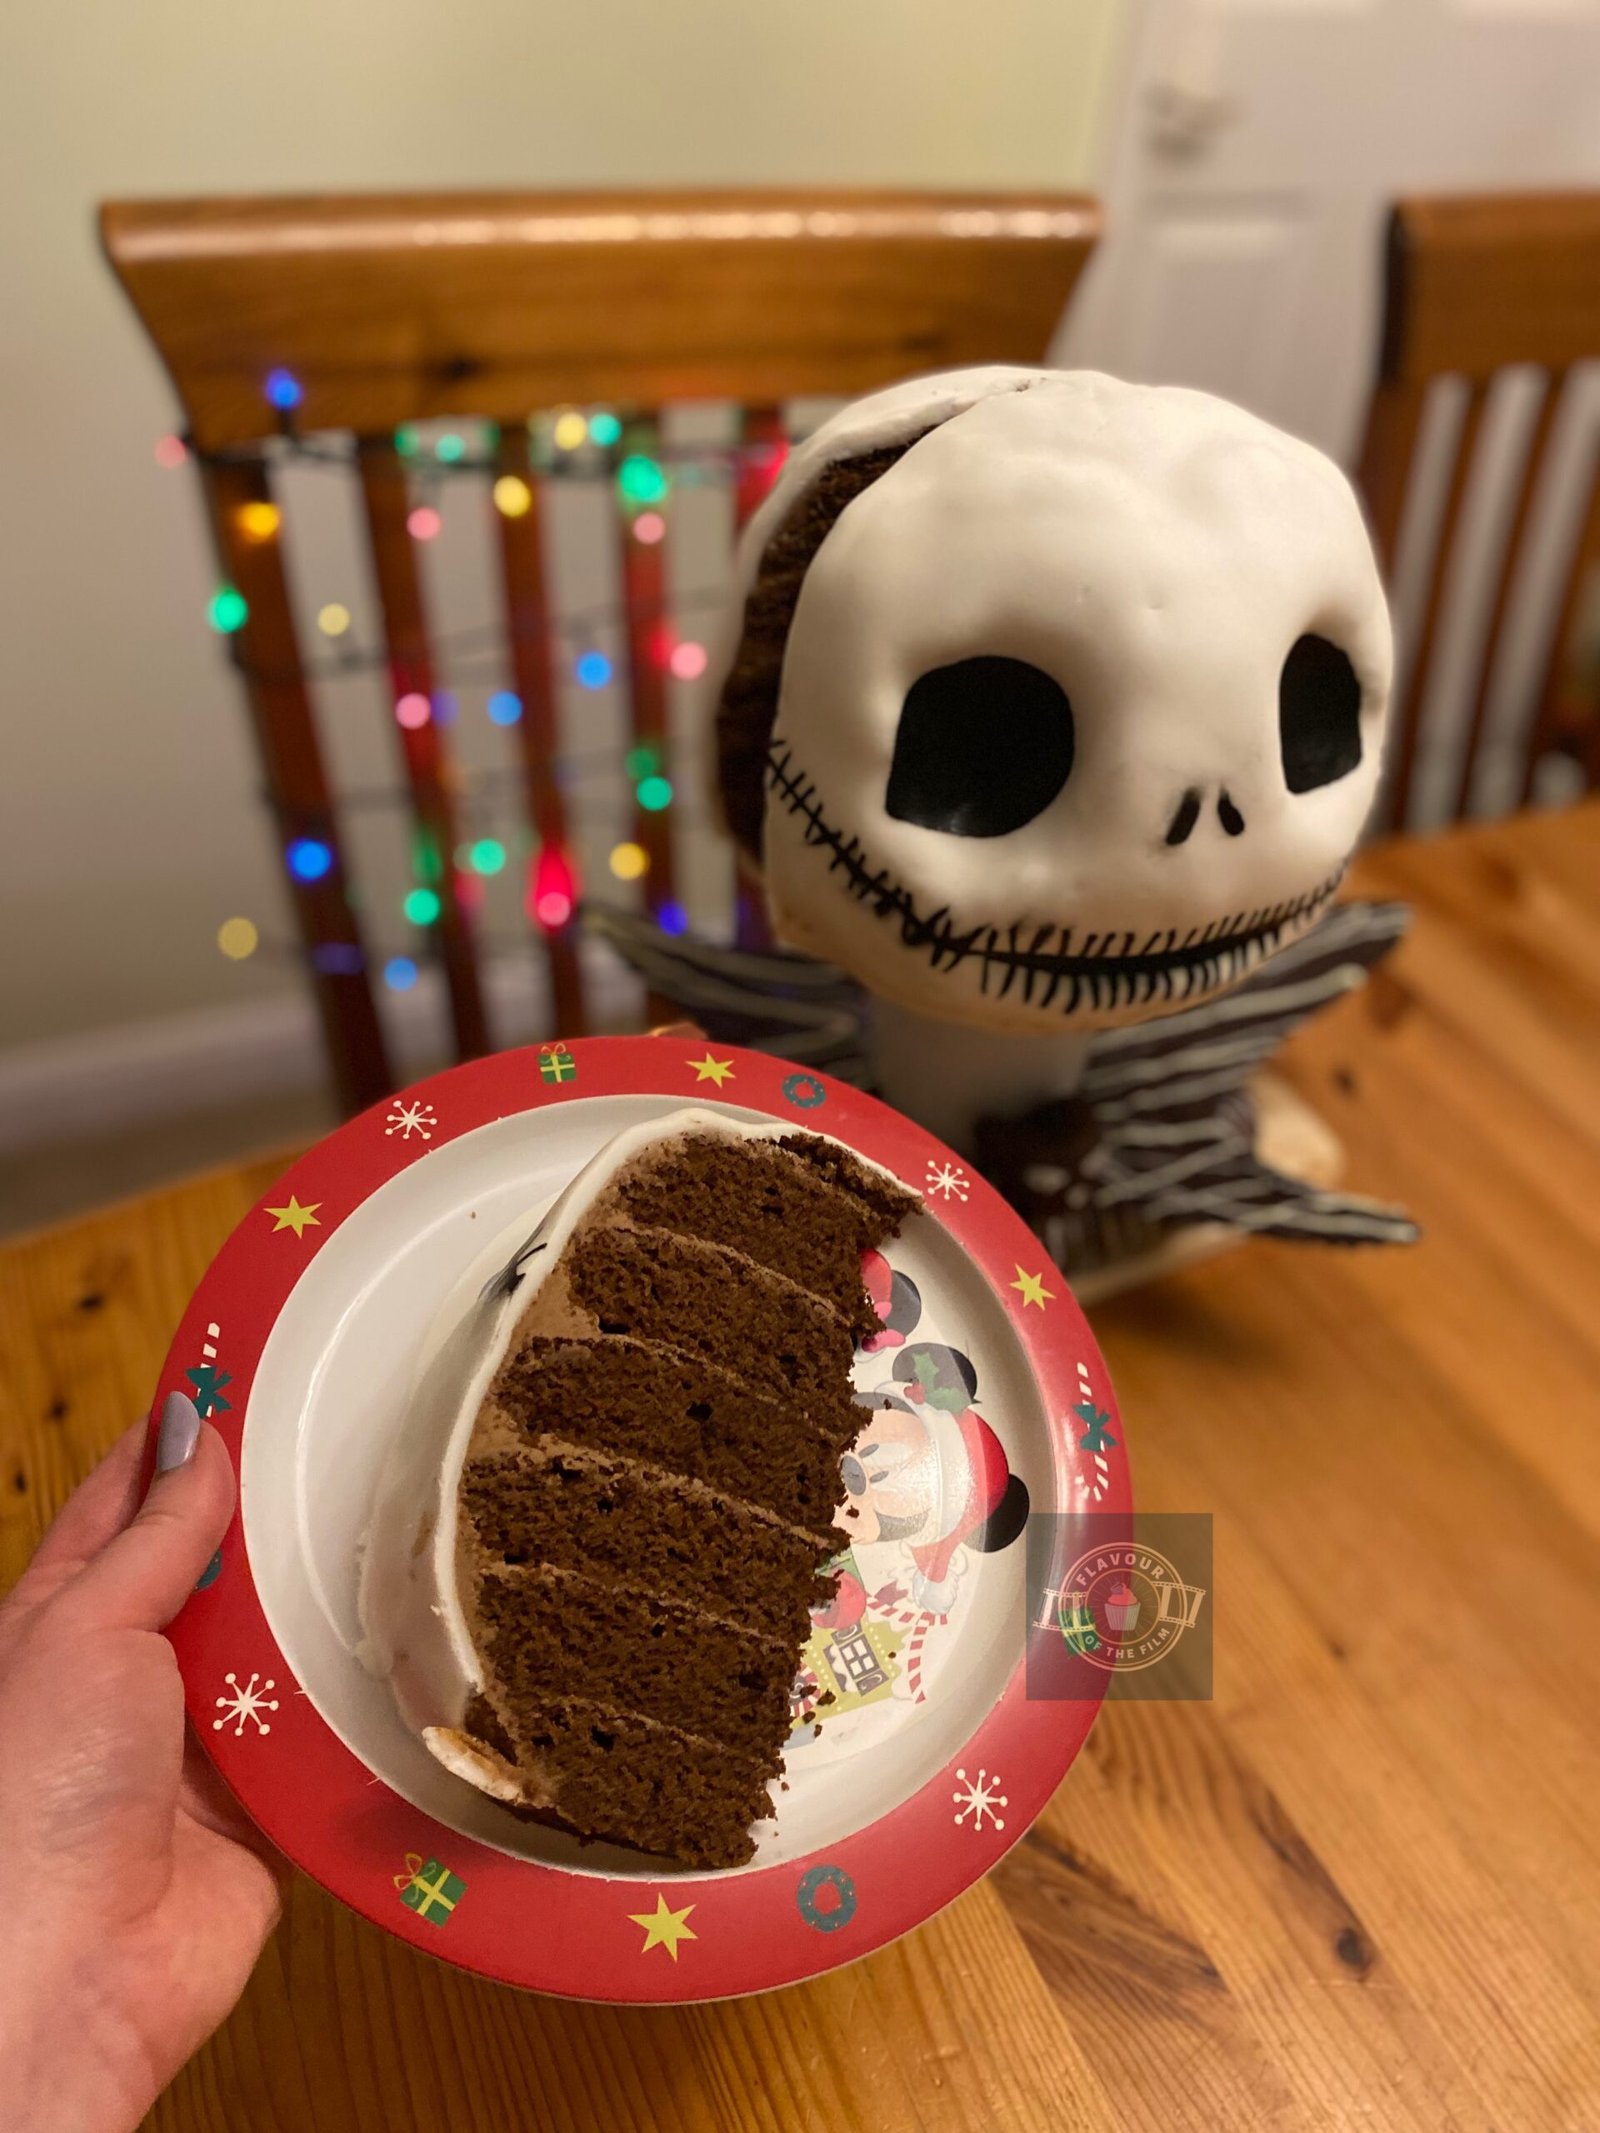
- When you have rounded off the head, gently carve out Jack’s eyes and the centre of his mouth.
- Use some spare cake to shape Jack’s ‘eyebrows’, using a little buttercream to ‘glue’ them down.
- Cover the head-shaped cake in most of your remaining buttercream (leave a little for the leftover cake).
- Roll out the white fondant icing. Knead it a little first if needed (to make it more pliable), then roll out as far as it’ll go without being overly thin. I lay my fondant icing over the cake in halves (front and back of the head) but if you can do it in one whole piece then go for it!
- Lay the fondant icing over your cake. Lift the bottom edge of it and press the fondant gently into the eye sockets and mouth gap, using your knuckle or a rounded sculpting tool to press it into the carved features.
- Smooth down the rest of the fondant – tucking right underneath the cake – and trim any excess off.
- Using the black food colouring, paint inside the eye sockets and mouth gap, and then paint the nose and stitches onto Jack’s face to create his features.
- Turn to the base of the structure.
- Construct the figure in a place where you are planning on keeping the cake once it is done. Alternatively, build the figure in a cake box that can be folded into shape after the figure is complete.
- Mix the leftover cake, leftover buttercream and any leftover pieces of fondant icing together in a bowl.
- Roll out the black fondant, leaving a palm-sized piece aside for the bow tie buckle. Place the item you are using for Jack’s neck into the centre of the fondant and cut out the fondant that it is sat on. Add it to the leftover cake mix.
- Press the leftover cake mix into the centre of the black fondant, around Jack’s neck and shape it all into a rough rectangle. Peel the edges of the fondant icing up and press them over the cake so that it is all covered.
- Using white food colouring mixed with a splash of vodka, paint the pinstripes over the black fondant base. They should look hand drawn, not perfect!
- Get your chocolate collar shards out of the fridge.
- Melt the white chocolate in a microwave in 20 second bursts, mixing in between to prevent it catching. Pour into a piping bag with a thin end snipped off.
- Drizzle the white chocolate over your chocolate collar shards (which should be set by now) in a stripe like fashion. Return them to the fridge to set again.
- With the remaining black fondant icing to mould the buckle for Jack’s bow tie (the centre of his collar).
- Set something flat and thin (like a sterilised old CD that you no longer use) on Jack’s neck. If using a cup or another hollow item for the neck, make sure you fill it with something weighted like baking beans, marbles or dry rice etc.
- Place Jack’s head on top and secure it (make sure it’s stable). I didn’t use a dowel through the cake because the weight distribution with the CD on the neck meant that it stayed completely stable.
- If transporting to another place, keep all elements separate and wait until you are there before constructing the bust figure.
- Take the collar shards from the fridge and carefully lift them from the greaseproof paper. If you have tempered the chocolate properly, they will stay set at room temperature!
- Place the two halves around the neck, sitting them on the cake’s base AKA Jack’s clavicle. If you want to ‘glue’ the collar ends together, use some of the melted white chocolate you used for the pinstripes earlier and hold in place until set. Otherwise, if needed, you can prop the collar up slightly using small pieces of fondant icing that you can roll into balls and place under the largest shards on either side.
- Place the fondant icing buckle in the centre to finish your masterpiece!
Notes
This The Nightmare Before Christmas cake is a proper showstopper and will feed a party of people. It’s incredibly delicious with some dark and earthy flavours that reflect the darkness of the character’s exterior.
It will last for at least 4 or 5 days in an airtight container (once cut into) or even longer if left uncut. You can spend days decorating and it will stay moist as long as the cake is covered with the fondant icing. I kid you not, my cake lasted for 10 days at peak freshness! I’m fairly convinced I have magic powers now.