Honeycomb Cake | Dune Landscape Cake
Incredibly light and soft honeycomb cake with homemade "spice" honeycomb and sculpted cake to create the Arrakis landscape, celebrating the Dune films.
Ingredients
Honeycomb (if making yourself):
- 200 g [1 cup] caster sugar
- 2 tbsp golden syrup
- 3 tbsp runny honey
- 2 tsp bicarbonate of soda
Honeycomb cake square layers:
- 400 g [14 oz] unsalted butter room temperature
- 400 g [2 cups] light brown sugar
- 400 g [around 5 large] eggs
- 400 g [2½ cups] self-raising flour
- 2 tsp vanilla extract
Small carving cake:
- 150 g [5.25 oz] unsalted butter
- 150 g [¾ cup] light brown sugar
- 150 g [around 2 large] eggs
- 150 g [¾ cup + 3 tbsp] self-raising flour
- 1 tsp vanilla extract
Decoration:
- 200 g [7 oz] unsalted butter softened
- 500 g [3¼ cups + 3 tbsp] icing [confectioners] sugar
- 3 splashes of milk
- Yellow/gold food colouring optional
- 2 Digestive biscuits or graham crackers crushed
- 119 g [2 large handfuls] chocolate buttons of your choice
Instructions
Honeycomb (if making your own):
- Line a square tray around 20 cm in size with greaseproof paper/baking parchment.
- In a saucepan over a medium heat, stir together the sugar, honey and golden syrup. Stir until the sugar has dissolved. The mix will be quite stiff to begin with but stick with it, it will soften as the sugar dissolves. Avoid letting the mixture bubble before the sugar has dissolved.
- Once the sugar has dissolved, turn the heat up and let the mixture simmer until it has turned a slightly deeper shade of amber. This will take a minute or two, so do not leave it!
- Take off the heat and pour in the bicarbonate of soda straight away. Beat into the mixture with a wooden spoon until fully incorporated, then watch the magic happen! Pour the mixture into your lined tin when it starts bubbling and rising. Remember to work fast and be very careful as the mixture will be very hot!
- Leave the honeycomb to set in the tin at room temperature for around 1 hour while you make your cakes.
Honeycomb cakes:
- Preheat your oven to 180°C [350°F] or 160°C fan. Grease and line two 8 x 8 x 2 inch square tins with greaseproof paper/baking parchment. Do the same for a deep 6 inch round cake tin. Set aside.
- In a large mixing bowl, beat the butter to loosen it slightly, then beat in the sugar until light and fluffy.
- Add the eggs, beating in one at a time until fully incorporated. Beat in the vanilla.
- Sieve in the flour and mix in until fully incorporated and you can’t see any flour left. Avoid over mixing here.
- Split the mix evenly into the lined square tins.
- Repeat steps 2 to 4 for the 6 inch round cake and pour the mixture into the deep lined tin.
- Bake the cakes on the middle shelves of your oven for around 40 minutes. Make sure to place the deep 6 inch cake on the top middle shelf with one of your square cakes as it is a thicker sponge and may bake at a different rate. The timing will depend on the size of your oven, and how hot it runs.
- Your cakes will be ready when a skewer or cocktail stick comes out clean, the surfaces of the sponges bounce back when gently pressed on, and you hear little to no bubbling/crackling sound when you listen to them.
- Once baked, allow your cakes to cool in the tins for at least 10 minutes, then transfer upside down to a wire rack to cool completely.
Decoration prep:
- While your sponges are cooling, prepare your buttercream.
- In a large mixing bowl, beat together the softened butter and ½ the icing sugar until fully combined. Add the other ½ of the icing sugar and beat in until smooth.
- Add the splashes of milk one at a time and beat in until your buttercream is smooth and soft but can still hold its shape.
- Your honeycomb should be set and cool now. If this is the case, lift it from the tin in the paper and simply drop the honeycomb back down onto your work surface until it breaks. Continue breaking the honeycomb into shards using your hands or the end of the rolling pin.
- Either in a food processor or sandwich bag paired with a rolling pin, blitz or crush ½ of your honeycomb into a mostly fine powder. The honeycomb will likely stick together in places, but don’t stress. It doesn’t need to be ultra fine.
- Scrape ⅔ of the blitzed honeycomb into your buttercream and beat in. Keep the rest for later.
- Add the yellow or gold food colouring into the buttercream now if desired. If the colour of your buttercream is sand-like enough for you, leave the food colouring out.
Decoration:
- Once your cakes are cool, place the first square layer onto a plate/cake board/cake stand. Smother it in a generous layer of buttercream, then sprinkle some of your remaining blitzed honeycomb over the top.
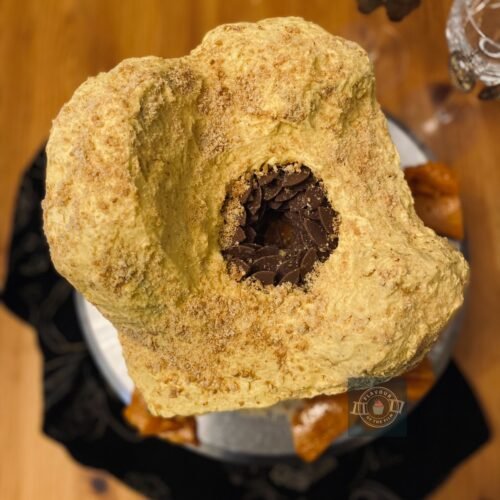
- Carve out a medium sized hold in your top square sponge. This can be in the centre, or wherever you are wanting to create your worm. Feel free to eat the round piece of sponge you have just carved out.
- Place this square sponge on top of the base one. Cover the top in buttercream, avoiding the hole you have just carved out.
- Place the six inch cake down flat and cut in half. Place one half onto your cake like a rainbow. Smother this in buttercream, using it as a glue and to form your first sand dune.
- Cut the other half of the 6 inch cake in half again to build a smaller sand dune. You can also choose to cut these pieces in half again to help build a bigger sand dune with the half already on your cake. This is completely up to you! Get creative.
- Smother any remaining buttercream on and around your sand dunes. Use a palette knife to create lines and textured swirls in your buttercream to show movement.
- Using your finger tip or the back of a spoon, gently press in any spikey parts of the buttercream to neaten it up.
- Cut the chocolate buttons in halves and carefully press them into the sides of the inside of your hole. Start from the bottom and arrange them in a swirling pattern going upwards. Like a spiral staircase.
- Crush and sprinkle your biscuits over the top of your cake to create a sand-like effect.
- Chill until ready to serve if it is a warm day.
Notes
This Dune inspired honeycomb cake is so light, so fluffy and oh so delicious. It will last for around 4 days in an airtight container/cake box/cake case or covered in tin foil. The sponges can be made ahead and kept in an airtight box for a day before they lose their peak texture. The sponges can be baked and frozen (individually wrapped) for up to 3 months.
See my Top Tips sections above for an idea on using any leftover honeycomb. Store the leftover honeycomb in an airtight container and use within a week or two so that it doesn’t soften. If making in warm weather, keep the container of honeycomb in the fridge until needed. Enjoy!