Disney's Aladdin Painted Buttercream Cake
A magically delicious vanilla cake with cookies & cream, decorated in a textured painted buttercream cake look, celebrating Disney's Aladdin (and my birthday!).
Ingredients
Aladdin cake sponges:
- 400 g [14 oz] unsalted butter
- 400 g [2 cups] caster sugar
- 400 g eggs about 6 - 7 medium
- 400 g [2½ cups] self-raising flour
- 2 tsp vanilla extract
Buttercream:
- 500 g [17.75 oz] unsalted butter
- 1 kg [6¾ cups + 2 tbsp] icing [confectioners] sugar
- 1 single pack Oreos
- Splash of milk
- Purple or deep blue food colouring oil based
- Yellow food colouring oil based
- White food colouring oil based
- Light blue food colouring oil based
- Black food colouring oil based
- Edible glitter optional
Instructions
Aladdin cake sponges:
- Preheat your oven to 180°C [350°F] or 160°C fan. Grease and line three deep 8 inch round cake tins. Set aside.
- In a large mixing bowl, cream together the butter and sugar until light and fluffy.
- Beat in the eggs, one at a time, until fully incorporated.
- Add in the vanilla and beat in.
- Sieve the flour over the mixture and mix in until you see no visible remnants of flour.
- Divide the mixture evenly into your lined cake tins.
- Bake on the middle shelves for 30 - 35 minutes until baked. The length of time your cakes take to bake may take up to 40 minutes - this is dependent on how hot your oven runs.
- Your cakes will be baked when a cocktail stick or skewer comes out clean when tested; the surface of the cakes bounce back when gently pressed on, and you hear little to no crackling/bubbling sound when you listen to them.
- Once baked, leave to cool in the tins for around 10 minutes before transferring upside down onto a wire rack to cool completely.
Buttercream:
- While your cakes are cooling, prepare your buttercream frosting.
- In a food processor, blitz the entire single pack of Oreos into a fine crumb. Alternatively, place all of the Oreo cookies into a sandwich bag, close the bag and then smash the biscuits into a fine crumb with a rolling pin or similar tool.
- In a large bowl, beat the butter to loosen it. Add ⅓ of the icing sugar in and beat in until smooth. Add the other ⅓ and beat in. Repeat with the final ⅓ of icing sugar.
- Pour the Oreo crumb in and beat in. If using extract or juice instead of Oreos, add it in now and beat in until smooth.
- Add the splash of milk and beat in until smooth and slightly looser. This makes it easier to work with. If using juice in your buttercream, skip this step.
- On a paint palette or in separate small bowls, place 2 heaped tbsp of buttercream in one bowl or onto one section of the paint palette. Add the white food colouring and mix in, adding more as and when needed.
- Place a heaped tbsp of buttercream into a separate bowl or on a different section of the paint palette. Add the light blue food colouring and beat in, adding colour until the desired tint is achieved.
- Repeat step 7 for the yellow food colouring and the black food colouring individually.
Decoration:
- Before adding your chosen base colour to the remainder of the buttercream, spoon some into a piping bag or sandwich bag with the end snipped off. The opening should be around ½ inch in diameter. Skip this step if you prefer to spoon the buttercream onto your cake layers.
- Smudge a small amount of buttercream onto your cake stand/plate/board and place the first layer of cake over it.
- Pipe or spoon a layer of buttercream on the top of this cake sponge. Use a palette or cutlery knife to spread it evenly across the surface.
- Place the next cake layer on top of the bottom and cake and repeat step 3.
- Place the last cake layer on the top.
- Add your chosen colour to the remaining buttercream i.e. purple or deep blue and beat in, adjusting until you have the desired tint or shade of your colour. Add another splash of milk and beat in here if needed.
- Spread some of the buttercream onto your cake in a thin layer all over to create a crumb coat.
- Fill a piping bag with the now purple/blue buttercream and pipe on and around the entire cake, spreading it with a palette knife until relatively smooth. Alternatively, simply use the palette knife to dollop and spread the buttercream all over and around the cake until relatively smooth. This is a textured painted buttercream cake: you don’t need to make it completely smooth!
- Chill the cake for 10 - 15 minutes in the fridge.
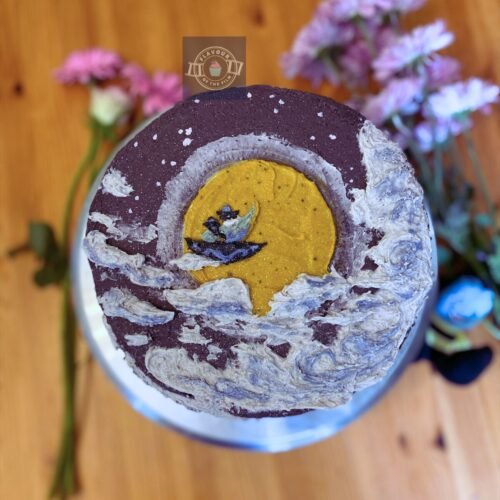
- Once chilled, you can finish by painting your design on. Start with the offset spatula to paint the sun with the yellow buttercream you mixed earlier. Use a paint brush to gently dab and swipe the clouds on in the white buttercream. Use a cocktail stick to work swirls of light blue buttercream into the clouds.
- Chill for up to 10 minutes now if working in a warm kitchen.
- Use a few cocktail sticks (one per colour) to dab and shape the black, light blue and white buttercream to shape Aladdin and Jasmine’s silhouettes on the magic carpet. You can also use any extra purple buttercream if you have any left over, too.
- Use a clean cocktail stick to neaten any of the detail.
- Finish with a few sprays of edible glitter and a few white stars dotted on for a hint of magic!
Notes
This simple Aladdin cake brings together delicious flavours and an impactful textured painted buttercream cake look. It will last for 4+ days when kept in an airtight container/cake case/cake box. You can protect any exposed cake with aluminium foil, too. The cake sponges can be baked and stored in the freezer (wrapped) for up to 3 months. Enjoy!